Talend Component Design Choices
Component API
The Component API is
The component API has multiple strong choices:
-
it is declarative (through annotations) to ensure it is
-
evolutive (it can get new fancy features without breaking old code)
-
static as much as possible
-
Evolution
Being fully declarative, any new API can be added iteratively without requiring any changes to existing components.
Example (projection on beam potential evolution):
@ElementListener
public MyOutput onElement(MyInput data) {
    return ...;
}
wouldn’t be affected by the addition of the new Timer API which can be used like:
@ElementListener
public MyOutput onElement(MyInput data,
                          @Timer("my-timer") Timer timer) {
    return ...;
}
Static
UI friendly
Intent of the framework is to be able to fit java UI as well as web UI. It must be understood as colocalized and remote UI. The direct impact of that choice is to try to move as much as possible the logic to the UI side for UI related actions. Typically we want to validate a pattern, a size, … on the client side and not on the server side. Being static encourages this practise.
Generic and specific
The processor API supports JsonObject as well as any custom model. Intent is to support generic component
development which need to access configured "object paths" and specific components which rely on a well defined
path from the input.
A generic component would look like:
@ElementListener
public MyOutput onElement(JsonObject input) {
    return ...;
}
A specific component would look like (with MyInput a POJO):
@ElementListener
public MyOutput onElement(MyInput input) {
    return ...;
}
No runtime assumption
By design the framework must run in DI (plain standalone java program) but also in Beam pipelines. It is also
out of scope of the framework to handle the way the runtime serializes - if needed - the data. For that reason
it is primordial to not import serialization constraint in the stack. This is why JsonObject is not an IndexedRecord
from avro for instance, to not impose any implementation.
Any actual serialization concern - implementation - should either be hidden in the framework runtime (= outside component developer scope)
or in the runtime integration with the framework (beam integration for instance). In this context, JSON-P is a good compromise
because it brings a very powerful API with very few constraints.
Isolated
The components must be able to execute even if they have conflicting libraries. For that purpose it requires to isolate their classloaders. For that purpose a component will define its dependencies based on a maven format and will always be bound to its own classloader.
REST
Consumable model
The definition payload is as flat as possible and strongly typed to ensure it can be manipulated by consumers. This way the consumers can add/remove fields with just some mapping rules and don’t require any abstract tree handling.
The execution (runtime) configuration is the concatenation of a few framework metadata (only the version actually) and a key/value model of the instance of the configuration based on the definition properties paths for the keys. This enables the consumers to maintain and work with the keys/values up to their need.
The framework not being responsible for any persistence it is crucial to ensure consumers can handle it from end to end
which includes the ability to search for values (update a machine, update a port etc…) and keys (new encryption rule on key certificate for instance).
Talend component is a metamodel provider (to build forms) and runtime execution platform (take a configuration instance and use it volatively to execute a component logic). This implies it can’t own the data more than defining the contract it has for these two endpoints and must let the consumers handle the data lifecycle (creation, encryption, deletion, ….).
Fixed set of icons
Icons (@Icon) are based on a fixed set. Even if a custom icon is usable this is
without any guarantee. This comes from the fact components can be used in any environment
and require a kind of uniform look which can’t be guaranteed outside the UI itself so
defining only keys is the best way to communicate this information.
| when you exactly know how you will deploy your component (ie in the Studio) then you can use `@Icon(value = CUSTOM, custom = "…") to use a custom icon file. |
Talend Component Documentation Overview
First steps
If you know nothing about Talend Components, the getting started is the place to start with.
-
From scratch: Overview | Requirements
-
Tutorial: Code |
Talend Component Getting Started
Introducing Talend Component
Talend Component intends to simplify the development of connectors at two main levels:
- Runtime
-
how to inject the specific component code into a job or pipeline. It should unify as much as possible the code required to run in DI and BEAM environments.
- Graphical interfaces
-
unify the code required to be able to render in a browser (web) or the eclipse based Studio (SWT).
Talend Component System Requirement
Talend Component requires Java 8. You can download it on Oracle website.
To develop a component or the project itself it is recommended to use Apache Maven 3.5.0. you can download it on Apache Maven website.
Talend Component Documentation
Talend Components Definitions Documentation
Components Definition
Talend Component framework relies on several primitive components.
They can all use @PostConstruct and @PreDestroy to initialize/release
some underlying resource at the beginning/end of the processing.
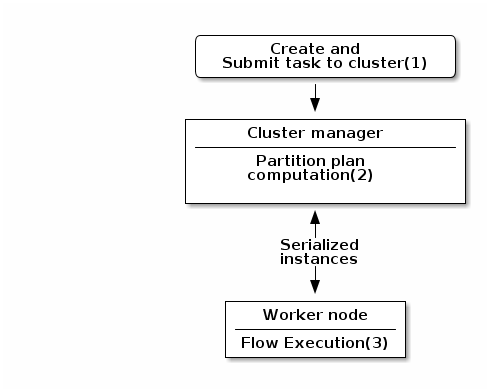
in distributed environments class' constructor will be called on cluster manager node, methods annotated with
@PostConstruct and @PreDestroy annotations will be called on worker nodes. Thus, partition plan computation and pipeline task
will be performed on different nodes.
|
-
Created task consists of Jar file, containing class, which describes pipeline(flow) which should be processed in cluster.
-
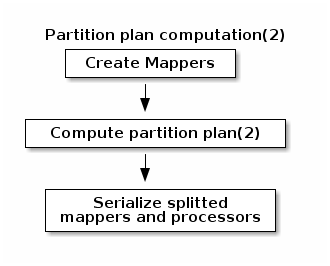
During partition plan computation step pipeline is analyzed and split into stages. Cluster Manager node instantiates mappers/processors gets estimated data size using mappers, splits created mappers according to the estimated data size. All instances are serialized and sent to Worker nodes afterwards.
-
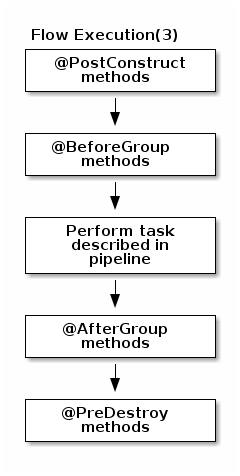
Serialized instances are received and deserialized, methods annotated with @PostConstruct annotation are called. After that, pipeline execution is started. Processor’s @BeforeGroup annotated method is called before processing first element in chunk. After processing number of records estimated as chunk size, Processor’s @AfterGroup annotated method called. Chunk size is calculated depending on environment the pipeline is processed by. After pipeline is processed, methods annotated with @PreDestroy annotation are called.
all framework managed methods MUST be public too. Private methods are ignored.
|
| in term of design the framework tries to be as declarative as possible but also to stay extensible not using fixed interfaces or method signatures. This will allow to add incrementally new features of the underlying implementations. |
PartitionMapper
A
PartitionMapperis a component able to split itself to make the execution more efficient.
This concept is borrowed to big data world and useful only in this context (BEAM executions).
Overall idea is to divide the work before executing it to try to reduce the overall execution time.
The process is the following:
-
Estimate the size of the data you will work on. This part is often heuristic and not very precise.
-
From that size the execution engine (runner for beam) will request the mapper to split itself in N mappers with a subset of the overall work.
-
The leaf (final) mappers will be used as a
Producer(actual reader) factory.
this kind of component MUST be Serializable to be distributable.
|
Definition
A partition mapper requires 3 methods marked with specific annotations:
-
@Assessorfor the evaluating method -
@Splitfor the dividing method -
@Emitterfor theProducerfactory
@Assessor
The assessor method will return the estimated size of the data related to the component (depending its configuration).
It MUST return a Number and MUST not take any parameter.
Here is an example:
@Assessor
public long estimateDataSetByteSize() {
    return ....;
}
@Split
The split method will return a collection of partition mappers and can take optionally a @PartitionSize long
value which is the requested size of the dataset per sub partition mapper.
Here is an example:
@Split
public List<MyMapper> split(@PartitionSize final long desiredSize) {
    return ....;
}Producer
A
Produceris the component interacting with a physical source. It produces input data for the processing flow.
A producer is a very simple component which MUST have a @Producer method without any parameter and returning any data:
@Producer
public MyData produces() {
    return ...;
}
Processor
A
Processoris a component responsible to convert an incoming data to another model.
A processor MUST have a method decorated with @ElementListener taking an incoming data and returning the processed data:
@ElementListener
public MyNewData map(final MyData data) {
    return ...;
}
this kind of component MUST be Serializable since it is distributed.
|
if you don’t care much of the type of the parameter and need to access data on a "map like" based rule set, then you can
use JsonObject as parameter type and Talend Component will just wrap the data to enable you to access it as a map. The parameter
type is not enforced, i.e. if you know you will get a SuperCustomDto then you can use that as parameter type but for generic
component reusable in any chain it is more than highly encouraged to use JsonObject until you have your an evaluation language
based processor (which has its own way to access component). Here is an example:
|
@ElementListener
public MyNewData map(final JsonObject incomingData) {
    String name = incomingData.getString("name");
    int name = incomingData.getInt("age");
    return ...;
}

// equivalent to (using POJO subclassing)

public class Person {
    private String age;
    private int age;

    // getters/setters
}

@ElementListener
public MyNewData map(final Person person) {
    String name = person.getName();
    int name = person.getAge();
    return ...;
}
A processor also supports @BeforeGroup and @AfterGroup which MUST be methods without parameters and returning void (result would be ignored).
This is used by the runtime to mark a chunk of the data in a way which is estimated good for the execution flow size.
| this is estimated so you don’t have any guarantee on the size of a group. You can literally have groups of size 1. |
The common usage is to batch records for performance reasons:
@BeforeGroup
public void initBatch() {
    // ...
}

@AfterGroup
public void endBatch() {
    // ...
}
it is a good practise to support a maxBatchSize here and potentially commit before the end of the group in case
of a computed size which is way too big for your backend.
|
Multiple outputs
In some case you may want to split the output of a processor in two. A common example is "main" and "reject" branches where part of the incoming data are put in a specific bucket to be processed later.
This can be done using @Output. This can be used as a replacement of the returned value:
@ElementListener
public void map(final MyData data, @Output final OutputEmitter<MyNewData> output) {
    output.emit(createNewData(data));
}
Or you can pass it a string which will represent the new branch:
@ElementListener
public void map(final MyData data,
                @Output final OutputEmitter<MyNewData> main,
                @Output("rejected") final OutputEmitter<MyNewDataWithError> rejected) {
    if (isRejected(data)) {
        rejected.emit(createNewData(data));
    } else {
        main.emit(createNewData(data));
    }
}

// or simply

@ElementListener
public MyNewData map(final MyData data,
                    @Output("rejected") final OutputEmitter<MyNewDataWithError> rejected) {
    if (isSuspicious(data)) {
        rejected.emit(createNewData(data));
        return createNewData(data); // in this case we continue the processing anyway but notified another channel
    }
    return createNewData(data);
}
Multiple inputs
Having multiple inputs is closeto the output case excep it doesn’t require a wrapper OutputEmitter:
@ElementListener
public MyNewData map(@Input final MyData data, @Input("input2") final MyData2 data2) {
    return createNewData(data1, data2);
}
@Input takes the input name as parameter, if not set it uses the main (default) input branch.
| due to the work required to not use the default branch it is recommended to use it when possible and not name its branches depending on the component semantic. |
Output
An
Outputis aProcessorreturning no data.
Conceptually an output is a listener of data. It perfectly matches the concept of processor. Being the last of the execution chain or returning no data will make your processor an output:
@ElementListener
public void store(final MyData data) {
    // ...
}Configuring components
Component are configured through their constructor parameters. They can all be marked with @Option
which will let you give a name to parameters (if not it will use the bytecode name which can require you to compile with -parameter flag
to not have arg0, arg1, … as names).
The parameter types can be primitives or complex objects with fields decorated with @Option exactly like method parameters.
| it is recommended to use simple models which can be serialized by components to avoid headaches when implementing serialized components. |
Here is an example:
class FileFormat implements Serializable {
    @Option("type")
    private FileType type = FileType.CSV;

    @Option("max-records")
    private int maxRecords = 1024;
}

@PartitionMapper(family = "demo", name = "file-reader")
public MyFileReader(@Option("file-path") final File file,
                    @Option("file-format") final FileFormat format) {
    // ...
}
Using this kind of API makes the configuration extensible and component oriented letting the user define all he needs.
The instantiation of the parameters is done from the properties passed to the component (see next part).
Primitives
What is considered as a primitive in this mecanism is a class which can be directly converted from a String to the expected type.
It obviously includes all java primitives, String type itself but also all the types with a org.apache.xbean.propertyeditor.Converter.
This includes out of the box:
-
BigDecimal -
BigInteger -
File -
InetAddress -
ObjectName -
URI -
URL -
Pattern
Complex object mapping
The conversion from properties to object is using the dotted notation. For instance:
file.path = /home/user/input.csv
file.format = CSV
will match
public class FileOptions {
    @Option("path")
    private File path;

    @Option("format")
    private Format format;
}
assuming the method parameter was configured with @Option("file").
List case
Lists use the same syntax but to define their elements their rely on an indexed syntax. Assuming the list parameter is named files
and the elements are of FileOptions type, here is how to define a list of 2 elements:
files[0].path = /home/user/input1.csv
files[0].format = CSV
files[1].path = /home/user/input2.xml
files[1].format = EXCEL
Map case
Inspired from the list case, the map uses .key[index] and .value[index] to represent its key and values:
// Map<String, FileOptions>
files.key[0] = first-file
files.value[0].path = /home/user/input1.csv
files.value[0].type = CSV
files.key[1] = second-file
files.value[1].path = /home/user/input2.xml
files.value[1].type = EXCEL
// Map<FileOptions, String>
files.key[0].path = /home/user/input1.csv
files.key[0].type = CSV
files.value[0] = first-file
files.key[1].path = /home/user/input2.xml
files.key[1].type = EXCEL
files.value[1] = second-file| don’t abuse of map type. If not needed for your configuration (= if you can configure your component with an object) don’t use it. |
Constraints and validation on the configuration/input
It is common to need to add as metadata a field is required, another has a minimum size etc. This is done with the
validation in org.talend.sdk.component.api.configuration.constraint package:
| API | Name | Parameter Type | Description | Supported Types | Metadata sample |
|---|---|---|---|---|---|
@org.talend.sdk.component.api.configuration.constraint.Max |
maxLength |
double |
Ensure the decorated option size is validated with a higher bound. |
CharSequence |
{"validation::maxLength":"12.34"} |
@org.talend.sdk.component.api.configuration.constraint.Min |
minLength |
double |
Ensure the decorated option size is validated with a lower bound. |
CharSequence |
{"validation::minLength":"12.34"} |
@org.talend.sdk.component.api.configuration.constraint.Pattern |
pattern |
string |
Validate the decorated string with a javascript pattern (even into the Studio). |
CharSequence |
{"validation::pattern":"test"} |
@org.talend.sdk.component.api.configuration.constraint.Max |
max |
double |
Ensure the decorated option size is validated with a higher bound. |
Number, int, short, byte, long, double, float |
{"validation::max":"12.34"} |
@org.talend.sdk.component.api.configuration.constraint.Min |
min |
double |
Ensure the decorated option size is validated with a lower bound. |
Number, int, short, byte, long, double, float |
{"validation::min":"12.34"} |
@org.talend.sdk.component.api.configuration.constraint.Required |
required |
- |
Mark the field as being mandatory. |
Object |
{"validation::required":"true"} |
@org.talend.sdk.component.api.configuration.constraint.Max |
maxItems |
double |
Ensure the decorated option size is validated with a higher bound. |
Collection |
{"validation::maxItems":"12.34"} |
@org.talend.sdk.component.api.configuration.constraint.Min |
minItems |
double |
Ensure the decorated option size is validated with a lower bound. |
Collection |
{"validation::minItems":"12.34"} |
@org.talend.sdk.component.api.configuration.constraint.Uniques |
uniqueItems |
- |
Ensure the elements of the collection must be distinct (kind of set). |
Collection |
{"validation::uniqueItems":"true"} |
using the programmatic API the metadata are prefixed by tcomp:: but this prefix is stripped in the web for convenience,
the previous table uses the web keys.
|
Marking a configuration as a particular type of data
It is common to classify the incoming data. You can see it as tagging them in several types. The most common ones are the:
-
datastore: all the data you need to connect to the backend
-
dataset: a datastore coupled with all the data you need to execute an action
| API | Type | Description | Metadata sample |
|---|---|---|---|
org.talend.sdk.component.api.configuration.type.DataSet |
dataset |
Mark a model (complex object) as being a dataset. |
{"tcomp::configurationtype::type":"dataset","tcomp::configurationtype::name":"test"} |
org.talend.sdk.component.api.configuration.type.DataStore |
datastore |
Mark a model (complex object) as being a datastore (connection to a backend). |
{"tcomp::configurationtype::type":"datastore","tcomp::configurationtype::name":"test"} |
| the component family associated with a configuration type (datastore/dataset) is always the one related to the component using that configuration. |
Those configuration types can be composed to provide one configuration item. For example a dataset type will often need a datastore type to be provided. and a datastore type (that provides the connection information) will be used to create a dataset type.
Those configuration types will also be used at design time to create shared configuration that can be stored and used at runtime.
For example, we can think about a relational database that support JDBC:
-
A datastore may provide:
-
jdbc url, username, password
-
-
A dataset may be:
-
datastore (that will provide the connection data to the database)
-
table name, data []
-
The component server will scan all those configuration types and provide a configuration type index. This index can be used for the integration into the targeted platforms (studio, web applications…)
The configuration type index is represented as a flat tree that contains all the configuration types represented as nodes and indexed by their ids.
Also, every node can point to other nodes. This relation is represented as an array of edges that provide the childes ids.
For example, a configuration type index for the above example will be:
{nodes: {
             "idForDstore": { datastore:"datastore data", edges:[id:"idForDset"] },
             "idForDset":   { dataset:"dataset data" }
    }
}
Define links between properties
It can be needed to define a binding between properties, a set of annotations allows to do it:
| API | Name | Description | Metadata Sample |
|---|---|---|---|
@org.talend.sdk.component.api.configuration.condition.ActiveIf |
if |
If the evaluation of the element at the location matches value then the element is considered active, otherwise it is deactivated. |
{"condition::if::target":"test","condition::if::value":"value1,value2"} |
@org.talend.sdk.component.api.configuration.condition.ActiveIfs |
ifs |
Allows to set multiple visibility conditions on the same property. |
{"condition::if::value::0":"value1,value2","condition::if::value::1":"SELECTED","condition::if::target::0":"sibling1","condition::if::target::1":"../../other"} |
Target element location is specified as a relative path to current location using Unix path characters.
Configuration class delimiter is /. Parent configuration class is specified by ...
Thus ../targetProperty denotes a property, which is located in parent configuration class and has name targetProperty.
using the programmatic API the metadata are prefixed by tcomp:: but this prefix is stripped in the web for convenience,
the previous table uses the web keys.
|
Add hints about the rendering based on configuration/component knowledge
In some case it can be needed to add some metadata about the configuration to let the UI render properly the configuration. A simple example is a password value must be hidden and not a simple clear input box. For these cases - when the component developper wants to influence the UI rendering - you can use a particular set of annotations:
| API | Description | Generated property metadata |
|---|---|---|
@org.talend.sdk.component.api.configuration.ui.DefaultValue |
Provide a default value the UI can use - only for primitive fields. |
{"ui::defaultvalue::value":"test"} |
@org.talend.sdk.component.api.configuration.ui.OptionsOrder |
Allows to sort a class properties. |
{"ui::optionsorder::value":"value1,value2"} |
@org.talend.sdk.component.api.configuration.ui.layout.AutoLayout |
Request the rendered to do what it thinks is best. |
{"ui::autolayout":"true"} |
@org.talend.sdk.component.api.configuration.ui.layout.GridLayout |
Advanced layout to place properties by row, this is exclusive with |
{"ui::gridlayout::value1::value":"first|second,third","ui::gridlayout::value2::value":"first|second,third"} |
@org.talend.sdk.component.api.configuration.ui.layout.GridLayouts |
Allow to configure multiple grid layouts on the same class, qualified with a classifier (name) |
{"ui::gridlayout::Advanced::value":"another","ui::gridlayout::Main::value":"first|second,third"} |
@org.talend.sdk.component.api.configuration.ui.layout.HorizontalLayout |
Put on a configuration class it notifies the UI an horizontal layout is preferred. |
{"ui::horizontallayout":"true"} |
@org.talend.sdk.component.api.configuration.ui.layout.VerticalLayout |
Put on a configuration class it notifies the UI a vertical layout is preferred. |
{"ui::verticallayout":"true"} |
@org.talend.sdk.component.api.configuration.ui.widget.Code |
Mark a field as being represented by some code widget (vs textarea for instance). |
{"ui::code::value":"test"} |
@org.talend.sdk.component.api.configuration.ui.widget.Credential |
Mark a field as being a credential. It is typically used to hide the value in the UI. |
{"ui::credential":"true"} |
@org.talend.sdk.component.api.configuration.ui.widget.Structure |
Mark a List<String> or Map<String, String> field as being represented as the component data selector (field names generally or field names as key and type as value). |
{"ui::structure::type":"null","ui::structure::discoverSchema":"test","ui::structure::value":"test"} |
@org.talend.sdk.component.api.configuration.ui.widget.TextArea |
Mark a field as being represented by a textarea(multiline text input). |
{"ui::textarea":"true"} |
using the programmatic API the metadata are prefixed by tcomp:: but this prefix is stripped in the web for convenience,
the previous table uses the web keys.
|
target support should cover org.talend.core.model.process.EParameterFieldType but we need to ensure web renderers is able to handle the same widgets.
|
Gallery
Widgets
| Name | Code | Studio Rendering | Web Rendering |
|---|---|---|---|
Input/Text |
|

|

|
Password |
|

|

|
Textarea |
|

|

|
Checkbox |
|

|

|
List |
|
|
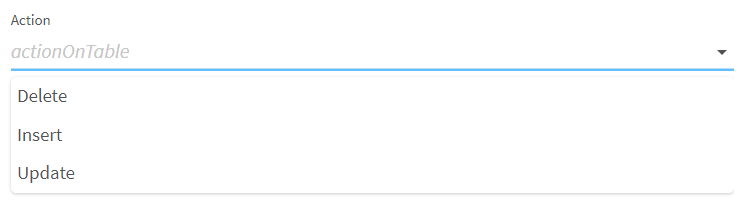
|
Table |
|

|
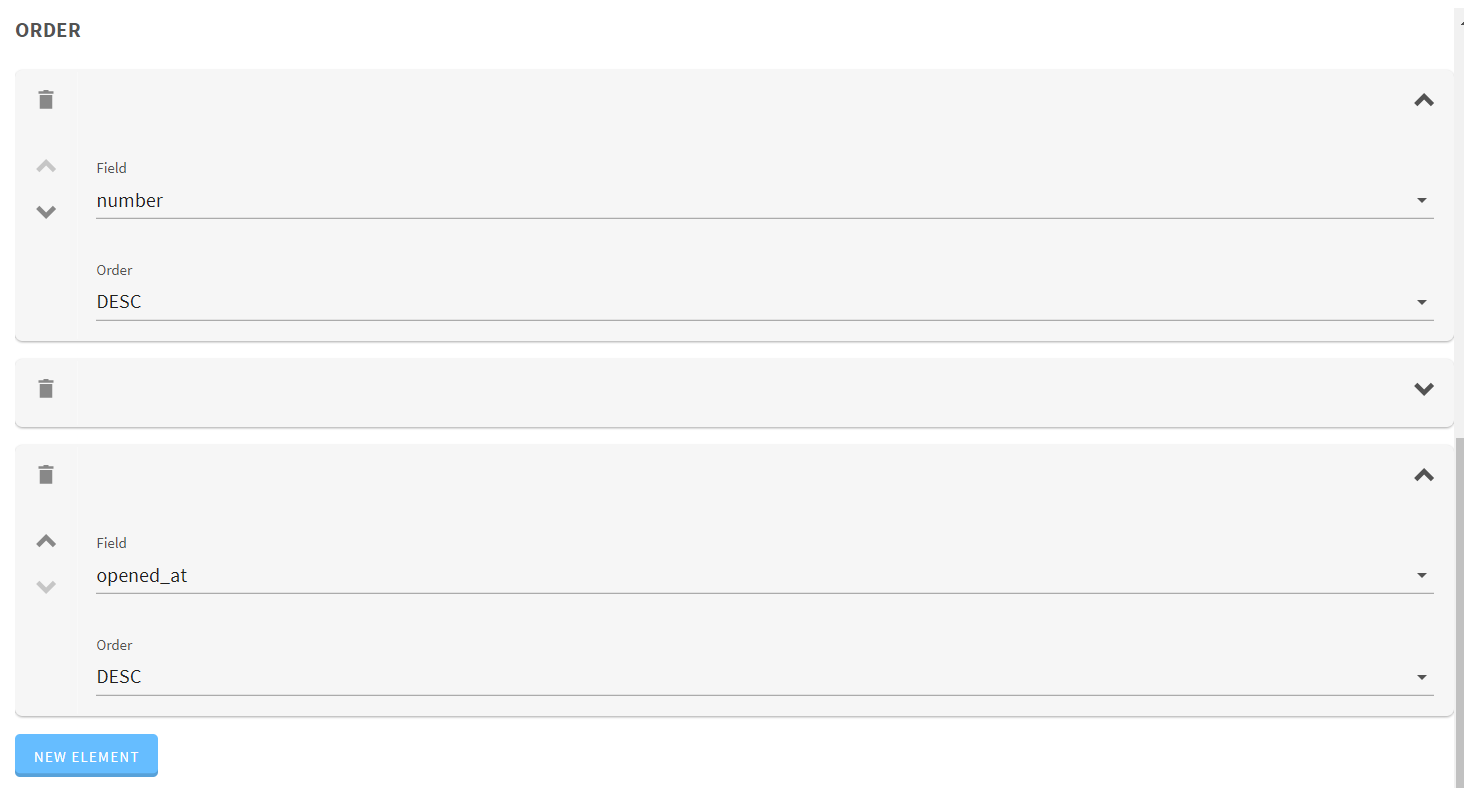
|
Code |
|

|

|
Schema |
|
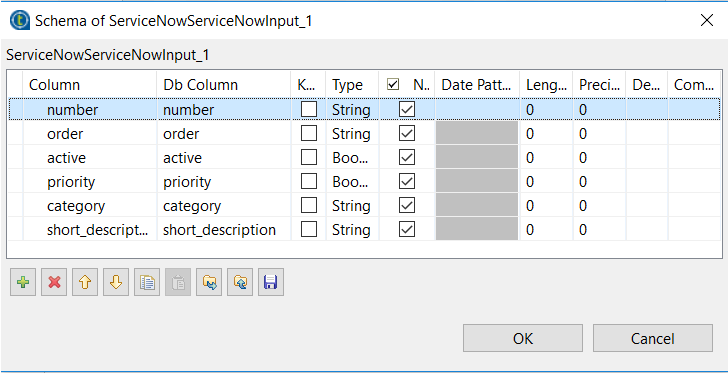
|
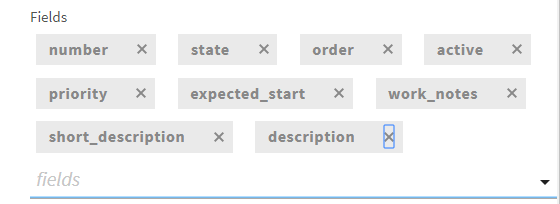
|
Validations
| Name | Code | Studio Rendering | Web Rendering |
|---|---|---|---|
Property validation |
|

|

|
Property validation with Pattern |
|

|

|
Data store validation |
|

|

|
There are also other types of validation similar to @Pattern that you can use :
-
@Min,@Maxfor numbers. -
@Uniquefor collection values -
@Requiredfor required configuration
Registering components
As seen in the Getting Started, you need an annotation to register
your component through family method. Multiple components can use the same family value but the pair family+name
MUST be unique for the system.
If you desire (recommended) to share the same component family name instead of repeating yourself in all family methods,
you can use @Components annotation on the root package of you component, it will enable you to define the component family and
the categories the component belongs to (default is Misc if not set). Here is a sample package-info.java:
@Components(name = "my_component_family", categories = "My Category")
package org.talend.sdk.component.sample;

import org.talend.sdk.component.api.component.Components;
For an existing component it can look like:
@Components(name = "Salesforce", categories = {"Business", "Cloud"})
package org.talend.sdk.component.sample;

import org.talend.sdk.component.api.component.Components;
Components metadata
Components can require a few metadata to be integrated in Talend Studio or Cloud platform. Here is how to provide these information.
These metadata are set on the component class and belongs to org.talend.sdk.component.api.component package.
| API | Description |
|---|---|
@Icon |
Set an icon key used to represent the component. Note you can use a custom key with |
@Version |
Set the component version, default to 1. |
Example:
@Icon(FILE_XML_O)
@PartitionMapper(name = "jaxbInput")
public class JaxbPartitionMapper implements Serializable {
    // ...
}
Management of configuration versions
If some impacting changes happen on the configuration they can be manage through a migration handler at component level (to enable to support trans-model migration).
The @Version annotation supports a migrationHandler method which will take the implementation migrating the incoming configuration
to the current model.
For instance if filepath configuration entry from v1 changed to location in v2 you can remap the value to the right key in your
MigrationHandler implementation.
| it is recommended to not manage all migrations in the handler but rather split it in services you inject in the migration handler (through constructor): |
// full component code structure skipped for brievity, kept only migration part
@Version(value = 3, migrationHandler = MyComponent.Migrations.class)
public class MyComponent {
    // the component code...


    private interface VersionConfigurationHandler {
        Map<String, String> migrate(Map<String, String> incomingData);
    }

    public static class Migrations {
        private final List<VersionConfigurationHandler> handlers;

        // VersionConfigurationHandler implementations are decorated with @Service
        public Migrations(final List<VersionConfigurationHandler> migrations) {
            this.handlers = migrations;
            this.handlers.sort(/*some custom logic*/);
        }

        @Override
        public Map<String, String> migrate(int incomingVersion, Map<String, String> incomingData) {
            Map<String, String> out = incomingData;
            for (MigrationHandler handler : handlers) {
                out = handler.migrate(out);
            }
        }
    }
}
What is important in this snippet is not much the way the code is organized but rather the fact you organize your migrations the way which fits the best
your component. If migrations are not conflicting no need of something fancy, just apply them all but if you need to apply them in order
you need to ensure they are sorted. Said otherwise: don’t see this API as a migration API but as a migration callback
and adjust the migration code structure you need behind the MigrationHandler based on your
component requirements. The service injection enables you to do so.
Internationalization
In the simplest case you should store messages using ResourceBundle properties file in your component module to use internationalization.
The location of the properties file should be in the same package as the related component(s) and is named Messages (ex: org.talend.demo.MyComponent will use org.talend.demo.Messages[locale].properties).
Default components keys
Out of the box components are internationalized using the same location logic for the resource bundle and here is the list of supported keys:
| Name Pattern | Description |
|---|---|
${family}._displayName |
the display name of the family |
${family}.${configurationType}.${name}._displayName |
the display name of a configuration type (dataStore or dataSet) |
${family}.${component_name}._displayName |
the display name of the component (used by the GUIs) |
${property_path}._displayName |
the display name of the option. |
${simple_class_name}.${property_name}._displayName |
the display name of the option using it class name. |
${enum_simple_class_name}.${enum_name}._displayName |
the display name of the |
${property_path}._placeholder |
the placeholder of the option. |
Example of configuration for a component named list belonging to the family memory (@Emitter(family = "memory", name = "list")):
memory.list._displayName = Memory ListConfiguration class are also translatable using the simple class name in the messages properties file. This useful when you have some common configuration shared within multiple components.
If you have a configuration class like :
public class MyConfig {

    @Option
    private String host;

    @Option
    private int port;
}
You can give it a translatable display name by adding ${simple_class_name}.${property_name}._displayName to Messages.properties under the same package as the config class.
MyConfig.host._displayName = Server Host Name
MyConfig.host._placeholder = Enter Server Host Name...

MyConfig.port._displayName = Server Port
MyConfig.port._placeholder = Enter Server Port...| If you have a display name using the property path, it will override the display name defined using the simple class name. this rule apply also to placeholders |
Components Packaging
Component Loading
Talend Component scanning is based on a plugin concept. To ensure plugins can be developped in parallel and avoid conflicts it requires to isolate plugins (components or component grouped in a single jar/plugin).
Here we have multiple options which are (high level):
-
flat classpath: listed for completeness but rejected by design because it doesn’t match at all this requirement.
-
tree classloading: a shared classloader inherited by plugin classloaders but plugin classloader classes are not seen by the shared classloader nor by other plugins.
-
graph classloading: this one allows you to link the plugins and dependencies together dynamically in any direction.
If you want to map it to concrete common examples, the tree classloading is commonly used by Servlet containers where plugins are web applications and the graph classloading can be illustrated by OSGi containers.
In the spirit of avoiding a lot of complexity added by this layer, Talend Component relies on a tree classloading. The advantage is you don’t need to define the relationship with other plugins/dependencies (it is built-in).
Here is a representation of this solution:
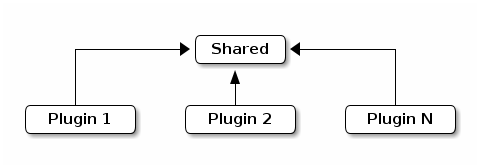
The interesting part is the shared area will contain Talend Component API which is the only (by default) shared classes accross the whole plugins.
Then each plugins will be loaded in their own classloader with their dependencies.
Packaging a plugin
| this part explains the overall way to handle dependecnies but the Talend Maven plugin provides a shortcut for that. |
A plugin is just a jar which was enriched with the list of its dependencies. By default Talend Component runtime is able to
read the output of maven-dependency-plugin in TALEND-INF/dependencies.txt location so you just need to ensure your component defines the following plugin:
<plugin>
  <groupId>org.apache.maven.plugins</groupId>
  <artifactId>maven-dependency-plugin</artifactId>
  <version>3.0.2</version>
  <executions>
    <execution>
      <id>create-TALEND-INF/dependencies.txt</id>
      <phase>process-resources</phase>
      <goals>
        <goal>list</goal>
      </goals>
      <configuration>
        <outputFile>${project.build.outputDirectory}/TALEND-INF/dependencies.txt</outputFile>
      </configuration>
    </execution>
  </executions>
</plugin>
If you check your jar once built you will see that the file contains something like:
$ unzip -p target/mycomponent-1.0.0-SNAPSHOT.jar TALEND-INF/dependencies.txt

The following files have been resolved:
   org.talend.sdk.component:component-api:jar:1.0.0-SNAPSHOT:provided
   org.apache.geronimo.specs:geronimo-annotation_1.3_spec:jar:1.0:provided
   org.superbiz:awesome-project:jar:1.2.3:compile
   junit:junit:jar:4.12:test
   org.hamcrest:hamcrest-core:jar:1.3:test
What is important to see is the scope associated to the artifacts:
-
the API (
component-apiandgeronimo-annotation_1.3_spec) areprovidedbecause you can consider them to be there when executing (it comes with the framework) -
your specific dependencies (
awesome-project) iscompile: it will be included as a needed dependency by the framework (note that usingruntimeworks too). -
the other dependencies will be ignored (
testdependencies)
Packaging an application
Even if a flat classpath deployment is possible, it is not recommended because it would then reduce the capabilities of the components.
Dependencies
The way the framework resolves dependencies is based on a local maven repository layout. As a quick reminder it looks like:
.
├── groupId1
│   └── artifactId1
│       ├── version1
│       │   └── artifactId1-version1.jar
│       └── version2
│           └── artifactId1-version2.jar
└── groupId2
    └── artifactId2
        └── version1
            └── artifactId2-version1.jar
This is all the layout the framework will use. Concretely the logic will convert the t-uple {groupId, artifactId, version, type (jar)} to the path in the repository.
Talend Component runtime has two ways to find an artifact:
-
from the file system based on a configure maven 2 repository.
-
from a fatjar (uber jar) with a nested maven repository under
MAVEN-INF/repository.
The first option will use either - by default - ${user.home}/.m2/repository or a specific path configured when creating a ComponentManager.
The nested repository option will need some configuration during the packaging to ensure the repository is well created.
To create the nested MAVEN-INF/repository repository you can use nested-maven-repository extension:
<plugin>
  <groupId>org.apache.maven.plugins</groupId>
  <artifactId>maven-shade-plugin</artifactId>
  <version>3.0.0</version>
  <executions>
    <execution>
      <phase>package</phase>
      <goals>
        <goal>shade</goal>
      </goals>
      <configuration>
        <transformers>
          <transformer implementation="org.talend.sdk.component.container.maven.shade.ContainerDependenciesTransformer">
            <session>${session}</project>
          </transformer>
        </transformers>
      </configuration>
    </execution>
  </executions>
  <dependencies>
    <dependency>
      <groupId>org.talend.sdk.component</groupId>
      <artifactId>nested-maven-repository</artifactId>
      <version>${the.plugin.version}</version>
    </dependency>
  </dependencies>
</plugin>
Listing needed plugins
Plugin are programmatically registered in general but if you want to make some of them automatically available you
need to generate a TALEND-INF/plugins.properties which will map a plugin name to coordinates found with the maven mecanism
we just talked about.
Here again we can enrich maven-shade-plugin to do it:
<plugin>
  <groupId>org.apache.maven.plugins</groupId>
  <artifactId>maven-shade-plugin</artifactId>
  <version>3.0.0</version>
  <executions>
    <execution>
      <phase>package</phase>
      <goals>
        <goal>shade</goal>
      </goals>
      <configuration>
        <transformers>
          <transformer implementation="org.talend.sdk.component.container.maven.shade.PluginTransformer">
            <session>${session}</project>
          </transformer>
        </transformers>
      </configuration>
    </execution>
  </executions>
  <dependencies>
    <dependency>
      <groupId>org.talend.sdk.component</groupId>
      <artifactId>nested-maven-repository</artifactId>
      <version>${the.plugin.version}</version>
    </dependency>
  </dependencies>
</plugin>
maven-shade-plugin extensions
Here is a final job/application bundle based on maven shade plugin:
<plugin>
  <groupId>org.apache.maven.plugins</groupId>
  <artifactId>maven-shade-plugin</artifactId>
  <version>3.0.0</version>
  <configuration>
    <createDependencyReducedPom>false</createDependencyReducedPom>
    <filters>
      <filter>
        <artifact>*:*</artifact>
        <excludes>
          <exclude>META-INF/.SF</exclude>
          <exclude>META-INF/.DSA</exclude>
          <exclude>META-INF/*.RSA</exclude>
        </excludes>
      </filter>
    </filters>
  </configuration>
  <executions>
    <execution>
      <phase>package</phase>
      <goals>
        <goal>shade</goal>
      </goals>
      <configuration>
        <shadedClassifierName>shaded</shadedClassifierName>
        <transformers>
          <transformer
              implementation="org.talend.sdk.component.container.maven.shade.ContainerDependenciesTransformer">
            <session>${session}</session>
            <userArtifacts>
              <artifact>
                <groupId>org.talend.sdk.component</groupId>
                <artifactId>sample-component</artifactId>
                <version>1.0</version>
                <type>jar</type>
              </artifact>
            </userArtifacts>
          </transformer>
          <transformer implementation="org.talend.sdk.component.container.maven.shade.PluginTransformer">
            <session>${session}</session>
            <userArtifacts>
              <artifact>
                <groupId>org.talend.sdk.component</groupId>
                <artifactId>sample-component</artifactId>
                <version>1.0</version>
                <type>jar</type>
              </artifact>
            </userArtifacts>
          </transformer>
        </transformers>
      </configuration>
    </execution>
  </executions>
  <dependencies>
    <dependency>
      <groupId>org.talend.sdk.component</groupId>
      <artifactId>nested-maven-repository-maven-plugin</artifactId>
      <version>${the.version}</version>
    </dependency>
  </dependencies>
</plugin>| the configuration unrelated to transformers can depend your application. |
ContainerDependenciesTransformer is the one to embed a maven repository and PluginTransformer to create a file listing (one per line)
a list of artifacts (representing plugins).
Both transformers share most of their configuration:
-
session: must be set to${session}. This is used to retrieve dependencies. -
scope: a comma separated list of scope to include in the artifact filtering (note that the default will rely onprovidedbut you can replace it bycompile,runtime,runtime+compile,runtime+system,test). -
include: a comma separated list of artifact to include in the artifact filtering. -
exclude: a comma separated list of artifact to exclude in the artifact filtering. -
userArtifacts: a list of artifacts (groupId, artifactId, version, type - optional, file - optional for plugin transformer, scope - optional) which can be forced inline - mainly useful forPluginTransformer. -
includeTransitiveDependencies: should transitive dependencies of the components be included, true by default. -
includeProjectComponentDependencies: should project component dependencies be included, false by default (normally a job project uses isolation for components so this is not needed). -
userArtifacts: set of component artifacts to include.
to use with the component tooling, it is recommended to keep default locations. Also if you feel you need to use project dependencies,
you can need to refactor your project structure to ensure you keep component isolation. Talend component let you handle that part but the recommended
practise is to use userArtifacts for the components and not the project <dependencies>.
|
ContainerDependenciesTransformer specific configuration is the following one:
-
repositoryBase: base repository location (default toMAVEN-INF/repository). -
ignoredPaths: a comma separated list of folder to not create in the output jar, this is common for the ones already created by other transformers/build parts.
ContainerDependenciesTransformer specific configuration is the following one:
-
pluginListResource: base repository location (default to TALEND-INF/plugins.properties`).
Example: if you want to list only the plugins you use you can configure this transformer like that:
<transformer implementation="org.talend.sdk.component.container.maven.shade.PluginTransformer">
  <session>${session}</session>
  <include>org.talend.sdk.component:component-x,org.talend.sdk.component:component-y,org.talend.sdk.component:component-z</include>
</transformer>
Component scanning rules and default exclusions
The framework uses two kind of filtering when scanning your component. One based on the jar name
and one based on the package name. Ensure your component definitions (including services)
are in a scanned module if not registered manually using ComponentManager.instance().addPlugin()
and that its package is not excluded.
Jars Scanning
To find components the framework can scan the classpath but in this case, to avoid to scan the whole classpath which can be really huge an impacts a lot the startup time, several jars are excluded out of the box.
These jars use the following prefix:
-
ApacheJMeter
-
FastInfoset
-
HdrHistogram
-
HikariCP
-
PDFBox
-
RoaringBitmap-
-
XmlSchema-
-
accessors-smart
-
activation-
-
activeio-
-
activemq-
-
aeron
-
aether-
-
agrona
-
akka-
-
animal-sniffer-annotation
-
annotation
-
ant-
-
antlr-
-
aopalliance-
-
apache-el
-
apacheds-
-
api-asn1-
-
api-util-
-
apiguardian-api-
-
app-
-
archaius-core
-
args4j-
-
arquillian-
-
asciidoctorj-
-
asm-
-
aspectj
-
async-http-client-
-
avalon-framework-
-
avro-
-
awaitility-
-
axis-
-
axis2-
-
base64-
-
batchee-jbatch
-
batik-
-
bcpkix
-
bcprov-
-
beam-model-
-
beam-runners-
-
beam-sdks-
-
bonecp
-
bootstrap.jar
-
brave-
-
bsf-
-
build-link
-
bval
-
byte-buddy
-
c3p0-
-
cache
-
carrier
-
cassandra-driver-core
-
catalina-
-
catalina.jar
-
cats
-
cdi-
-
cglib-
-
charsets.jar
-
chill
-
classindex
-
classmate
-
classutil
-
classycle
-
cldrdata
-
commands-
-
common-
-
commons-
-
component-api
-
component-form
-
component-runtime
-
component-server
-
component-spi
-
component-studio
-
components-api
-
components-common
-
compress-lzf
-
config
-
constructr
-
container-core
-
contenttype
-
coverage-agent
-
cryptacular-
-
cssparser-
-
curator-
-
cxf-
-
daikon
-
databinding
-
dataquality
-
debugger-agent
-
deltaspike-
-
deploy.jar
-
derby-
-
derbyclient-
-
derbynet-
-
dnsns
-
dom4j
-
draw2d
-
ecj-
-
eclipselink-
-
ehcache-
-
el-api
-
enunciate-core-annotations
-
error_prone_annotations
-
expressions
-
fastutil
-
feign-core
-
feign-hystrix
-
feign-slf4j
-
filters-helpers
-
findbugs-
-
fluentlenium-core
-
freemarker-
-
fusemq-leveldb-
-
gef-
-
geocoder
-
geronimo-
-
gmbal
-
google-
-
gpars-
-
gragent.jar
-
graph
-
grizzled-scala
-
grizzly-
-
groovy-
-
grpc-
-
gson-
-
guava-
-
guice-
-
h2-
-
hadoop-
-
hamcrest-
-
hawtbuf-
-
hawtdispatch-
-
hawtio-
-
hawtjni-runtime
-
help-
-
hibernate-
-
hk2-
-
howl-
-
hsqldb-
-
htmlunit-
-
htrace-
-
httpclient-
-
httpcore-
-
httpmime
-
hystrix
-
iban4j-
-
icu4j-
-
idb-
-
idea_rt.jar
-
instrumentation-api
-
istack-commons-runtime-
-
ivy-
-
j2objc-annotations
-
jBCrypt
-
jaccess
-
jackson-
-
janino-
-
jansi-
-
jasper-el.jar
-
jasper.jar
-
jasypt-
-
java-atk-wrapper
-
java-support-
-
java-xmlbuilder-
-
javacsv
-
javaee-
-
javaee-api
-
javassist-
-
javaws.jar
-
javax.
-
jaxb-
-
jaxp-
-
jbake-
-
jboss-
-
jbossall-
-
jbosscx-
-
jbossjts-
-
jbosssx-
-
jcache
-
jce.jar
-
jcip-annotations
-
jcl-over-slf4j-
-
jcommander-
-
jdbcdslog-1
-
jersey-
-
jets3t
-
jettison-
-
jetty-
-
jface
-
jfairy
-
jffi
-
jfr.jar
-
jfxrt.jar
-
jfxswt
-
jjwt
-
jline
-
jmdns-
-
jmustache
-
jna-
-
jnr-
-
jobs-
-
joda-convert
-
joda-time-
-
johnzon-
-
jolokia-
-
jopt-simple
-
jruby-
-
json-
-
json4s-
-
jsonb-api
-
jsoup-
-
jsp-api
-
jsr
-
jsse.jar
-
jta
-
jul-to-slf4j-
-
juli-
-
junit-
-
junit5-
-
jwt
-
kafka
-
kahadb-
-
kotlin-runtime
-
kryo
-
leveldb
-
libphonenumber
-
lift-json
-
lmdbjava
-
localedata
-
log4j-
-
logback
-
logging-event-layout
-
logkit-
-
lombok
-
lucene
-
lz4
-
machinist
-
macro-compat
-
mail-
-
management-
-
mapstruct-
-
maven-
-
mbean-annotation-api-
-
meecrowave-
-
mesos-
-
metrics-
-
mimepull-
-
mina-
-
minlog
-
mockito-core
-
mqtt-client-
-
multiverse-core-
-
mx4j-
-
myfaces-
-
mysql-connector-java-
-
nashorn
-
neethi-
-
neko-htmlunit
-
nekohtml-
-
netflix
-
netty-
-
nimbus-jose-jwt
-
objenesis-
-
okhttp
-
okio
-
openjpa-
-
openmdx-
-
opensaml-
-
opentest4j-
-
openwebbeans-
-
openws-
-
ops4j-
-
org.apache.aries
-
org.apache.commons
-
org.apache.log4j
-
org.eclipse.
-
org.junit.
-
org.osgi.core-
-
org.osgi.enterprise
-
org.talend
-
orient-commons-
-
orientdb-core-
-
orientdb-nativeos-
-
oro-
-
osgi
-
paranamer
-
pax-url
-
play
-
plexus-
-
plugin.jar
-
poi-
-
postgresql
-
preferences-
-
prefixmapper
-
protobuf-
-
py4j-
-
pyrolite-
-
qdox-
-
quartz-2
-
quartz-openejb-
-
reactive-streams
-
reflectasm-
-
registry-
-
resources.jar
-
ribbon
-
rmock-
-
routes-compiler
-
routines
-
rt.jar
-
runners
-
runtime-
-
rxjava
-
rxnetty
-
saaj-
-
sac-
-
scala
-
scalap
-
scalatest
-
scannotation-
-
selenium
-
serializer-
-
serp-
-
service-common
-
servlet-api-
-
servo-
-
shaded
-
shrinkwrap-
-
sisu-guice
-
sisu-inject
-
slf4j-
-
slick
-
smack-
-
smackx-
-
snakeyaml-
-
snappy-
-
spark-
-
specs2
-
spring-
-
sshd-
-
ssl-config-core
-
stax-api-
-
stax2-api-
-
stream
-
sunec.jar
-
sunjce_provider
-
sunpkcs11
-
surefire-
-
swagger-
-
swizzle-
-
sxc-
-
system-rules
-
tachyon-
-
talend-icon
-
test-interface
-
testng-
-
tomcat
-
tomee-
-
tools.jar
-
twirl
-
twitter4j-
-
tyrex
-
uncommons
-
unused
-
validation-api-
-
velocity-
-
wagon-
-
webbeans-
-
websocket
-
woodstox-core
-
workbench
-
ws-commons-util-
-
wsdl4j-
-
wss4j-
-
wstx-asl-
-
xalan-
-
xbean-
-
xercesImpl-
-
xml-apis-
-
xml-resolver-
-
xmlbeans-
-
xmlenc-
-
xmlgraphics-
-
xmlpull-
-
xmlrpc-
-
xmlschema-
-
xmlsec-
-
xmltooling-
-
xmlunit-
-
xstream-
-
xz-
-
zipfs.jar
-
zipkin-
-
ziplock-
-
zkclient
-
zookeeper-
Package Scanning
Since the framework can be used in the case of fatjars or shades, and because it still uses scanning, it is important to ensure we don’t scan the whole classes for performances reason.
Therefore, the following packages are ignored:
-
avro.shaded
-
com.codehale.metrics
-
com.ctc.wstx
-
com.datastax.driver.core
-
com.fasterxml.jackson.annotation
-
com.fasterxml.jackson.core
-
com.fasterxml.jackson.databind
-
com.fasterxml.jackson.dataformat
-
com.fasterxml.jackson.module
-
com.google.common
-
com.google.thirdparty
-
com.ibm.wsdl
-
com.jcraft.jsch
-
com.kenai.jffi
-
com.kenai.jnr
-
com.sun.istack
-
com.sun.xml.bind
-
com.sun.xml.messaging.saaj
-
com.sun.xml.txw2
-
com.thoughtworks
-
io.jsonwebtoken
-
io.netty
-
io.swagger.annotations
-
io.swagger.config
-
io.swagger.converter
-
io.swagger.core
-
io.swagger.jackson
-
io.swagger.jaxrs
-
io.swagger.model
-
io.swagger.models
-
io.swagger.util
-
javax
-
jnr
-
junit
-
net.sf.ehcache
-
net.shibboleth.utilities.java.support
-
org.aeonbits.owner
-
org.apache.activemq
-
org.apache.beam
-
org.apache.bval
-
org.apache.camel
-
org.apache.catalina
-
org.apache.commons.beanutils
-
org.apache.commons.cli
-
org.apache.commons.codec
-
org.apache.commons.collections
-
org.apache.commons.compress
-
org.apache.commons.dbcp2
-
org.apache.commons.digester
-
org.apache.commons.io
-
org.apache.commons.jcs.access
-
org.apache.commons.jcs.admin
-
org.apache.commons.jcs.auxiliary
-
org.apache.commons.jcs.engine
-
org.apache.commons.jcs.io
-
org.apache.commons.jcs.utils
-
org.apache.commons.lang
-
org.apache.commons.lang3
-
org.apache.commons.logging
-
org.apache.commons.pool2
-
org.apache.coyote
-
org.apache.cxf
-
org.apache.geronimo.javamail
-
org.apache.geronimo.mail
-
org.apache.geronimo.osgi
-
org.apache.geronimo.specs
-
org.apache.http
-
org.apache.jcp
-
org.apache.johnzon
-
org.apache.juli
-
org.apache.logging.log4j.core
-
org.apache.logging.log4j.jul
-
org.apache.logging.log4j.util
-
org.apache.logging.slf4j
-
org.apache.meecrowave
-
org.apache.myfaces
-
org.apache.naming
-
org.apache.neethi
-
org.apache.openejb
-
org.apache.openjpa
-
org.apache.oro
-
org.apache.tomcat
-
org.apache.tomee
-
org.apache.velocity
-
org.apache.webbeans
-
org.apache.ws
-
org.apache.wss4j
-
org.apache.xbean
-
org.apache.xml
-
org.apache.xml.resolver
-
org.bouncycastle
-
org.codehaus.jackson
-
org.codehaus.stax2
-
org.codehaus.swizzle.Grep
-
org.codehaus.swizzle.Lexer
-
org.cryptacular
-
org.eclipse.jdt.core
-
org.eclipse.jdt.internal
-
org.fusesource.hawtbuf
-
org.h2
-
org.hamcrest
-
org.hsqldb
-
org.jasypt
-
org.jboss.marshalling
-
org.joda.time
-
org.jose4j
-
org.junit
-
org.jvnet.mimepull
-
org.metatype.sxc
-
org.objectweb.asm
-
org.objectweb.howl
-
org.openejb
-
org.opensaml
-
org.slf4j
-
org.swizzle
-
org.terracotta.context
-
org.terracotta.entity
-
org.terracotta.modules.ehcache
-
org.terracotta.statistics
-
org.tukaani
-
org.yaml.snakeyaml
-
serp
it is not recommanded but possible to add in your plugin module a
TALEND-INF/scanning.properties file with classloader.includes and
classloader.excludes entries to refine the scanning with custom rules.
In such a case, exclusions win over inclusions.
|
Build tools
Maven Plugin
talend-component-maven-plugin intends to help you to write components
validating components match best practices and also generating transparently metadata used by Talend Studio.
Here is how to use it:
<plugin>
  <groupId>org.talend.sdk.component</groupId>
  <artifactId>talend-component-maven-plugin</artifactId>
  <version>${component.version}</version>
</plugin>
Note that this plugin is also an extension so you can declare it in your build/extensions block as:
<extension>
  <groupId>org.talend.sdk.component</groupId>
  <artifactId>talend-component-maven-plugin</artifactId>
  <version>${component.version}</version>
</extension>
Used as an extension, dependencies, validate and documentation goals will be set up.
Dependencies
The first goal is a shortcut for the maven-dependency-plugin, it will create the TALEND-INF/dependencies.txt file
with the compile and runtime dependencies to let the component use it at runtime:
<plugin>
  <groupId>org.talend.sdk.component</groupId>
  <artifactId>talend-component-maven-plugin</artifactId>
  <version>${component.version}</version>
  <executions>
    <execution>
      <id>talend-dependencies</id>
      <goals>
        <goal>dependencies</goal>
      </goals>
    </execution>
  </executions>
</plugin>
Validate
The most important goal is here to help you to validate the common programming model of the component. Here is the execution definition to activate it:
<plugin>
  <groupId>org.talend.sdk.component</groupId>
  <artifactId>talend-component-maven-plugin</artifactId>
  <version>${component.version}</version>
  <executions>
    <execution>
      <id>talend-component-validate</id>
      <goals>
        <goal>validate</goal>
      </goals>
    </execution>
  </executions>
</plugin>
By default it will be bound to process-classes phase. When executing it will do several validations which can be switched off
adding the corresponding flags to false in the <configuration> block of the execution:
| Name | Description | Default |
|---|---|---|
validateInternationalization |
Validates resource bundle are presents and contain commonly used keys (like |
true |
validateModel |
Ensure components pass validations of the |
true |
validateSerializable |
Ensure components are |
true |
validateMetadata |
Ensure components define an |
true |
validateDataStore |
Ensure any |
true |
validateComponent |
Ensure native programming model is respected, you can disable it when using another programming model like in beam case. |
true |
validateActions |
Validate actions signatures for the ones not tolerating dynamic binding ( |
true |
validateFamily |
Validate the family, i.e. the package containing the |
true |
validateDocumentation |
Ensure all 1. components and 2. |
true |
Documentation
This goal generates an Asciidoc file documenting your component from the configuration model (@Option) and
@Documentation you can put on options and the component itself.
<plugin>
  <groupId>org.talend.sdk.component</groupId>
  <artifactId>talend-component-maven-plugin</artifactId>
  <version>${component.version}</version>
  <executions>
    <execution>
      <id>talend-component-documentation</id>
      <goals>
        <goal>asciidoc</goal>
      </goals>
    </execution>
  </executions>
</plugin>| Name | Description | Default |
|---|---|---|
level |
Which level are the root title |
2 which means |
output |
Where to store the output, it is NOT recommended to change it |
|
formats |
A map of the renderings to do, keys are the format ( |
- |
attributes |
A map of asciidoctor attributes when formats is set |
- |
templateDir / templateEngine |
Template configuration for the rendering |
- |
title |
Document title |
${project.name} |
attachDocumentations |
Should the documentations ( |
true |
if you use the extension you can add the property talend.documentation.htmlAndPdf and set it to true in your project
to automatically get a html and PDF rendering of the documentation.
|
Render your documentation
To render the generated documentation you can use the Asciidoctor Maven plugin (or Gradle equivalent):
<plugin> (1)
  <groupId>org.talend.sdk.component</groupId>
  <artifactId>talend-component-maven-plugin</artifactId>
  <version>${talend-component-kit.version}</version>
  <executions>
    <execution>
      <id>documentation</id>
      <phase>prepare-package</phase>
      <goals>
        <goal>asciidoc</goal>
      </goals>
    </execution>
  </executions>
</plugin>
<plugin> (2)
  <groupId>org.asciidoctor</groupId>
  <artifactId>asciidoctor-maven-plugin</artifactId>
  <version>1.5.6</version>
  <executions>
    <execution>
      <id>doc-html</id>
      <phase>prepare-package</phase>
      <goals>
        <goal>process-asciidoc</goal>
      </goals>
      <configuration>
        <sourceDirectory>${project.build.outputDirectory}/TALEND-INF</sourceDirectory>
        <sourceDocumentName>documentation.adoc</sourceDocumentName>
        <outputDirectory>${project.build.directory}/documentation</outputDirectory>
        <backend>html5</backend>
      </configuration>
    </execution>
  </executions>
</plugin>-
Will generate in
target/classes/TALEND-INF/documentation.adocthe components documentation. -
Will render the documenation as an html file in
target/documentation/documentation.html.
| ensure to execute it after the documentation generation. |
If you prefer a PDF rendering you can configure the following execution in the asciidoctor plugin (note that you can configure both executions if you want both HTML and PDF rendering):
<plugin>
  <groupId>org.asciidoctor</groupId>
  <artifactId>asciidoctor-maven-plugin</artifactId>
  <version>1.5.6</version>
  <executions>
    <execution>
      <id>doc-html</id>
      <phase>prepare-package</phase>
      <goals>
        <goal>process-asciidoc</goal>
      </goals>
      <configuration>
        <sourceDirectory>${project.build.outputDirectory}/TALEND-INF</sourceDirectory>
        <sourceDocumentName>documentation.adoc</sourceDocumentName>
        <outputDirectory>${project.build.directory}/documentation</outputDirectory>
        <backend>pdf</backend>
      </configuration>
    </execution>
  </executions>
  <dependencies>
    <dependency>
      <groupId>org.asciidoctor</groupId>
      <artifactId>asciidoctorj-pdf</artifactId>
      <version>1.5.0-alpha.16</version>
    </dependency>
  </dependencies>
</plugin>If you want to add some more content or add a title, you can include the generated document into
another document using Asciidoc include directive.
A common example is:
= Super Components
Super Writer
:toc:
:toclevels: 3
:source-highlighter: prettify
:numbered:
:icons: font
:hide-uri-scheme:
:imagesdir: images

include::{generated_doc}/documentation.adoc[]
This assumes you pass to the plugin the attribute generated_doc, this can be done this way:
<plugin>
  <groupId>org.asciidoctor</groupId>
  <artifactId>asciidoctor-maven-plugin</artifactId>
  <version>1.5.6</version>
  <executions>
    <execution>
      <id>doc-html</id>
      <phase>prepare-package</phase>
      <goals>
        <goal>process-asciidoc</goal>
      </goals>
      <configuration>
        <sourceDirectory>${project.basedir}/src/main/asciidoc</sourceDirectory>
        <sourceDocumentName>my-main-doc.adoc</sourceDocumentName>
        <outputDirectory>${project.build.directory}/documentation</outputDirectory>
        <backend>html5</backend>
        <attributes>
          <generated_adoc>${project.build.outputDirectory}/TALEND-INF</generated_adoc>
        </attributes>
      </configuration>
    </execution>
  </executions>
</plugin>
This is optional but allows to reuse maven placeholders to pass paths which is quite convenient in an automated build.
You can find more customizations on Asciidoctor website.
Web
Testing the rendering of your component(s) configuration into the Studio is just a matter of deploying a component
in Talend Studio (you can have a look to link::studio.html[Studio Documentation] page. But don’t forget
the component can also be deployed into a Cloud (web) environment. To ease the testing of the related rendering,
you can use the goal web of the plugin:
mvn talend-component:webThen you can test your component going on localhost:8080. You need to select which component form you want to see using the treeview on the left, then on the right the form will be displayed.
The two available configurations of the plugin are serverPort which is a shortcut to change the default, 8080, port
of the embedded server and serverArguments to pass Meecrowave options to the server. More on that configuration
is available at openwebbeans.apache.org/meecrowave/meecrowave-core/cli.html.
| this command reads the component jar from the local maven repository so ensure to install the artifact before using it. |
Generate inputs or outputs
The Mojo generate (maven plugin goal) of the same plugin also embeds a generator you can use to bootstrap any input or output component:
<plugin>
  <groupId>org.talend.sdk.component</groupId>
  <artifactId>talend-component-maven-plugin</artifactId>
  <version>${talend-component.version}</version>
  <executions>
    <execution> (1)
      <id>generate-input</id>
      <phase>generate-sources</phase>
      <goals>
        <goal>generate</goal>
      </goals>
      <configuration>
        <type>input</type>
      </configuration>
    </execution>
    <execution> (2)
      <id>generate-output</id>
      <phase>generate-sources</phase>
      <goals>
        <goal>generate</goal>
      </goals>
      <configuration>
        <type>output</type>
      </configuration>
    </execution>
  </executions>
</plugin>| 1 | Generates an input (partition mapper + emitter) |
| 2 | Generates an output |
It is intended to be used from the command line (or IDE Maven integration):
$ mvn talend-component:generate \
    -Dtalend.generator.type=[input|output] \ (1)
    [-Dtalend.generator.classbase=com.test.MyComponent] \ (2)
    [-Dtalend.generator.family=my-family] \ (3)
[-Dtalend.generator.pom.read-only=false] (4)| 1 | select the type of component you want, input to generate a mapper and emitter and output to generate an output processor |
| 2 | set the class name base (will be suffixed by the component type), if not set the package will be guessed and classname based on the basedir name |
| 3 | set the component family to use, default to the base dir name removing (component[s] from the name, ex: my-component will lead to my as family if not explicitly set) |
| 4 | should the generator try to add component-api in the pom if not already here, if you added it you can set it to false directly in the pom |
For this command to work you will need to just register the plugin:
<plugin>
  <groupId>org.talend.sdk.component</groupId>
  <artifactId>talend-component-maven-plugin</artifactId>
  <version>${talend-component.version}</version>
</plugin>
Talend Component Archive
Component ARchive (.car) is the way to bundle a component to share it in Talend ecosystem. It is a plain Java ARchive (.jar)
containing a metadata file and a nested maven repository containing the component and its depenencies.
mvn talend-component:carIt will create a .car in your build directory which is shareable on Talend platforms.
Note that this CAR is executable and exposes the command studio-deploy which takes as parameter
a Talend Studio home location. Executed it will install the dependencies into the studio and register the component
in your instance. Here is a sample launch command:
# for a studio
java -jar mycomponent.car studio-deploy /path/to/my/studio

# for a m2 provisioning
java -jar mycomponent.car maven-deploy /path/to/.m2/repository
Gradle Plugin
gradle-talend-component intends to help you to write components
validating components match best practices. It is inspired from the Maven plugin
and adds the ability to generate automatically the dependencies.txt file the SDK
uses to build the component classpath. For more information on the configuration
you can check out the maven properties matching the attributes.
Here is how to use it:
buildscript {
  repositories {
    mavenLocal()
    mavenCentral()
  }
  dependencies {
    classpath "org.talend.sdk.component:gradle-talend-component:${talendComponentVersion}"
  }
}

apply plugin: 'org.talend.sdk.component'
apply plugin: 'java'

// optional customization
talendComponentKit {
    // dependencies.txt generation, replaces maven-dependency-plugin
    dependenciesLocation = "TALEND-INF/dependencies.txt"
    boolean skipDependenciesFile = false;

    // classpath for validation utilities
    sdkVersion = "${talendComponentVersion}"
    apiVersion = "${talendComponentApiVersion}"

    // documentation
    skipDocumentation = false
    documentationOutput = new File(....)
    documentationLevel = 2 // first level will be == in the generated adoc
    documentationTitle = 'My Component Family' // default to project name
    documentationFormats = [:] // adoc attributes
    documentationFormats = [:] // renderings to do

    // validation
    skipValidation = false
    validateFamily = true
    validateSerializable = true
    validateInternationalization = true
    validateModel = true
    validateMetadata = true
    validateComponent = true
    validateDataStore = true
    validateDataSet = true
    validateActions = true

    // web
    serverArguments = []
    serverPort = 8080

    // car
    carOutput = new File(....)
    carMetadata = [:] // custom meta (string key-value pairs)
}
Services
Internationalization
Recommanded practise for internationalization are:
-
store messages using
ResourceBundleproperties file in your component module -
the location of the properties are in the same package than the related component(s) and is named
Messages(ex:org.talend.demo.MyComponentwill useorg.talend.demo.Messages[locale].properties) -
for your own messages use the internationalization API
Internationalization API
Overal idea is to design its messages as methods returning String values
and back the template by a ResourceBundle located in the same package than the interface
defining these methods and named Messages.
| this is the mecanism to use to internationalize your own messages in your own components. |
To ensure you internationalization API is identified you need to mark it with @Internationalized:
@Internationalized (1)
public interface Translator {

    String message();

    String templatizedMessage(String arg0, int arg1); (2)

    String localized(String arg0, @Language Locale locale); (3)
}| 1 | @Internationalized allows to mark a class as a i18n service |
| 2 | you can pass parameters and the message will use MessageFormat syntax to be resolved based on the ResourceBundle template |
| 3 | you can use @Language on a Locale parameter to specify manually the locale to use, note that a single value will be used (the first parameter tagged as such). |
Providing some actions for consumers/clients
In some cases you will desire to add some actions unrelated to the runtime. A simple example is to enable clients - the users of the plugin/library - to test if a connection works. Even more concretely: does my database is up?.
To do so you need to define an @Action which is a method with a name (representing the event name) in a class decorated with @Service:
@Service
public class MyDbTester {
    @Action(family = "mycomp", "test")
    public Status doTest(final IncomingData data) {
        return ...;
    }
}| services are singleton so if you need some thread safety ensure they match that requirement. They shouldn’t store any state too (state is held by the component) since they can be serialized any time. |
| services are usable in components as well (matched by type) and allow to reuse some shared logic like a client. Here is a sample with a service used to access files: |
@Emitter(family = "sample", name = "reader")
public class PersonReader implements Serializable {
    // attributes skipped to be concise

    public PersonReader(@Option("file") final File file,
                        final FileService service) {
        this.file = file;
        this.service = service;
    }

    // use the service
    @PostConstruct
    public void open() throws FileNotFoundException {
        reader = service.createInput(file);
    }

}| service is passed to constructor automatically, it can be used as a bean. Only call of service’s method is required. |
Particular action types
Some actions are that common and need a clear contract so they are defined as API first citizen, this is the case for wizards or healthchecks for instance. Here is the list of all actions:
| API | Type | Description | Return type | Sample returned type |
|---|---|---|---|---|
@org.talend.sdk.component.api.service.completion.DynamicValues |
dynamic_values |
Mark a method as being useful to fill potential values of a string option for a property denoted by its value. You can link a field as being completable using @Proposable(value). The resolution of the completion action is then done through the component family and value of the action. The callback doesn’t take any parameter. |
Values |
|
@org.talend.sdk.component.api.service.healthcheck.HealthCheck |
healthcheck |
This class marks an action doing a connection test |
HealthCheckStatus |
|
@org.talend.sdk.component.api.service.schema.DiscoverSchema |
schema |
Mark an action as returning a discovered schema. Its parameter MUST be the type decorated with |
Schema |
|
@org.talend.sdk.component.api.service.Action |
user |
- |
any |
- |
@org.talend.sdk.component.api.service.asyncvalidation.AsyncValidation |
validation |
Mark a method as being used to validate a configuration. IMPORTANT: this is a server validation so only use it if you can’t use other client side validation to implement it. |
ValidationResult |
|
Built in services
The framework provides some built-in services you can inject by type in components and actions out of the box.
Here is the list:
| Type | Description | ||||
|---|---|---|---|---|---|
|
Provides a small abstraction to cache data which don’t need to be recomputed very often. Commonly used by actions for the UI interactions. |
||||
|
Allows to resolve a dependency from its Maven coordinates. |
||||
|
A JSON-B instance. If your model is static and you don’t want to handle the serialization manually using JSON-P you can inject that instance. |
||||
|
A JSON-P instance. Prefer other JSON-P instances if you don’t exactly know why you use this one. |
||||
|
A JSON-P instance. It is recommended to use this one instead of a custom one for memory/speed optimizations. |
||||
|
A JSON-P instance. It is recommended to use this one instead of a custom one for memory/speed optimizations. |
||||
|
A JSON-P instance. It is recommended to use this one instead of a custom one for memory/speed optimizations. |
||||
|
A JSON-P instance. It is recommended to use this one instead of a custom one for memory/speed optimizations. |
||||
|
A JSON-P instance. It is recommended to use this one instead of a custom one for memory/speed optimizations. |
||||
|
Represents the local configuration which can be used during the design.
|
||||
Every interface that extends |
This let you define an http client in a declarative manner using an annotated interface.
|
| all these injected instances are serializable which is important for the big data environment, if you create the instances yourself you will not benefit from that features and the memory optimization done by the runtime so try to prefer to reuse the framework instances over custom ones. |
HttpClient usage
Let assume that we have a REST API defined like below, and that it requires a basic authentication header.
GET |
- |
POST |
with a json playload to be created |
To create an http client able to consume this REST API, we will define an interface that extends HttpClient,
The HttpClient interface lets you set the base for the http address that our client will hit.
The base is the part of the address that we will need to add to the request path to hit the api.
Every method annotated with @Request of our interface will define an http request.
Also every request can have @Codec that let us encode/decode the request/response playloads.
if your payload(s) is(are) String or Void you can ignore the coder/decoder.
|
public interface APIClient extends HttpClient {
    @Request(path = "api/records/{id}", method = "GET")
    @Codec(decoder = RecordDecoder.class) //decoder =  decode returned data to Record class
    Record getRecord(@Header("Authorization") String basicAuth, @Path("id") int id);

    @Request(path = "api/records", method = "POST")
    @Codec(encoder = RecordEncoder.class, decoder = RecordDecoder.class) //encoder = encode record to fit request format (json in this example)
    Record createRecord(@Header("Authorization") String basicAuth, Record record);
}
The interface should extends HttpClient.
|
In the codec classes (class that implement Encoder/Decoder) you can inject any of your services annotated with @Service or @Internationalized into the constructor.
The i18n services can be useful to have i18n messages for errors handling for example.
This interface can be injected into our Components classes or Services to consume the defined api.
@Service
public class MyService {

    private APIClient client;

    public MyService(...,APIClient client){
        //...
        this.client = client;
        client.base("http://localhost:8080");// init the base of the api, ofen in a PostConstruct or init method
    }

    //...
    // Our get request
    Record rec =  client.getRecord("Basic MLFKG?VKFJ", 100);

    //...
    // Our post request
    Record newRecord = client.createRecord("Basic MLFKG?VKFJ", new Record());
}
Note: by default /+json are mapped to JSON-P and /+xml to JAX-B if the model has a @XmlRootElement annotation.
Advanced HTTP client request customization
For advanced cases you can customize the Connection directly using @UseConfigurer on the method.
It will call your custom instance of Configurer. Note that you can use some @ConfigurerOption in the method
signature to pass some configurer configuration.
For instance if you have this configurer:
public class BasicConfigurer implements Configurer {
    @Override
    public void configure(final Connection connection, final ConfigurerConfiguration configuration) {
        final String user = configuration.get("username", String.class);
        final String pwd = configuration.get("password", String.class);
        connection.withHeader(
            "Authorization",
            Base64.getEncoder().encodeToString((user + ':' + pwd).getBytes(StandardCharsets.UTF_8)));
    }
}
You can then set it on a method to automatically add the basic header with this kind of API usage:
public interface APIClient extends HttpClient {
    @Request(path = "...")
    @UseConfigurer(BasicConfigurer.class)
    Record findRecord(@ConfigurerOption("username") String user, @ConfigurerOption("password") String pwd);
}
Services and interceptors
For common concerns like caching, auditing etc, it can be fancy to use interceptor like API. It is enabled by the framework on services.
An interceptor defines an annotation marked with @Intercepts which defines the implementation of the interceptor (an InterceptorHandler).
Here is an example:
@Intercepts(LoggingHandler.class)
@Target({ TYPE, METHOD })
@Retention(RUNTIME)
public @interface Logged {
    String value();
}
Then handler is created from its constructor and can take service injections (by type). The first parameter, however, can be
a BiFunction<Method, Object[], Object> which representes the invocation chain if your interceptor can be used with others.
| if you do a generic interceptor it is important to pass the invoker as first parameter. If you don’t do so you can’t combine interceptors at all. |
Here is an interceptor implementation for our @Logged API:
public class LoggingHandler implements InterceptorHandler {
    // injected
    private final BiFunction<Method, Object[], Object> invoker;
    private final SomeService service;

    // internal
    private final ConcurrentMap<Method, String> loggerNames = new ConcurrentHashMap<>();

    public CacheHandler(final BiFunction<Method, Object[], Object> invoker, final SomeService service) {
        this.invoker = invoker;
        this.service = service;
    }

    @Override
    public Object invoke(final Method method, final Object[] args) {
        final String name = loggerNames.computeIfAbsent(method, m -> findAnnotation(m, Logged.class).get().value());
        service.getLogger(name).info("Invoking {}", method.getName());
        return invoker.apply(method, args);
    }
}
This implementation is compatible with interceptor chains since it takes the invoker as first constructor parameter and it also takes a service injection. Then the implementation just does what is needed - logging the invoked method here.
the findAnnotation annotation - inherited from InterceptorHandler is an utility method to find an annotation on a method
or class (in this order).
|
Creating a job pipeline
Job Builder
The Job builder let you create a job pipeline programmatically using Talend components
(Producers and Processors).
The job pipeline is an acyclic graph, so you can built complex pipelines.
Let’s take a simple use case where we will have 2 data source (employee and salary) that we will format to csv and write the result to a file.
A job is defined based on components (nodes) and links (edges) to connect their branches together.
Every component is defined by an unique id and an URI that identify the component.
The URI follow the form : [family]://[component][?version][&configuration]
-
family: the name of the component family
-
component: the name of the component
-
version : the version of the component, it’s represented in a key=value format. where the key is
__versionand the value is a number. -
configuration: here you can provide the component configuration as key=value tuple where the key is the path of the configuration and the value is the configuration value in string format.
job://csvFileGen?__version=1&path=/temp/result.csv&encoding=utf-8"| configuration parameters must be URI/URL encoded. |
Here is a more concrete job example:
Job.components()   (1)
        .component("employee","db://input")
        .component("salary", "db://input")
        .component("concat", "transform://concat?separator=;")
        .component("csv", "file://out?__version=2")
    .connections()  (2)
        .from("employee").to("concat", "string1")
        .from("salary").to("concat", "string2")
        .from("concat").to("csv")
    .build()    (3)
.run(); (4)| 1 | We define all the components that will be used in the job pipeline. |
| 2 | Then, we define the connections between the components to construct the job pipeline.
the links from → to use the component id and the default input/output branches.
You can also connect a specific branch of a component if it has multiple or named inputs/outputs branches
using the methods from(id, branchName) → to(id, branchName).
In the example above, the concat component have to inputs (string1 and string2). |
| 3 | In this step, we validate the job pipeline by asserting that :
|
| 4 | We run the job pipeline. |
| In this version, the execution of the job is linear. the component are not executed in parallel even if some steps may be independents. |
Environment/Runner
Depending the configuration you can select which environment you execute your job in.
To select the environment the logic is the following one:
-
if an
org.talend.sdk.component.runtime.manager.chain.Job.ExecutorBuilderis passed through the job properties then use it (supported type are aExecutionBuilderinstance, aClassor aString). -
if an
ExecutionBuilderSPI is present then use it (it is the case ifcomponent-runtime-beamis present in your classpath). -
else just use a local/standalone execution.
In the case of a Beam execution you can customize the pipeline options using system properties. They have to be prefixed
by talend.beam.job.. For instance to set appName option you will set -Dtalend.beam.job.appName=mytest.
Key Provider
The job builder let you set a key provider to join your data when a component has multiple inputs. The key provider can be set contextually to a component or globally to the job
Job.components()
        .component("employee","db://input")
            .property(GroupKeyProvider.class.getName(),
                 (GroupKeyProvider) context -> context.getData().getString("id")) (1)
        .component("salary", "db://input")
        .component("concat", "transform://concat?separator=;")
    .connections()
        .from("employee").to("concat", "string1")
        .from("salary").to("concat", "string2")
    .build()
    .property(GroupKeyProvider.class.getName(), (2)
                 (GroupKeyProvider) context -> context.getData().getString("employee_id"))
.run();| 1 | Here we have defined a key provider for the data produced by the component employee |
| 2 | Here we have defined a key provider for all the data manipulated in this job. |
If the incoming data has different ids you can provide a complex global key provider relaying on the context that give you the component id
and the branch Name.
GroupKeyProvider keyProvider = context -> {
    if ("employee".equals(context.getComponentId())) {
        return context.getData().getString("id");
    }
    return context.getData().getString("employee_id");
};
Beam case
For beam case, you need to rely on beam pipeline definition and use component-runtime-beam dependency which provides Beam bridges.
I/O
org.talend.sdk.component.runtime.beam.TalendIO provides a way to convert a partition mapper or a processor to an input
or processor
using the read or write methods.
public class Main {
    public static void main(final String[] args) {
        final ComponentManager manager = ComponentManager.instance()
        Pipeline pipeline = Pipeline.create();
        //Create beam input from mapper and apply input to pipeline
        pipeline.apply(TalendIO.read(manager.findMapper(manager.findMapper("sample", "reader", 1, new HashMap<String, String>() {{
                    put("fileprefix", "input");
                }}).get()))
                .apply(new ViewsMappingTransform(emptyMap(), "sample")) // prepare it for the output record format (see next part)
        //Create beam processor from talend processor and apply to pipeline
                .apply(TalendIO.write(manager.findProcessor("test", "writer", 1, new HashMap<String, String>() {{
                    put("fileprefix", "output");
                }}).get(), emptyMap()));

        //... run pipeline
    }
}
Processors
org.talend.sdk.component.runtime.beam.TalendFn provides the way to wrap a processor in a Beam PTransform and integrate
it in the pipeline.
public class Main {
    public static void main(final String[] args) {
        //Component manager and pipeline initialization...

        //Create beam PTransform from processor and apply input to pipeline
        pipeline.apply(TalendFn.asFn(manager.findProcessor("sample", "mapper", 1, emptyMap())).get())), emptyMap());

        //... run pipeline
    }
}
The multiple inputs/outputs are represented by a Map element in beam case to avoid to use multiple inputs/outputs.
you can use ViewsMappingTransform or CoGroupByKeyResultMappingTransform to adapt the input/output
format to the record format representing the multiple inputs/output, so a kind of Map<String, List<?>>,
but materialized as a JsonObject. Input data must be of type JsonObject in this case.
|
Convert a Beam.io in a component I/O
For simple I/O you can get automatic conversion of the Beam.io to a component I/O transparently if you decorated your PTransform
with @PartitionMapper or @Processor.
The limitation are:
-
Inputs must implement
PTransform<PBegin, PCollection<?>>and must be aBoundedSource. -
Outputs must implement
PTransform<PCollection<?>, PDone>and just register on the inputPCollectionaDoFn.
More information on that topic on How to wrap a Beam I/O page.
Advanced: define a custom API
It is possible to extend the Component API for custom front features.
What is important here is to keep in mind you should do it only if it targets not portable components (only used by the Studio or Beam).
In term of organization it is recommended to create a custom xxxx-component-api module with the new set of annotations.
Talend Component Testing Documentation
Best practises
| this part is mainly around tools usable with JUnit. You can use most of these techniques with TestNG as well, check out the documentation if you need to use TestNG. |
Parameterized tests
This is a great solution to repeat the same test multiple times. Overall idea
is to define a test scenario (I test function F) and to make the input/output data
dynamic.
JUnit 4
Here is an example. Let’s assume we have this test which validates the connection URI using ConnectionService:
public class MyConnectionURITest {
    @Test
    public void checkMySQL() {
        assertTrue(new ConnectionService().isValid("jdbc:mysql://localhost:3306/mysql"));
    }

    @Test
    public void checkOracle() {
        assertTrue(new ConnectionService().isValid("jdbc:oracle:thin:@//myhost:1521/oracle"));
    }
}
We clearly identify the test method is always the same except the value. It can therefore be rewritter
using JUnit Parameterized runner like that:
@RunWith(Parameterized.class) (1)
public class MyConnectionURITest {

    @Parameterized.Parameters(name = "{0}") (2)
    public static Iterable<String> uris() { (3)
        return asList(
            "jdbc:mysql://localhost:3306/mysql",
            "jdbc:oracle:thin:@//myhost:1521/oracle");
    }

    @Parameterized.Parameter (4)
    public String uri;

    @Test
    public void isValid() { (5)
        assertNotNull(uri);
    }
}| 1 | Parameterized is the runner understanding @Parameters and how to use it. Note that you can generate random data here if desired. |
| 2 | by default the name of the executed test is the index of the data, here we customize it using the first parameter toString() value to have something more readable |
| 3 | the @Parameters method MUST be static and return an array or iterable of the data used by the tests |
| 4 | you can then inject the current data using @Parameter annotation, it can take a parameter if you use an array of array instead of an iterable of object in @Parameterized and you can select which item you want injected this way |
| 5 | the @Test method will be executed using the contextual data, in this sample we’ll get executed twice with the 2 specified urls |
you don’t have to define a single @Test method, if you define multiple, each of them will be executed with all the data (ie if we add a test in previous example you will get 4 tests execution - 2 per data, ie 2x2)
|
JUnit 5
JUnit 5 reworked this feature to make it way easier to use. The full documentation is available at junit.org/junit5/docs/current/user-guide/#writing-tests-parameterized-tests.
The main difference is you can also define inline on the test method that it is a parameterized test and which are the values:
@ParameterizedTest
@ValueSource(strings = { "racecar", "radar", "able was I ere I saw elba" })
void mytest(String currentValue) {
    // do test
}
However you can still use the previous behavior using a method binding configuration:
@ParameterizedTest
@MethodSource("stringProvider")
void mytest(String currentValue) {
    // do test
}

static Stream<String> stringProvider() {
    return Stream.of("foo", "bar");
}
This last option allows you to inject any type of value - not only primitives - which is very common to define scenarii.
don’t forget to add junit-jupiter-params dependency to benefit from this feature.
|
component-runtime-testing
component-runtime-junit
component-runtime-junit is a small test library allowing you to validate simple logic based on Talend Component tooling.
To import it add to your project the following dependency:
<dependency>
  <groupId>org.talend.sdk.component</groupId>
  <artifactId>component-runtime-junit</artifactId>
  <version>${talend-component.version}</version>
  <scope>test</scope>
</dependency>
This dependency also provide some mocked components that you can use with your own component to create tests.
The mocked components are provided under the family test :
-
emitter: a mock of an input component -
collector: a mock of an output component
JUnit 4
Then you can define a standard JUnit test and use the SimpleComponentRule rule:
public class MyComponentTest {

    @Rule (1)
    public final SimpleComponentRule components = new SimpleComponentRule("org.talend.sdk.component.mycomponent.");

    @Test
    public void produce() {
        Job.components() (2)
             .component("mycomponent","yourcomponentfamily://yourcomponent?"+createComponentConfig())
             .component("collector", "test://collector")
           .connections()
             .from("mycomponent").to("collector")
           .build()
           .run();

        final List<MyRecord> records = components.getCollectedData(MyRecord.class); (3)
        doAssertRecords(records); // depending your test
    }
}| 1 | the rule will create a component manager and provide two mock components: an emitter and a collector. Don’t forget to set the root package of your component to enable it. |
| 2 | you define any chain you want to test, it generally uses the mock as source or collector |
| 3 | you validate your component behavior, for a source you can assert the right records were emitted in the mock collect |
JUnit 5
The JUnit 5 integration is mainly the same as for JUnit 4 except it uses the new JUnit 5 extension mecanism.
The entry point is the @WithComponents annotation you put on your test class which takes the
component package you want to test and you can use @Injected to inject in a test class field an instance of ComponentsHandler
which exposes the same utilities than the JUnit 4 rule:
@WithComponents("org.talend.sdk.component.junit.component") (1)
public class ComponentExtensionTest {
    @Injected (2)
    private ComponentsHandler handler;

    @Test
    public void manualMapper() {
        final Mapper mapper = handler.createMapper(Source.class, new Source.Config() {

            {
                values = asList("a", "b");
            }
        });
        assertFalse(mapper.isStream());
        final Input input = mapper.create();
        assertEquals("a", input.next());
        assertEquals("b", input.next());
        assertNull(input.next());
    }
}| 1 | The annotation defines which components to register in the test context. |
| 2 | The field allows to get the handler to be able to orchestrate the tests. |
if it is the first time you use JUnit 5, don’t forget the imports changed and you must use org.junit.jupiter.api.Test instead of org.junit.Test.
Some IDE versions and surefire versions can also need you to install either a plugin or a specific configuration.
|
Mocking the output
Using the component "test"/"collector" as in previous sample stores all records emitted by the chain (typically your source)
in memory, you can then access them using theSimpleComponentRule.getCollectoedRecord(type). Note that this method filters by type,
if you don’t care of the type just use Object.class.
Mocking the input
The input mocking is symmetric to the output but here you provide the data you want to inject:
public class MyComponentTest {

    @Rule
    public final SimpleComponentRule components = new SimpleComponentRule("org.talend.sdk.component.mycomponent.");

    @Test
    public void produce() {
        components.setInputData(asList(createData(), createData(), createData())); (1)

        Job.components() (2)
             .component("emitter","test://emitter")
             .component("out", "yourcomponentfamily://myoutput?"+createComponentConfig())
           .connections()
              .from("emitter").to("out")
           .build
           .run();

        assertMyOutputProcessedTheInputData();
    }
}| 1 | using setInputData you prepare the execution(s) to have a fake input when using "test"/"emitter" component. |
Creating runtime configuration from component configuration
The component configuration is a POJO (using @Option on fields) and the runtime configuration (ExecutionChainBuilder) uses
a Map<String, String>. To make the conversion easier, the JUnit integration provides a SimpleFactory.configurationByExample utility
to get this map instance from a configuration instance.
Example:
final MyComponentConfig componentConfig = new MyComponentConfig();
componentConfig.setUser("....");
// .. other inits

final Map<String, String> configuration = configurationByExample(componentConfig);
The same factory provides a fluent DSL to create configuration calling configurationByExample without any parameter.
The advantage is to be able to convert an object as a Map<String, String> as seen previously or as a query string
to use it with the Job DSL:
final String uri = "family://component?" +
    configurationByExample().forInstance(componentConfig).configured().toQueryString();
It handles the encoding of the URI to ensure it is correctly done.
Testing a Mapper
The SimpleComponentRule also allows to test a mapper unitarly, you can get an instance from a configuration
and you can execute this instance to collect the output. Here is a snippet doing that:
public class MapperTest {

    @ClassRule
    public static final SimpleComponentRule COMPONENT_FACTORY = new SimpleComponentRule(
            "org.company.talend.component");

    @Test
    public void mapper() {
        final Mapper mapper = COMPONENT_FACTORY.createMapper(MyMapper.class, new Source.Config() {{
            values = asList("a", "b");
        }});
        assertEquals(asList("a", "b"), COMPONENT_FACTORY.collectAsList(String.class, mapper));
    }
}
Testing a Processor
As for the mapper a processor is testable unitary. The case is a bit more complex since you can have multiple inputs and outputs:
public class ProcessorTest {

    @ClassRule
    public static final SimpleComponentRule COMPONENT_FACTORY = new SimpleComponentRule(
            "org.company.talend.component");

    @Test
    public void processor() {
        final Processor processor = COMPONENT_FACTORY.createProcessor(Transform.class, null);
        final SimpleComponentRule.Outputs outputs = COMPONENT_FACTORY.collect(processor,
                        new JoinInputFactory().withInput("__default__", asList(new Transform.Record("a"), new Transform.Record("bb")))
                                              .withInput("second", asList(new Transform.Record("1"), new Transform.Record("2")))
                );
        assertEquals(2, outputs.size());
        assertEquals(asList(2, 3), outputs.get(Integer.class, "size"));
        assertEquals(asList("a1", "bb2"), outputs.get(String.class, "value"));
    }
}
Here again the rule allows you to instantiate a Processor from your code
and then to collect the output from the inputs you pass in. There are two convenient implementation
of the input factory:
-
MainInputFactoryfor processors using only the default input. -
JoinInputfactoryfor processors using multiple inputs have a methodwithInput(branch, data)The first arg is the branch name and the second arg is the data used by the branch.
you can also implement your own input representation if needed implementing org.talend.sdk.component.junit.ControllableInputFactory.
|
component-runtime-testing-spark
The folowing artifact will allow you to test against a spark cluster:
<dependency>
  <groupId>org.talend.sdk.component</groupId>
  <artifactId>component-runtime-testing-spark</artifactId>
  <version>${talend-component.version}</version>
  <scope>test</scope>
</dependency>
JUnit 4
The usage relies on a JUnit TestRule. It is recommended to use it as a @ClassRule to ensure
a single instance of a spark cluster is built but you can also use it as a simple @Rule which means
it will be created per method instead of per test class.
It takes as parameter the spark and scala version to use. It will then fork a master and N slaves.
Finally it will give you submit* method allowing you to send jobs either from the test classpath
or from a shade if you run it as an integration test.
Here is a sample:
public class SparkClusterRuleTest {

    @ClassRule
    public static final SparkClusterRule SPARK = new SparkClusterRule("2.10", "1.6.3", 1);

    @Test
    public void classpathSubmit() throws IOException {
        SPARK.submitClasspath(SubmittableMain.class, getMainArgs());

        // do wait the test passed
    }
}
this is working with @Parameterized so you can submit a bunch of jobs with different args and even combine it with beam TestPipeline if you make it transient!
|
JUnit 5
The integration with JUnit 5 of that spark cluster logic uses @WithSpark marker for the extension
and let you, optionally, inject through @SparkInject, the BaseSpark<?> handler to access te spark cluster
meta information - like its host/port.
Here is a basic test using it:
@WithSpark
class SparkExtensionTest {

    @SparkInject
    private BaseSpark<?> spark;

    @Test
    void classpathSubmit() throws IOException {
        final File out = new File(jarLocation(SparkClusterRuleTest.class).getParentFile(), "classpathSubmitJunit5.out");
        if (out.exists()) {
            out.delete();
        }
        spark.submitClasspath(SparkClusterRuleTest.SubmittableMain.class, spark.getSparkMaster(), out.getAbsolutePath());

        await().atMost(5, MINUTES).until(
                () -> out.exists() ? Files.readAllLines(out.toPath()).stream().collect(joining("\n")).trim() : null,
                equalTo("b -> 1\na -> 1"));
    }
}
How to know the job is done
In current state, SparkClusterRule doesn’t allow to know a job execution is done - even if it exposes the webui url so
you can poll it to check. The best at the moment is to ensure the output of your job exists and contains the right value.
awaitability or equivalent library can help you to write such logic.
Here are the coordinates of the artifact:
<dependency>
  <groupId>org.awaitility</groupId>
  <artifactId>awaitility</artifactId>
  <version>3.0.0</version>
  <scope>test</scope>
</dependency>
And here is how to wait a file exists and its content (for instance) is the expected one:
await()
    .atMost(5, MINUTES)
    .until(
        () -> out.exists() ? Files.readAllLines(out.toPath()).stream().collect(joining("\n")).trim() : null,
        equalTo("the expected content of the file"));
component-runtime-http-junit
The HTTP JUnit module allows you to mock REST API very easily. Here are its coordinates:
<dependency>
  <groupId>org.talend.sdk.component</groupId>
  <artifactId>component-runtime-junit</artifactId>
  <version>${talend-component.version}</version>
  <scope>test</scope>
</dependency>
this module uses Apache Johnzon and Netty, if you have any conflict (in particular with netty) you can add the classifier shaded
to the dependency and the two dependencies are shaded avoiding the conflicts with your component.
|
It supports JUnit 4 and JUnit 5 as well but the overall concept is the exact same one: the extension/rule is able to serve precomputed responses saved in the classpath.
You can plug your own ResponseLocator to map a request to a response but the default implementation - which should be sufficient
in most cases - will look in talend/testing/http/<class name>_<method name>.json. Note that you can also put it
in talend/testing/http/<request path>.json.
JUnit 4
JUnit 4 setup is done through two rules: JUnit4HttpApi which is responsible to start the server and JUnit4HttpApiPerMethodConfigurator
which is responsible to configure the server per test and also handle the capture mode (see later).
if you don’t use the JUnit4HttpApiPerMethodConfigurator, the capture feature will be deactivated and the per test mocking will not be available.
|
Most of the test will look like:
public class MyRESTApiTest {
    @ClassRule
    public static final JUnit4HttpApi API = new JUnit4HttpApi();

    @Rule
    public final JUnit4HttpApiPerMethodConfigurator configurator = new JUnit4HttpApiPerMethodConfigurator(API);

    @Test
    public void direct() throws Exception {
        // ... do your requests
    }
}For tests using SSL based services, you will need to use activeSsl() on the JUnit4HttpApi rule.
If you need to access the server ssl socket factory you can do it from the HttpApiHandler (the rule):
@ClassRule
public static final JUnit4HttpApi API = new JUnit4HttpApi().activeSsl();

@Test
public void test() throws Exception {
    final HttpsURLConnection connection = getHttpsConnection();
    connection.setSSLSocketFactory(API.getSslContext().getSocketFactory());
    // ....
}
JUnit 5
JUnit 5 uses a JUnit 5 extension based on the HttpApi annotation you can put on your test class. You can inject
the test handler (which has some utilities for advanced cases) through @HttpApiInject:
@HttpApi
class JUnit5HttpApiTest {
    @HttpApiInject
    private HttpApiHandler<?> handler;

    @Test
    void getProxy() throws Exception {
        // .... do your requests
    }
}
the injection is optional and the @HttpApi allows you to configure several behaviors of the test.
|
For tests using SSL based services, you will need to use @HttpApi(useSsl = true).
You can access the client SSL socket factory through the api handler:
@HttpApi*(useSsl = true)*
class MyHttpsApiTest {
    @HttpApiInject
    private HttpApiHandler<?> handler;

    @Test
    void test() throws Exception {
        final HttpsURLConnection connection = getHttpsConnection();
        connection.setSSLSocketFactory(handler.getSslContext().getSocketFactory());
        // ....
    }
}
Capturing mode
The strength of this implementation is to run a small proxy server and auto configure the JVM:
http[s].proxyHost, http[s].proxyPort, HttpsURLConnection#defaultSSLSocketFactory and SSLContext#default
are auto configured to work out of the box with the proxy.
It allows you to keep in your tests the native and real URLs. For instance this test is perfectlt valid:
public class GoogleTest {
    @ClassRule
    public static final JUnit4HttpApi API = new JUnit4HttpApi();

    @Rule
    public final JUnit4HttpApiPerMethodConfigurator configurator = new JUnit4HttpApiPerMethodConfigurator(API);

    @Test
    public void google() throws Exception {
        assertEquals(HttpURLConnection.HTTP_OK, get("https://google.fr?q=Talend"));
    }

    private int get(final String uri) throws Exception {
        // do the GET request, skipped for brievity
    }
}
If you execute this test, it will fail with a HTTP 400 because the proxy doesn’t find the mocked response.
You can create it manually as seen in the introduction of the module but you can also set the property talend.junit.http.capture
to the folder where to store the captures. It must be the root folder and not the folder where the json are (ie not prefixed by talend/testing/http by default).
Generally you will want to use src/test/resources. If new File("src/test/resources") resolves to the valid folder when executing your test (Maven default),
then you can just set the system property to true, otherwise you need to adjust accordingly the system property value.
Once you ran the tests with this system property, the testing framework will have created the correct mock response files and you can
remove the system property. The test will still pass, using google.com…even if you disconnect your machine from the internet.
The rule (extension) is doing all the work for you :).
Beam testing
If you want to ensure your component works in Beam the minimum to do is to try with the direct runner (if you don’t want to use spark).
Check beam.apache.org/contribute/testing/ out for more details.
Multiple environments for the same tests
JUnit (4 or 5) already provides some ways to parameterized tests and execute the same "test logic" against several data. However it is not that convenient to test multiple environments.
For instance, with Beam, you can desire to test against multiple runners your code and it requires to solve conflicts between runner dependencies, setup the correct classloaders etc…It is a lot of work!
To simplify such cases, the framework provides you a multi-environment support for your tests.
It is in the junit module and is usable with JUnit 4 and JUnit 5.
JUnit 4
@RunWith(MultiEnvironmentsRunner.class)
@Environment(Env1.class)
@Environment(Env2.class)
public class TheTest {
    @Test
    public void test1() {
        // ...
    }
}
The MultiEnvironmentsRunner will execute the test(s) for each defined environments. It means it will
run test1 for Env1 and Env2 in previous example.
By default JUnit4 runner will be used to execute the tests in one environment but you can use @DelegateRunWith
to use another runner.
JUnit 5
JUnit 5 configuration is close to JUnit 4 one:
@Environment(EnvironmentsExtensionTest.E1.class)
@Environment(EnvironmentsExtensionTest.E2.class)
class TheTest {

    @EnvironmentalTest
    void test1() {
        // ...
    }
}
The main difference is you don’t use a runner (it doesn’t exist in JUnit 5) and you replace @Test by @EnvironmentalTest.
the main difference with JUnit 4 integration is that the tests are execute one after each other for all environments
instead of running all tests in each environments sequentially. It means, for instance, that @BeforeAll and @AfterAll are executed
once for all runners.
|
Provided environments
The provided environment setup the contextual classloader to load the related runner of Apache Beam.
Package: org.talend.sdk.component.junit.environment.builtin.beam
| the configuration is read from system properties, environment variables, …. |
| Class | Name | Description |
|---|---|---|
ContextualEnvironment |
Contextual |
Contextual runner |
DirectRunnerEnvironment |
Direct |
Direct runner |
FlinkRunnerEnvironment |
Flink |
Flink runner |
SparkRunnerEnvironment |
Spark |
Spark runner |
Configuring environments
If the environment extends BaseEnvironmentProvider and therefore defines an environment name - which is the case of the default ones, you can use EnvironmentConfiguration
to customize the system properties used for that environment:
@Environment(DirectRunnerEnvironment.class)
@EnvironmentConfiguration(
    environment = "Direct",
    systemProperties = @EnvironmentConfiguration.Property(key = "beamTestPipelineOptions", value = "..."))

@Environment(SparkRunnerEnvironment.class)
@EnvironmentConfiguration(
    environment = "Spark",
    systemProperties = @EnvironmentConfiguration.Property(key = "beamTestPipelineOptions", value = "..."))

@Environment(FlinkRunnerEnvironment.class)
@EnvironmentConfiguration(
    environment = "Flink",
    systemProperties = @EnvironmentConfiguration.Property(key = "beamTestPipelineOptions", value = "..."))
class MyBeamTest {

    @EnvironmentalTest
    void execute() {
        // run some pipeline
    }
}
if you set the system property <environment name>.skip=true then the environment related executions will be skipped.
|
Advanced usage
this usage assumes Beam 2.4.0 is in used and the classloader fix about the PipelineOptions is merged.
|
Dependencies:
<dependencies>
  <dependency>
    <groupId>org.talend.sdk.component</groupId>
    <artifactId>component-runtime-junit</artifactId>
    <scope>test</scope>
  </dependency>
  <dependency>
    <groupId>org.junit.jupiter</groupId>
    <artifactId>junit-jupiter-api</artifactId>
    <scope>test</scope>
  </dependency>
  <dependency>
    <groupId>org.jboss.shrinkwrap.resolver</groupId>
    <artifactId>shrinkwrap-resolver-impl-maven</artifactId>
    <version>3.0.1</version>
    <scope>test</scope>
  </dependency>
  <dependency>
    <groupId>org.talend.sdk.component</groupId>
    <artifactId>component-runtime-beam</artifactId>
    <scope>test</scope>
  </dependency>
</dependencies>
These dependencies brings into the test scope the JUnit testing toolkit, the Beam integration and the multi-environment testing toolkit for JUnit.
Then using the fluent DSL to define jobs - which assumes your job is linear and each step sends a single value (no multi-input/multi-output), you can write this kind of test:
@Environment(ContextualEnvironment.class)
@Environment(DirectRunnerEnvironment.class)
class TheComponentTest {
    @EnvironmentalTest
    void testWithStandaloneAndBeamEnvironments() {
        from("myfamily://in?config=xxxx")
            .to("myfamily://out")
            .create()
            .execute();
        // add asserts on the output if needed
    }
}
It will execute the chain twice:
-
with a standalone environment to simulate the studio
-
with a beam (direct runner) environment to ensure the portability of your job
Secrets/Passwords and Maven
If you desire you can reuse your Maven settings.xml servers - including the encrypted ones.
org.talend.sdk.component.maven.MavenDecrypter will give you the ability to find a server username/password from
a server identifier:
final MavenDecrypter decrypter = new MavenDecrypter();
final Server decrypted = decrypter.find("my-test-server");
// decrypted.getUsername();
// decrypted.getPassword();
It is very useful to not store secrets and test on real systems on a continuous integration platform.
even if you don’t use maven on the platform you can generate the settings.xml and settings-security.xml files
to use that feature. See maven.apache.org/guides/mini/guide-encryption.html for more details.
|
Generating data?
Several data generator exists if you want to populate objects with a semantic a bit more evolved than a plain random string
like commons-lang3:
A bit more advanced, these ones allow to bind directly generic data on a model - but data quality is not always there:
Note there are two main kind of implementations:
-
the one using a pattern and random generated data
-
a set of precomputed data extrapolated to create new values
Check against your use case to know which one is the best.
| an interesting alternative to data generation is to import real data and use Talend Studio to sanitize the data (remove sensitive information replacing them by generated data or anonymized data) and just inject that file into the system. |
If you are using JUnit 5, you can have a look to glytching.github.io/junit-extensions/randomBeans which is pretty good on that topic.
Talend Component Testing Documentation
Best practises
| this part is mainly around tools usable with JUnit. You can use most of these techniques with TestNG as well, check out the documentation if you need to use TestNG. |
Parameterized tests
This is a great solution to repeat the same test multiple times. Overall idea
is to define a test scenario (I test function F) and to make the input/output data
dynamic.
JUnit 4
Here is an example. Let’s assume we have this test which validates the connection URI using ConnectionService:
public class MyConnectionURITest {
    @Test
    public void checkMySQL() {
        assertTrue(new ConnectionService().isValid("jdbc:mysql://localhost:3306/mysql"));
    }

    @Test
    public void checkOracle() {
        assertTrue(new ConnectionService().isValid("jdbc:oracle:thin:@//myhost:1521/oracle"));
    }
}
We clearly identify the test method is always the same except the value. It can therefore be rewritter
using JUnit Parameterized runner like that:
@RunWith(Parameterized.class) (1)
public class MyConnectionURITest {

    @Parameterized.Parameters(name = "{0}") (2)
    public static Iterable<String> uris() { (3)
        return asList(
            "jdbc:mysql://localhost:3306/mysql",
            "jdbc:oracle:thin:@//myhost:1521/oracle");
    }

    @Parameterized.Parameter (4)
    public String uri;

    @Test
    public void isValid() { (5)
        assertNotNull(uri);
    }
}| 1 | Parameterized is the runner understanding @Parameters and how to use it. Note that you can generate random data here if desired. |
| 2 | by default the name of the executed test is the index of the data, here we customize it using the first parameter toString() value to have something more readable |
| 3 | the @Parameters method MUST be static and return an array or iterable of the data used by the tests |
| 4 | you can then inject the current data using @Parameter annotation, it can take a parameter if you use an array of array instead of an iterable of object in @Parameterized and you can select which item you want injected this way |
| 5 | the @Test method will be executed using the contextual data, in this sample we’ll get executed twice with the 2 specified urls |
you don’t have to define a single @Test method, if you define multiple, each of them will be executed with all the data (ie if we add a test in previous example you will get 4 tests execution - 2 per data, ie 2x2)
|
JUnit 5
JUnit 5 reworked this feature to make it way easier to use. The full documentation is available at junit.org/junit5/docs/current/user-guide/#writing-tests-parameterized-tests.
The main difference is you can also define inline on the test method that it is a parameterized test and which are the values:
@ParameterizedTest
@ValueSource(strings = { "racecar", "radar", "able was I ere I saw elba" })
void mytest(String currentValue) {
    // do test
}
However you can still use the previous behavior using a method binding configuration:
@ParameterizedTest
@MethodSource("stringProvider")
void mytest(String currentValue) {
    // do test
}

static Stream<String> stringProvider() {
    return Stream.of("foo", "bar");
}
This last option allows you to inject any type of value - not only primitives - which is very common to define scenarii.
don’t forget to add junit-jupiter-params dependency to benefit from this feature.
|
component-runtime-testing
component-runtime-junit
component-runtime-junit is a small test library allowing you to validate simple logic based on Talend Component tooling.
To import it add to your project the following dependency:
<dependency>
  <groupId>org.talend.sdk.component</groupId>
  <artifactId>component-runtime-junit</artifactId>
  <version>${talend-component.version}</version>
  <scope>test</scope>
</dependency>
This dependency also provide some mocked components that you can use with your own component to create tests.
The mocked components are provided under the family test :
-
emitter: a mock of an input component -
collector: a mock of an output component
JUnit 4
Then you can define a standard JUnit test and use the SimpleComponentRule rule:
public class MyComponentTest {

    @Rule (1)
    public final SimpleComponentRule components = new SimpleComponentRule("org.talend.sdk.component.mycomponent.");

    @Test
    public void produce() {
        Job.components() (2)
             .component("mycomponent","yourcomponentfamily://yourcomponent?"+createComponentConfig())
             .component("collector", "test://collector")
           .connections()
             .from("mycomponent").to("collector")
           .build()
           .run();

        final List<MyRecord> records = components.getCollectedData(MyRecord.class); (3)
        doAssertRecords(records); // depending your test
    }
}| 1 | the rule will create a component manager and provide two mock components: an emitter and a collector. Don’t forget to set the root package of your component to enable it. |
| 2 | you define any chain you want to test, it generally uses the mock as source or collector |
| 3 | you validate your component behavior, for a source you can assert the right records were emitted in the mock collect |
JUnit 5
The JUnit 5 integration is mainly the same as for JUnit 4 except it uses the new JUnit 5 extension mecanism.
The entry point is the @WithComponents annotation you put on your test class which takes the
component package you want to test and you can use @Injected to inject in a test class field an instance of ComponentsHandler
which exposes the same utilities than the JUnit 4 rule:
@WithComponents("org.talend.sdk.component.junit.component") (1)
public class ComponentExtensionTest {
    @Injected (2)
    private ComponentsHandler handler;

    @Test
    public void manualMapper() {
        final Mapper mapper = handler.createMapper(Source.class, new Source.Config() {

            {
                values = asList("a", "b");
            }
        });
        assertFalse(mapper.isStream());
        final Input input = mapper.create();
        assertEquals("a", input.next());
        assertEquals("b", input.next());
        assertNull(input.next());
    }
}| 1 | The annotation defines which components to register in the test context. |
| 2 | The field allows to get the handler to be able to orchestrate the tests. |
if it is the first time you use JUnit 5, don’t forget the imports changed and you must use org.junit.jupiter.api.Test instead of org.junit.Test.
Some IDE versions and surefire versions can also need you to install either a plugin or a specific configuration.
|
Mocking the output
Using the component "test"/"collector" as in previous sample stores all records emitted by the chain (typically your source)
in memory, you can then access them using theSimpleComponentRule.getCollectoedRecord(type). Note that this method filters by type,
if you don’t care of the type just use Object.class.
Mocking the input
The input mocking is symmetric to the output but here you provide the data you want to inject:
public class MyComponentTest {

    @Rule
    public final SimpleComponentRule components = new SimpleComponentRule("org.talend.sdk.component.mycomponent.");

    @Test
    public void produce() {
        components.setInputData(asList(createData(), createData(), createData())); (1)

        Job.components() (2)
             .component("emitter","test://emitter")
             .component("out", "yourcomponentfamily://myoutput?"+createComponentConfig())
           .connections()
              .from("emitter").to("out")
           .build
           .run();

        assertMyOutputProcessedTheInputData();
    }
}| 1 | using setInputData you prepare the execution(s) to have a fake input when using "test"/"emitter" component. |
Creating runtime configuration from component configuration
The component configuration is a POJO (using @Option on fields) and the runtime configuration (ExecutionChainBuilder) uses
a Map<String, String>. To make the conversion easier, the JUnit integration provides a SimpleFactory.configurationByExample utility
to get this map instance from a configuration instance.
Example:
final MyComponentConfig componentConfig = new MyComponentConfig();
componentConfig.setUser("....");
// .. other inits

final Map<String, String> configuration = configurationByExample(componentConfig);
The same factory provides a fluent DSL to create configuration calling configurationByExample without any parameter.
The advantage is to be able to convert an object as a Map<String, String> as seen previously or as a query string
to use it with the Job DSL:
final String uri = "family://component?" +
    configurationByExample().forInstance(componentConfig).configured().toQueryString();
It handles the encoding of the URI to ensure it is correctly done.
Testing a Mapper
The SimpleComponentRule also allows to test a mapper unitarly, you can get an instance from a configuration
and you can execute this instance to collect the output. Here is a snippet doing that:
public class MapperTest {

    @ClassRule
    public static final SimpleComponentRule COMPONENT_FACTORY = new SimpleComponentRule(
            "org.company.talend.component");

    @Test
    public void mapper() {
        final Mapper mapper = COMPONENT_FACTORY.createMapper(MyMapper.class, new Source.Config() {{
            values = asList("a", "b");
        }});
        assertEquals(asList("a", "b"), COMPONENT_FACTORY.collectAsList(String.class, mapper));
    }
}
Testing a Processor
As for the mapper a processor is testable unitary. The case is a bit more complex since you can have multiple inputs and outputs:
public class ProcessorTest {

    @ClassRule
    public static final SimpleComponentRule COMPONENT_FACTORY = new SimpleComponentRule(
            "org.company.talend.component");

    @Test
    public void processor() {
        final Processor processor = COMPONENT_FACTORY.createProcessor(Transform.class, null);
        final SimpleComponentRule.Outputs outputs = COMPONENT_FACTORY.collect(processor,
                        new JoinInputFactory().withInput("__default__", asList(new Transform.Record("a"), new Transform.Record("bb")))
                                              .withInput("second", asList(new Transform.Record("1"), new Transform.Record("2")))
                );
        assertEquals(2, outputs.size());
        assertEquals(asList(2, 3), outputs.get(Integer.class, "size"));
        assertEquals(asList("a1", "bb2"), outputs.get(String.class, "value"));
    }
}
Here again the rule allows you to instantiate a Processor from your code
and then to collect the output from the inputs you pass in. There are two convenient implementation
of the input factory:
-
MainInputFactoryfor processors using only the default input. -
JoinInputfactoryfor processors using multiple inputs have a methodwithInput(branch, data)The first arg is the branch name and the second arg is the data used by the branch.
you can also implement your own input representation if needed implementing org.talend.sdk.component.junit.ControllableInputFactory.
|
component-runtime-testing-spark
The folowing artifact will allow you to test against a spark cluster:
<dependency>
  <groupId>org.talend.sdk.component</groupId>
  <artifactId>component-runtime-testing-spark</artifactId>
  <version>${talend-component.version}</version>
  <scope>test</scope>
</dependency>
JUnit 4
The usage relies on a JUnit TestRule. It is recommended to use it as a @ClassRule to ensure
a single instance of a spark cluster is built but you can also use it as a simple @Rule which means
it will be created per method instead of per test class.
It takes as parameter the spark and scala version to use. It will then fork a master and N slaves.
Finally it will give you submit* method allowing you to send jobs either from the test classpath
or from a shade if you run it as an integration test.
Here is a sample:
public class SparkClusterRuleTest {

    @ClassRule
    public static final SparkClusterRule SPARK = new SparkClusterRule("2.10", "1.6.3", 1);

    @Test
    public void classpathSubmit() throws IOException {
        SPARK.submitClasspath(SubmittableMain.class, getMainArgs());

        // do wait the test passed
    }
}
this is working with @Parameterized so you can submit a bunch of jobs with different args and even combine it with beam TestPipeline if you make it transient!
|
JUnit 5
The integration with JUnit 5 of that spark cluster logic uses @WithSpark marker for the extension
and let you, optionally, inject through @SparkInject, the BaseSpark<?> handler to access te spark cluster
meta information - like its host/port.
Here is a basic test using it:
@WithSpark
class SparkExtensionTest {

    @SparkInject
    private BaseSpark<?> spark;

    @Test
    void classpathSubmit() throws IOException {
        final File out = new File(jarLocation(SparkClusterRuleTest.class).getParentFile(), "classpathSubmitJunit5.out");
        if (out.exists()) {
            out.delete();
        }
        spark.submitClasspath(SparkClusterRuleTest.SubmittableMain.class, spark.getSparkMaster(), out.getAbsolutePath());

        await().atMost(5, MINUTES).until(
                () -> out.exists() ? Files.readAllLines(out.toPath()).stream().collect(joining("\n")).trim() : null,
                equalTo("b -> 1\na -> 1"));
    }
}
How to know the job is done
In current state, SparkClusterRule doesn’t allow to know a job execution is done - even if it exposes the webui url so
you can poll it to check. The best at the moment is to ensure the output of your job exists and contains the right value.
awaitability or equivalent library can help you to write such logic.
Here are the coordinates of the artifact:
<dependency>
  <groupId>org.awaitility</groupId>
  <artifactId>awaitility</artifactId>
  <version>3.0.0</version>
  <scope>test</scope>
</dependency>
And here is how to wait a file exists and its content (for instance) is the expected one:
await()
    .atMost(5, MINUTES)
    .until(
        () -> out.exists() ? Files.readAllLines(out.toPath()).stream().collect(joining("\n")).trim() : null,
        equalTo("the expected content of the file"));
component-runtime-http-junit
The HTTP JUnit module allows you to mock REST API very easily. Here are its coordinates:
<dependency>
  <groupId>org.talend.sdk.component</groupId>
  <artifactId>component-runtime-junit</artifactId>
  <version>${talend-component.version}</version>
  <scope>test</scope>
</dependency>
this module uses Apache Johnzon and Netty, if you have any conflict (in particular with netty) you can add the classifier shaded
to the dependency and the two dependencies are shaded avoiding the conflicts with your component.
|
It supports JUnit 4 and JUnit 5 as well but the overall concept is the exact same one: the extension/rule is able to serve precomputed responses saved in the classpath.
You can plug your own ResponseLocator to map a request to a response but the default implementation - which should be sufficient
in most cases - will look in talend/testing/http/<class name>_<method name>.json. Note that you can also put it
in talend/testing/http/<request path>.json.
JUnit 4
JUnit 4 setup is done through two rules: JUnit4HttpApi which is responsible to start the server and JUnit4HttpApiPerMethodConfigurator
which is responsible to configure the server per test and also handle the capture mode (see later).
if you don’t use the JUnit4HttpApiPerMethodConfigurator, the capture feature will be deactivated and the per test mocking will not be available.
|
Most of the test will look like:
public class MyRESTApiTest {
    @ClassRule
    public static final JUnit4HttpApi API = new JUnit4HttpApi();

    @Rule
    public final JUnit4HttpApiPerMethodConfigurator configurator = new JUnit4HttpApiPerMethodConfigurator(API);

    @Test
    public void direct() throws Exception {
        // ... do your requests
    }
}
SSL
For tests using SSL based services, you will need to use activeSsl() on the JUnit4HttpApi rule.
If you need to access the server ssl socket factory you can do it from the HttpApiHandler (the rule):
@ClassRule
public static final JUnit4HttpApi API = new JUnit4HttpApi().activeSsl();

@Test
public void test() throws Exception {
    final HttpsURLConnection connection = getHttpsConnection();
    connection.setSSLSocketFactory(API.getSslContext().getSocketFactory());
    // ....
}
JUnit 5
JUnit 5 uses a JUnit 5 extension based on the HttpApi annotation you can put on your test class. You can inject
the test handler (which has some utilities for advanced cases) through @HttpApiInject:
@HttpApi
class JUnit5HttpApiTest {
    @HttpApiInject
    private HttpApiHandler<?> handler;

    @Test
    void getProxy() throws Exception {
        // .... do your requests
    }
}
the injection is optional and the @HttpApi allows you to configure several behaviors of the test.
|
SSL
For tests using SSL based services, you will need to use @HttpApi(useSsl = true).
You can access the client SSL socket factory through the api handler:
@HttpApi*(useSsl = true)*
class MyHttpsApiTest {
    @HttpApiInject
    private HttpApiHandler<?> handler;

    @Test
    void test() throws Exception {
        final HttpsURLConnection connection = getHttpsConnection();
        connection.setSSLSocketFactory(handler.getSslContext().getSocketFactory());
        // ....
    }
}
Capturing mode
The strength of this implementation is to run a small proxy server and auto configure the JVM:
http[s].proxyHost, http[s].proxyPort, HttpsURLConnection#defaultSSLSocketFactory and SSLContext#default
are auto configured to work out of the box with the proxy.
It allows you to keep in your tests the native and real URLs. For instance this test is perfectlt valid:
public class GoogleTest {
    @ClassRule
    public static final JUnit4HttpApi API = new JUnit4HttpApi();

    @Rule
    public final JUnit4HttpApiPerMethodConfigurator configurator = new JUnit4HttpApiPerMethodConfigurator(API);

    @Test
    public void google() throws Exception {
        assertEquals(HttpURLConnection.HTTP_OK, get("https://google.fr?q=Talend"));
    }

    private int get(final String uri) throws Exception {
        // do the GET request, skipped for brievity
    }
}
If you execute this test, it will fail with a HTTP 400 because the proxy doesn’t find the mocked response.
You can create it manually as seen in the introduction of the module but you can also set the property talend.junit.http.capture
to the folder where to store the captures. It must be the root folder and not the folder where the json are (ie not prefixed by talend/testing/http by default).
Generally you will want to use src/test/resources. If new File("src/test/resources") resolves to the valid folder when executing your test (Maven default),
then you can just set the system property to true, otherwise you need to adjust accordingly the system property value.
Once you ran the tests with this system property, the testing framework will have created the correct mock response files and you can
remove the system property. The test will still pass, using google.com…even if you disconnect your machine from the internet.
The rule (extension) is doing all the work for you :).
Beam testing
If you want to ensure your component works in Beam the minimum to do is to try with the direct runner (if you don’t want to use spark).
Check beam.apache.org/contribute/testing/ out for more details.
Multiple environments for the same tests
JUnit (4 or 5) already provides some ways to parameterized tests and execute the same "test logic" against several data. However it is not that convenient to test multiple environments.
For instance, with Beam, you can desire to test against multiple runners your code and it requires to solve conflicts between runner dependencies, setup the correct classloaders etc…It is a lot of work!
To simplify such cases, the framework provides you a multi-environment support for your tests.
It is in the junit module and is usable with JUnit 4 and JUnit 5.
JUnit 4
@RunWith(MultiEnvironmentsRunner.class)
@Environment(Env1.class)
@Environment(Env2.class)
public class TheTest {
    @Test
    public void test1() {
        // ...
    }
}
The MultiEnvironmentsRunner will execute the test(s) for each defined environments. It means it will
run test1 for Env1 and Env2 in previous example.
By default JUnit4 runner will be used to execute the tests in one environment but you can use @DelegateRunWith
to use another runner.
JUnit 5
JUnit 5 configuration is close to JUnit 4 one:
@Environment(EnvironmentsExtensionTest.E1.class)
@Environment(EnvironmentsExtensionTest.E2.class)
class TheTest {

    @EnvironmentalTest
    void test1() {
        // ...
    }
}
The main difference is you don’t use a runner (it doesn’t exist in JUnit 5) and you replace @Test by @EnvironmentalTest.
the main difference with JUnit 4 integration is that the tests are execute one after each other for all environments
instead of running all tests in each environments sequentially. It means, for instance, that @BeforeAll and @AfterAll are executed
once for all runners.
|
Provided environments
The provided environment setup the contextual classloader to load the related runner of Apache Beam.
Package: org.talend.sdk.component.junit.environment.builtin.beam
| the configuration is read from system properties, environment variables, …. |
| Class | Name | Description |
|---|---|---|
ContextualEnvironment |
Contextual |
Contextual runner |
DirectRunnerEnvironment |
Direct |
Direct runner |
FlinkRunnerEnvironment |
Flink |
Flink runner |
SparkRunnerEnvironment |
Spark |
Spark runner |
Configuring environments
If the environment extends BaseEnvironmentProvider and therefore defines an environment name - which is the case of the default ones, you can use EnvironmentConfiguration
to customize the system properties used for that environment:
@Environment(DirectRunnerEnvironment.class)
@EnvironmentConfiguration(
    environment = "Direct",
    systemProperties = @EnvironmentConfiguration.Property(key = "beamTestPipelineOptions", value = "..."))

@Environment(SparkRunnerEnvironment.class)
@EnvironmentConfiguration(
    environment = "Spark",
    systemProperties = @EnvironmentConfiguration.Property(key = "beamTestPipelineOptions", value = "..."))

@Environment(FlinkRunnerEnvironment.class)
@EnvironmentConfiguration(
    environment = "Flink",
    systemProperties = @EnvironmentConfiguration.Property(key = "beamTestPipelineOptions", value = "..."))
class MyBeamTest {

    @EnvironmentalTest
    void execute() {
        // run some pipeline
    }
}
if you set the system property <environment name>.skip=true then the environment related executions will be skipped.
|
Advanced usage
this usage assumes Beam 2.4.0 is in used and the classloader fix about the PipelineOptions is merged.
|
Dependencies:
<dependencies>
  <dependency>
    <groupId>org.talend.sdk.component</groupId>
    <artifactId>component-runtime-junit</artifactId>
    <scope>test</scope>
  </dependency>
  <dependency>
    <groupId>org.junit.jupiter</groupId>
    <artifactId>junit-jupiter-api</artifactId>
    <scope>test</scope>
  </dependency>
  <dependency>
    <groupId>org.jboss.shrinkwrap.resolver</groupId>
    <artifactId>shrinkwrap-resolver-impl-maven</artifactId>
    <version>3.0.1</version>
    <scope>test</scope>
  </dependency>
  <dependency>
    <groupId>org.talend.sdk.component</groupId>
    <artifactId>component-runtime-beam</artifactId>
    <scope>test</scope>
  </dependency>
</dependencies>
These dependencies brings into the test scope the JUnit testing toolkit, the Beam integration and the multi-environment testing toolkit for JUnit.
Then using the fluent DSL to define jobs - which assumes your job is linear and each step sends a single value (no multi-input/multi-output), you can write this kind of test:
@Environment(ContextualEnvironment.class)
@Environment(DirectRunnerEnvironment.class)
class TheComponentTest {
    @EnvironmentalTest
    void testWithStandaloneAndBeamEnvironments() {
        from("myfamily://in?config=xxxx")
            .to("myfamily://out")
            .create()
            .execute();
        // add asserts on the output if needed
    }
}
It will execute the chain twice:
-
with a standalone environment to simulate the studio
-
with a beam (direct runner) environment to ensure the portability of your job
Secrets/Passwords and Maven
If you desire you can reuse your Maven settings.xml servers - including the encrypted ones.
org.talend.sdk.component.maven.MavenDecrypter will give you the ability to find a server username/password from
a server identifier:
final MavenDecrypter decrypter = new MavenDecrypter();
final Server decrypted = decrypter.find("my-test-server");
// decrypted.getUsername();
// decrypted.getPassword();
It is very useful to not store secrets and test on real systems on a continuous integration platform.
even if you don’t use maven on the platform you can generate the settings.xml and settings-security.xml files
to use that feature. See maven.apache.org/guides/mini/guide-encryption.html for more details.
|
Generating data?
Several data generator exists if you want to populate objects with a semantic a bit more evolved than a plain random string
like commons-lang3:
A bit more advanced, these ones allow to bind directly generic data on a model - but data quality is not always there:
Note there are two main kind of implementations:
-
the one using a pattern and random generated data
-
a set of precomputed data extrapolated to create new values
Check against your use case to know which one is the best.
| an interesting alternative to data generation is to import real data and use Talend Studio to sanitize the data (remove sensitive information replacing them by generated data or anonymized data) and just inject that file into the system. |
If you are using JUnit 5, you can have a look to glytching.github.io/junit-extensions/randomBeans which is pretty good on that topic.
Talend Component Best Practices
Organize your code
Few recommendations apply to the way a component packages are organized:
-
ensure to create a
package-info.javawith the component family/categories at the root of your component package:
@Components(family = "jdbc", categories = "Database")
package org.talend.sdk.component.jdbc;

import org.talend.sdk.component.api.component.Components;-
create a package for the configuration
-
create a package for the actions
-
create a package for the component and one subpackage by type of component (input, output, processors, …)
Model your configuration
It is recommended to ensure your configuration is serializable since it is likely you will pass it through your components which can be serialized.
I/O configuration
The first step to build a component is to identify the way it must be configured.
It is generally split into two main big concepts:
-
the DataStore which is the way you can access the backend
-
the DataSet which is the way you interact with the backend
Here are some examples to let you get an idea of what you put in each categories:
| Example description | DataStore | DataSet |
|---|---|---|
Accessing a relational database like MySQL |
the JDBC driver, url, username and password |
the query to execute, row mapper, … |
Access a file system |
the file pattern (or directory + file extension/prefix/…) |
the file format, potentially the buffer size, … |
It is common to make the dataset including the datastore since both are required to work. However it is recommended to replace this pattern by composing both in a higher level configuration model:
@DataSet
public class MyDataSet {
    // ...
}

@DataStore
public class MyDataStore {
    // ...
}


public class MyComponentConfiguration {
    @Option
    private MyDataSet dataset;

    @Option
    private MyDataStore datastore;
}
Processor configuration
Processor configuration is simpler than I/O configuration since it is specific each time. For instance a mapper will take the mapping between the input and output model:
public class MappingConfiguration {
    @Option
    private Map<String, String> fieldsMapping;

    @Option
    private boolean ignoreCase;

    //...
}
I/O recommendations
I/O are particular because they can be linked to a set of actions. It is recommended to wire all the ones you can apply to ensure the consumers of your component can provide a rich experience to their users.
Here are the most common ones:
| Type | Action | Description | Configuration example | Action example |
|---|---|---|---|---|
DataStore |
|
Expose a way to ensure the datastore/connection works |
|
|
I/O limitations
Until the studio integration is complete, it is recommended to limit processors to 1 input.
Handle UI interactions
It is also recommended to provide as much information as possible to let the UI work with the data during its edition.
Validations
Light validations
The light validations are all the validations you can execute on the client side. They are listed in the UI hint part.
This is the ones to use first before going with custom validations since they will be more efficient.
Custom validations
These ones will enforce custom code to be executed, they are more heavy so try to avoid to use them for simple validations you can do with the previous part.
Here you define an action taking some parameters needed for the validation and you link the option you want to validate to this action. Here is an example to validate a dataset. For example for our JDBC driver we could have:
// ...
public class JdbcDataStore
  implements Serializable {

  @Option
  @Validable("driver")
  private String driver;

  // ...
}

@AsyncValidation("driver")
public ValidationResult validateDriver(@Option("value") String driver) {
  if (findDriver(driver) != null) {
    return new ValidationResult(Status.OK, "Driver found");
  }
  return new ValidationResult(Status.KO, "Driver not found");
}
Note that you can also make a class validable and you can use it to validate a form if you put it on your whole configuration:
// note: some part of the API were removed for brievity

public class MyConfiguration {

  // a lot of @Options
}

public MyComponent {
    public MyComponent(@Validable("configuration") MyConfiguration config) {
        // ...
    }

    //...
}

@AsyncValidation("configuration")
public ValidationResult validateDriver(@Option("value") MyConfiguration configuration) {
  if (isValid(configuration)) {
    return new ValidationResult(Status.OK, "Configuration valid");
  }
  return new ValidationResult(Status.KO, "Driver not valid ${because ...}");
}
the parameter binding of the validation method uses the same logic than the component configuration
injection. Therefore the @Option specifies the prefix to use to reference a parameter. It is recommended to
use @Option("value") until you know exactly why you don’t use it. This way the consumer can match the configuration
model and just prefix it with value. to send the instance to validate.
|
Completion
It can be neat and user friendly to provide completion on some fields. Here an example for the available drivers:
// ...
public class JdbcDataStore
  implements Serializable {

  @Option
  @Completable("driver")
  private String driver;

  // ...
}

@Completion("driver")
public CompletionList findDrivers() {
    return new CompletionList(findDriverList());
}
Don’t forget the component representation
Each component must have its own icon:
@Icon(Icon.IconType.DB_INPUT)
@PartitionMapper(family = "jdbc", name = "input")
public class JdbcPartitionMapper
    implements Serializable {
}| you can use talend.surge.sh/icons/ to identify the one you want to use. |
Version and component
Not mandatory for the first version but recommended: enforce the version of your component.
@Version(1)
@PartitionMapper(family = "jdbc", name = "input")
public class JdbcPartitionMapper
    implements Serializable {
}
If you break a configuration entry in a later version ensure to:
-
upgrade the version
-
support a migration of the configuration
@Version(value = 2, migrationHandler = JdbcPartitionMapper.Migrations.class)
@PartitionMapper(family = "jdbc", name = "input")
public class JdbcPartitionMapper
    implements Serializable {

    public static class Migrations implements MigrationHandler {
        // implement your migration
    }
}Talend Component REST API Documentation
| a test environment is available on Heroku and browable using Talend Component Kit Server Restlet Studio instance. |
HTTP API
The HTTP API intends to expose over HTTP most of Talend Component features, it is a standalone Java HTTP server.
WebSocket protocol is activated for the endpoints as well, instead of /api/v1 they uses the base /websocket/v1, see WebSocket part for more details.
|
Here is the API:
REST resources of Component Runtime :: Server
0.0.8-SNAPSHOT
POST api/v1/action/execute
This endpoint will execute any UI action and serialize the response as a JSON (pojo model) It takes as input the family, type and name of the related action to identify it and its configuration as a flat key value set using the same kind of mapping than for components (option path as key).
Request
Content-Type: application/json
Request Body: (java.util.Map<java.lang.String, java.lang.String>)
Query Param: action, java.lang.String
Query Param: family, java.lang.String
Query Param: type, java.lang.String
Response
Content-Type: application/json
GET api/v1/action/index
This endpoint returns the list of available actions for a certain family and potentially filters the " output limiting it to some families and types of actions.
Request
No body
Query Param: family, java.lang.String
Query Param: language, java.lang.String
Query Param: type, java.lang.String
Response
Content-Type: application/json
200 OKResponse Body: (org.talend.sdk.component.server.front.model.ActionList)
{
    "items": [
        {
            "component": "string",
            "name": "string",
            "properties": [
                {
                    "defaultValue": "string",
                    "displayName": "string",
                    "metadata": {
                    },
                    "name": "string",
                    "path": "string",
                    "placeholder": "string",
                    "proposalDisplayNames": {
                    },
                    "type": "string",
                    "validation": {
                        "enumValues": [
                            "string"
                        ],
                        "max": 0,
                        "maxItems": 0,
                        "maxLength": 0,
                        "min": 0,
                        "minItems": 0,
                        "minLength": 0,
                        "pattern": "string",
                        "required": false,
                        "uniqueItems": false
                    }
                }
            ],
            "type": "string"
        }
    ]
}
GET api/v1/component/dependencies
Returns a list of dependencies for the given components.
| don’t forget to add the component itself since it will not be part of the dependencies. |
Then you can use /dependency/{id} to download the binary.
GET api/v1/component/dependency/{id}
Return a binary of the dependency represented by id.
It can be maven coordinates for dependencies or a component id.
GET api/v1/component/details
Returns the set of metadata about a few components identified by their 'id'.
Response
Content-Type: application/json
200 OKResponse Body: (org.talend.sdk.component.server.front.model.ComponentDetailList)
{
    "details": [
        {
            "actions": [
                {
                    "family": "string",
                    "name": "string",
                    "properties": [
                        {
                            "defaultValue": "string",
                            "displayName": "string",
                            "metadata": {
                            },
                            "name": "string",
                            "path": "string",
                            "placeholder": "string",
                            "proposalDisplayNames": {
                            },
                            "type": "string",
                            "validation": {
                                "enumValues": [
                                    "string"
                                ],
                                "max": 0,
                                "maxItems": 0,
                                "maxLength": 0,
                                "min": 0,
                                "minItems": 0,
                                "minLength": 0,
                                "pattern": "string",
                                "required": false,
                                "uniqueItems": false
                            }
                        }
                    ],
                    "type": "string"
                }
            ],
            "displayName": "string",
            "icon": "string",
            "id": {
                "family": "string",
                "familyId": "string",
                "id": "string",
                "name": "string",
                "plugin": "string",
                "pluginLocation": "string"
            },
            "inputFlows": [
                "string"
            ],
            "links": [
                {
                    "contentType": "string",
                    "name": "string",
                    "path": "string"
                }
            ],
            "outputFlows": [
                "string"
            ],
            "properties": [
                {
                    "defaultValue": "string",
                    "displayName": "string",
                    "metadata": {
                    },
                    "name": "string",
                    "path": "string",
                    "placeholder": "string",
                    "proposalDisplayNames": {
                    },
                    "type": "string",
                    "validation": {
                        "enumValues": [
                            "string"
                        ],
                        "max": 0,
                        "maxItems": 0,
                        "maxLength": 0,
                        "min": 0,
                        "minItems": 0,
                        "minLength": 0,
                        "pattern": "string",
                        "required": false,
                        "uniqueItems": false
                    }
                }
            ],
            "type": "string",
            "version": 0
        }
    ]
}GET api/v1/component/icon/family/{id}
Returns a particular family icon in raw bytes.
GET api/v1/component/icon/{id}
Returns a particular component icon in raw bytes.
GET api/v1/component/index
Returns the list of available components.
Response
Content-Type: application/json
200 OKResponse Body: (org.talend.sdk.component.server.front.model.ComponentIndices)
{
    "components": [
        {
            "categories": [
                "string"
            ],
            "displayName": "string",
            "familyDisplayName": "string",
            "icon": {
                "customIcon": {
                },
                "customIconType": "string",
                "icon": "string"
            },
            "iconFamily": {
                "customIcon": {
                },
                "customIconType": "string",
                "icon": "string"
            },
            "id": {
                "family": "string",
                "familyId": "string",
                "id": "string",
                "name": "string",
                "plugin": "string",
                "pluginLocation": "string"
            },
            "links": [
                {
                    "contentType": "string",
                    "name": "string",
                    "path": "string"
                }
            ],
            "version": 0
        }
    ]
}
POST api/v1/component/migrate/{id}/{configurationVersion}
Allows to migrate a component configuration without calling any component execution.
GET api/v1/configurationtype/details
Returns the set of metadata about a few configurations identified by their 'id'.
GET api/v1/configurationtype/index
Returns all available configuration type - storable models. Note that the lightPayload flag allows to load all of them at once when you eagerly need to create a client model for all configurations.
POST api/v1/configurationtype/migrate/{id}/{configurationVersion}
Allows to migrate a configuration without calling any component execution.
GET api/v1/documentation/component/{id}
Returns an asciidoctor version of the documentation for the component represented by its identifier id.
Format can be either asciidoc or html - if not it will fallback on asciidoc - and if html is selected you get a partial document.
| it is recommended to use asciidoc format and handle the conversion on your side if you can, the html flavor handles a limited set of the asciidoc syntax only like plain arrays, paragraph and titles. |
The documentation will likely be the family documentation but you can use anchors to access a particular component (_componentname_inlowercase).
GET api/v1/environment
Returns the environment of this instance. Useful to check the version or configure a healthcheck for the server.
POST api/v1/execution/read/{family}/{component}
| deprecated |
Read inputs from an instance of mapper. The number of returned records if enforced to be limited to 1000. The format is a JSON based format where each like is a json record.
POST api/v1/execution/write/{family}/{component}
| deprecated |
Sends records using a processor instance. Note that the processor should have only an input. Behavior for other processors is undefined. The input format is a JSON based format where each like is a json record - same as for the symmetric endpoint.
Deprecated endpoints
If some endpoints are intended to disappear they will be deprecated. In practise it means a header X-Talend-Warning
will be returned with some message as value.
WebSocket transport
You can connect on any endpoint replacing /api by /websocket and appending /<http method> for the URL and formatting the request as:
SEND
destination: <endpoint after v1>
<headers>

<payload>^@
For instance:
SEND
destination: /component/index
Accept: application/json

^@
The response is formatted as follow:
MESSAGE
status: <http status code>
<headers>

<payload>^@| if you have a doubt about the endpoint, they are all logged during startup and you can find them in the logs. |
If you don’t want to create a pool of connection per endpoint/verb you can use the bus endpoint: /websocket/v1/bus.
This endpoint requires that you add the header destinationMethod to each request with the verb value - default would be GET:
SEND
destination: /component/index
destinationMethod: GET
Accept: application/json

^@
HTTPS activation
Using the server zip (or Docker image)
you can configure HTTPS adding properties to MEECROWAVE_OPTS. Assuming you have a certificate in /opt/certificates/component.p12
(don’t forget to add/mount it in the Docker image if you use it) you can activate it through:
# use -e for Docker
#
# this will skip the http port binding to only bind https on the port 8443 and setup the right certificate
export MEECROWAVE_OPTS="-Dskip-http=true -Dssl=true -Dhttps=8443 -Dkeystore-type=PKCS12 -Dkeystore-alias=talend -Dkeystore-password=talend -Dkeystore-file=/opt/certificates/component.p12"
Web forms and REST API
component-form library provides a way to build a component REST API facade compatible with react form library.
A trivial facade can be:
@Path("tacokit-facade")
@ApplicationScoped
public class ComponentFacade {
    private static final String[] EMPTY_ARRAY = new String[0];

    @Inject
    private Client client;

    @Inject
    private ActionService actionService;

    @Inject
    private UiSpecService uiSpecService;

    @Inject // assuming it is available in your app, use any client you want
    private WebTarget target;

    @POST
    @Path("action")
    public void action(@Suspended final AsyncResponse response, @QueryParam("family") final String family,
            @QueryParam("type") final String type, @QueryParam("action") final String action,
            final Map<String, Object> params) {
        client.action(family, type, action, params).handle((r, e) -> {
            if (e != null) {
                onException(response, e);
            } else {
                response.resume(actionService.map(type, r));
            }
            return null;
        });
    }

    @GET
    @Path("index")
    public void getIndex(@Suspended final AsyncResponse response,
            @QueryParam("language") @DefaultValue("en") final String language) {
        target
                .path("component/index")
                .queryParam("language", language)
                .request(APPLICATION_JSON_TYPE)
                .rx()
                .get(ComponentIndices.class)
                .toCompletableFuture()
                .handle((index, e) -> {
            if (e != null) {
                onException(response, e);
            } else {
                index.getComponents().stream().flatMap(c -> c.getLinks().stream()).forEach(
                        link -> link.setPath(link.getPath().replaceFirst("/component/", "/application/").replace(
                                "/details?identifiers=", "/detail/")));
                response.resume(index);
            }
            return null;
        });
    }

    @GET
    @Path("detail/{id}")
    public void getDetail(@Suspended final AsyncResponse response,
            @QueryParam("language") @DefaultValue("en") final String language, @PathParam("id") final String id) {
        target
                .path("component/details")
                .queryParam("language", language)
                .queryParam("identifiers", id)
                .request(APPLICATION_JSON_TYPE)
                .rx()
                .get(ComponentDetailList.class)
                .toCompletableFuture()
                .thenCompose(result -> uiSpecService.convert(result.getDetails().iterator().next()))
                .handle((result, e) -> {
                    if (e != null) {
                        onException(response, e);
                    } else {
                        response.resume(result);
                    }
                    return null;
                });
    }

    private void onException(final AsyncResponse response, final Throwable e) {
        final UiActionResult payload;
        final int status;
        if (WebException.class.isInstance(e)) {
            final WebException we = WebException.class.cast(e);
            status = we.getStatus();
            payload = actionService.map(we);
        } else if (CompletionException.class.isInstance(e)) {
            final CompletionException actualException = CompletionException.class.cast(e);
            log.error(actualException.getMessage(), actualException);
            status = Response.Status.BAD_GATEWAY.getStatusCode();
            payload = actionService.map(new WebException(actualException, -1, emptyMap()));
        } else {
            log.error(e.getMessage(), e);
            status = Response.Status.BAD_GATEWAY.getStatusCode();
            payload = actionService.map(new WebException(e, -1, emptyMap()));
        }
        response.resume(new WebApplicationException(Response.status(status).entity(payload).build()));
    }
}
the Client can be created using ClientFactory.createDefault(System.getProperty("app.components.base", "http://localhost:8080/api/v1"))
and the service can be a simple new UiSpecService(). The factory uses JAX-RS if the API is available (assuming a JSON-B provider is registered) otherwise it tries to use Spring.
|
All the conversion between component model (REST API) and uiSpec model is done through the UiSpecService. It is based on the object model
which will be mapped to a ui model. The advantage to have a flat model in the component REST API is to make these layers easy to customize.
You can completely control the available components, tune the rendering switching the uiSchema if desired or add/remove part of the form.
You can also add custom actions/buttons for specific needs of the application.
the /migrate endpoint has nothing special so was not shown in previous snippet but if you need it you must add it as well.
|
Use UiSpec model without all the tooling
<dependency>
  <groupId>org.talend.sdk.component</groupId>
  <artifactId>component-form-model</artifactId>
  <version>${talend-component-kit.version}</version>
</dependency>
This maven dependency provides the UISpec model classes. You can use the Ui API (with or without the builders)
to create UiSpec representations.
Example:
final Ui form1 = ui()
    // (1)
    .withJsonSchema(JsonSchema.jsonSchemaFrom(Form1.class).build())
    // (2)
    .withUiSchema(uiSchema()
        .withKey("multiSelectTag")
        .withRestricted(false)
        .withTitle("Simple multiSelectTag")
        .withDescription("This datalist accepts values that are not in the list of suggestions")
        .withWidget("multiSelectTag")
        .build())
    // (3)
    .withProperties(myFormInstance)
    .build();

// (4)
final String json = jsonb.toJson(form1);-
We extract the
JsonSchemafrom reflection on the classForm1. Note that@JsonSchemaIgnoreallows to ignore a field and@JsonSchemaPropertyallows to rename a property, -
We build programmatically using the builder API a
UiSchema, -
We pass an instance of the form to let the serializer extracts it JSON model,
-
We serialize the
Uimodel which can be used by UiSpec compatible front widgets.
| the model uses JSON-B API to define the binding, ensure to have an implementation in your classpath. This can be done adding these dependencies: |
<dependency>
  <groupId>org.apache.geronimo.specs</groupId>
  <artifactId>geronimo-jsonb_1.0_spec</artifactId>
  <version>1.0</version>
</dependency>
<dependency>
  <groupId>org.apache.geronimo.specs</groupId>
  <artifactId>geronimo-json_1.1_spec</artifactId>
  <version>1.0</version>
</dependency>
<dependency>
  <groupId>org.apache.johnzon</groupId>
  <artifactId>johnzon-jsonb</artifactId>
  <version>${johnzon.version}</version> <!-- 1.1.5 for instance -->
</dependency>
Javascript integration
Default javascript integration goes through Talend UI Forms library.
It is bundled as a NPM module called component-kit.js. It provides a default trigger implementation for the UIForm.
Here is how to use it:
import React from 'react';
import UIForm from '@talend/react-forms/lib/UIForm/UIForm.container';
import TalendComponentKitTrigger from 'component-kit.js';

export default class ComponentKitForm extends React.Component {
  constructor(props) {
    super(props);
    this.trigger = new TalendComponentKitTrigger({ url: '/api/to/component/server/proxy' });
    this.onTrigger = this.onTrigger.bind(this);
    // ...
  }

  onTrigger(event, payload) {
    return this.trigger.onDefaultTrigger(event, payload);
  }

  // ...

  render() {
    if(! this.state.uiSpec) {
      return (<div>Loading ...</div>);
    }

    return (
        <UIForm
          data={this.state.uiSpec}
          onTrigger={this.onTrigger}
          onSubmit={this.onSubmit}
        />
    );
  }
}
Logging
The logging uses Log4j2, you can specify a custom configuration using the system property -Dlog4j.configurationFile
or adding a log4j2.xml file into the classpath.
Here are some common configurations:
-
Console logging:
<?xml version="1.0"?>
<Configuration status="INFO">
  <Appenders>
    <Console name="Console" target="SYSTEM_OUT">
      <PatternLayout pattern="[%d{HH:mm:ss.SSS}][%highlight{%-5level}][%15.15t][%30.30logger] %msg%n"/>
    </Console>
  </Appenders>
  <Loggers>
    <Root level="INFO">
      <AppenderRef ref="Console"/>
    </Root>
  </Loggers>
</Configuration>
This outputs messages looking like:
[16:59:58.198][INFO ][ main][oyote.http11.Http11NioProtocol] Initializing ProtocolHandler ["http-nio-34763"]-
JSON logging:
<?xml version="1.0"?>
<Configuration status="INFO">
  <Properties>
    <!-- DO NOT PUT logSource there, it is useless and slow -->
    <Property name="jsonLayout">{"severity":"%level","logMessage":"%encode{%message}{JSON}","logTimestamp":"%d{ISO8601}{UTC}","eventUUID":"%uuid{RANDOM}","@version":"1","logger.name":"%encode{%logger}{JSON}","host.name":"${hostName}","threadName":"%encode{%thread}{JSON}","stackTrace":"%encode{%xThrowable{full}}{JSON}"}%n</Property>
  </Properties>
  <Appenders>
    <Console name="Console" target="SYSTEM_OUT">
      <PatternLayout pattern="${jsonLayout}"/>
    </Console>
  </Appenders>
  <Loggers>
    <Root level="INFO">
      <AppenderRef ref="Console"/>
    </Root>
  </Loggers>
</Configuration>
Output messages look like:
{"severity":"INFO","logMessage":"Initializing ProtocolHandler [\"http-nio-46421\"]","logTimestamp":"2017-11-20T16:04:01,763","eventUUID":"8b998e17-7045-461c-8acb-c43f21d995ff","@version":"1","logger.name":"org.apache.coyote.http11.Http11NioProtocol","host.name":"TLND-RMANNIBUCAU","threadName":"main","stackTrace":""}-
Rolling file appender
<?xml version="1.0"?>
<Configuration status="INFO">
  <Appenders>
    <RollingRandomAccessFile name="File" fileName="${LOG_PATH}/application.log" filePattern="${LOG_PATH}/application-%d{yyyy-MM-dd}.log">
      <PatternLayout pattern="[%d{HH:mm:ss.SSS}][%highlight{%-5level}][%15.15t][%30.30logger] %msg%n"/>
      <Policies>
        <SizeBasedTriggeringPolicy size="100 MB" />
        <TimeBasedTriggeringPolicy interval="1" modulate="true"/>
      </Policies>
    </RollingRandomAccessFile>
  </Appenders>
  <Loggers>
    <Root level="INFO">
      <AppenderRef ref="File"/>
    </Root>
  </Loggers>
</Configuration>
More details are available on RollingFileAppender documentation.
| of course you can compose previous layout (message format) and appenders (where logs are written). |
Server Configuration
The server module contains several configuration you can set in:
-
Environment variables
-
System properties
-
A file located based on the
--component-configurationCLI option
| the configuration is read from system properties, environment variables, …. |
| Key | Description | Default |
|---|---|---|
talend.component.server.component.coordinates |
A comma separated list of gav to locate the components |
- |
talend.component.server.component.registry |
A property file where the value is a gav of a component to register (complementary with |
- |
talend.component.server.documentation.active |
Should the /documentation endpoint be activated. |
true |
talend.component.server.execution.dataset.retriever.timeout |
How long the read execution endpoint can last (max) |
180 |
talend.component.server.execution.pool.size |
The size of the execution pool for runtime endpoints. |
64 |
talend.component.server.execution.pool.wait |
How long the application waits during shutdown for the execution tasks to complete |
PT10S |
talend.component.server.jaxrs.exceptionhandler.defaultMessage |
If set it will replace any message for exceptions. Set to |
false |
talend.component.server.maven.repository |
The local maven repository used to locate components and their dependencies |
- |
talend.component.server.monitoring.brave.reporter.async |
When using url or kafka reporter, you can configure the async reporter with properties passed to this configuration entry.Ex: |
console |
talend.component.server.monitoring.brave.reporter.type |
The brave reporter to use to send the spans. Supported values are [auto, console, noop, url]. When configuration is needed,you can use this syntax to configure the repoter if needed: In |
auto |
talend.component.server.monitoring.brave.sampling.action.rate |
The accuracy rate of the sampling for action endpoints. |
-1 |
talend.component.server.monitoring.brave.sampling.component.rate |
The accuracy rate of the sampling for component endpoints. |
-1 |
talend.component.server.monitoring.brave.sampling.configurationtype.rate |
The accuracy rate of the sampling for environment endpoints. |
-1 |
talend.component.server.monitoring.brave.sampling.documentation.rate |
The accuracy rate of the sampling for documentation endpoint. |
-1 |
talend.component.server.monitoring.brave.sampling.environment.rate |
The accuracy rate of the sampling for environment endpoints. |
-1 |
talend.component.server.monitoring.brave.sampling.execution.rate |
The accuracy rate of the sampling for execution endpoints. |
1 |
talend.component.server.monitoring.brave.sampling.rate |
The accuracy rate of the sampling. |
-1. |
talend.component.server.monitoring.brave.service.name |
The name used by the brave integration (zipkin) |
component-server |
talend.component.server.security.command.handler |
How to validate a command/request. Accepted values: securityNoopHandler. |
securityNoopHandler |
talend.component.server.security.connection.handler |
How to validate a connection. Accepted values: securityNoopHandler. |
securityNoopHandler |
Wrapping a Beam I/O
Limitations
This part is limited to particular kinds of Beam PTransform:
-
the
PTransform<PBegin, PCollection<?>>for the inputs -
the
PTransform<PCollection<?>, PDone>for the outputs. The outputs also must use a single (composite or not)DoFnin theirapplymethod.
Wrap an input
Assume you want to wrap an input like this one (based on existing Beam ones):
@AutoValue
public abstract [static] class Read extends PTransform<PBegin, PCollection<String>> {

  // config

  @Override
  public PCollection<String> expand(final PBegin input) {
    return input.apply(
        org.apache.beam.sdk.io.Read.from(new BoundedElasticsearchSource(this, null)));
  }

  // ... other transform methods
}
To wrap the Read in a framework component you create a transform delegating to this one with a @PartitionMapper annotation
at least (you likely want to follow the best practices as well adding @Icon and @Version) and using @Option constructor injections
to configure the component:
@PartitionMapper(family = "myfamily", name = "myname")
public class WrapRead extends PTransform<PBegin, PCollection<String>> {
  private PTransform<PBegin, PCollection<String>> delegate;

  public WrapRead(@Option("dataset") final WrapReadDataSet dataset) {
    delegate = TheIO.read().withConfiguration(this.createConfigurationFrom(dataset));
  }

  @Override
  public PCollection<String> expand(final PBegin input) {
    return delegate.expand(input);
  }

  // ... other methods like the mapping with the native configuration (createConfigurationFrom)
}
Wrap an output
Assume you want to wrap an output like this one (based on existing Beam ones):
@AutoValue
public abstract [static] class Write extends PTransform<PCollection<String>, PDone> {


    // configuration withXXX(...)

    @Override
    public PDone expand(final PCollection<String> input) {
      input.apply(ParDo.of(new WriteFn(this)));
      return PDone.in(input.getPipeline());
    }

    // other methods of the transform
}
You can wrap this output exactly the same way than for the inputs but using @Processor this time:
@PartitionMapper(family = "myfamily", name = "myname")
public class WrapRead extends PTransform<PCollection<String>, PDone> {
  private PTransform<PCollection<String>, PDone> delegate;

  public WrapRead(@Option("dataset") final WrapReadDataSet dataset) {
    delegate = TheIO.write().withConfiguration(this.createConfigurationFrom(dataset));
  }

  @Override
  public PDone expand(final PCollection<String> input) {
    return delegate.expand(input);
  }

  // ... other methods like the mapping with the native configuration (createConfigurationFrom)
}
Tip
Note that the class org.talend.sdk.component.runtime.beam.transform.DelegatingTransform fully delegates
to another transform the "expansion". Therefore you can extend it and just implement the configuration mapping:
@Processor(family = "beam", name = "file")
public class BeamFileOutput extends DelegatingTransform<PCollection<String>, PDone> {

    public BeamFileOutput(@Option("output") final String output) {
        super(TextIO.write()
            .withSuffix("test")
            .to(FileBasedSink.convertToFileResourceIfPossible(output)));
    }
}
Advanced
In terms of classloading, when you write an IO all the Beam SDK Java core stack is assumed in Talend Component Kit runtime as provided so never include it in compile scope - it would be ignored anyway.
Coder
If you need a JSonCoder you can use org.talend.sdk.component.runtime.beam.factory.service.PluginCoderFactory service
which gives you access the JSON-P and JSON-B coders.
Sample
Here is a sample input based on beam Kafka:
@Version
@Icon(Icon.IconType.KAFKA)
@Emitter(name = "Input")
@AllArgsConstructor
@Documentation("Kafka Input")
public class KafkaInput extends PTransform<PBegin, PCollection<JsonObject>> { (1)

    private final InputConfiguration configuration;

    private final JsonBuilderFactory builder;

    private final PluginCoderFactory coderFactory;

    private KafkaIO.Read<byte[], byte[]> delegate() {
        final KafkaIO.Read<byte[], byte[]> read = KafkaIO.<byte[], byte[]> read()
                .withBootstrapServers(configuration.getBootstrapServers())
                .withTopics(configuration.getTopics().stream().map(InputConfiguration.Topic::getName).collect(toList()))
                .withKeyDeserializer(ByteArrayDeserializer.class).withValueDeserializer(ByteArrayDeserializer.class);
        if (configuration.getMaxResults() > 0) {
            return read.withMaxNumRecords(configuration.getMaxResults());
        }
        return read;
    }

    @Override (2)
    public PCollection<JsonObject> expand(final PBegin pBegin) {
        final PCollection<KafkaRecord<byte[], byte[]>> kafkaEntries = pBegin.getPipeline().apply(delegate());
        return kafkaEntries.apply(ParDo.of(new RecordToJson(builder))).setCoder(coderFactory.jsonp()); (3)
    }

    @AllArgsConstructor
    private static class RecordToJson extends DoFn<KafkaRecord<byte[], byte[]>, JsonObject> {

        private final JsonBuilderFactory builder;

        @ProcessElement
        public void onElement(final ProcessContext context) {
            context.output(toJson(context.element()));
        }

        // todo: we shouldnt be typed string/string so make it evolving
        private JsonObject toJson(final KafkaRecord<byte[], byte[]> element) {
            return builder.createObjectBuilder().add("key", new String(element.getKV().getKey()))
                    .add("value", new String(element.getKV().getValue())).build();
        }
    }
}| 1 | the PTransform generics define it is an input (PBegin marker) |
| 2 | the expand method chains the native IO with a custom mapper (RecordToJson) |
| 3 | the mapper uses the JSON-P coder automatically created from the contextual component |
Since the Beam wrapper doesn’t respect the standard Kit programming Model (no @Emitter for instance)
you need to set <talend.validation.component>false</talend.validation.component> property in your pom.xml
(or equivalent for Gradle) to skip the Kit component programming model validations.
Talend Component Appendix
ContainerManager or the classloader manager
The entry point of the API is the ContainerManager, it will enable
you to define what is the Shared classloader and to create children:
try (final ContainerManager manager = new ContainerManager( (1)
    ContainerManager.DependenciesResolutionConfiguration.builder() (2)
        .resolver(new MvnDependencyListLocalRepositoryResolver("META-INF/talend/dependencies.list"))
        .rootRepositoryLocation(new File(System.getProperty("user.home", ".m2/repository"))
        .create(),
    ContainerManager.ClassLoaderConfiguration.builder() (3)
        .parent(getClass().getClassLoader())
        .classesFilter(name -> true)
        .parentClassesFilter(name -> true)
        .create())) {

    // create plugins

}| 1 | the ContainerManager is an AutoCloseable so you can use it in a try/finally block if desired.
NOTE: it is recommended to keep it running if you can reuse plugins to avoid to recreate classloaders and to
mutualize them. This manager has two main configuration entries: how to resolve dependencies for plugins from the plugin
file/location and how to configure the classloaders (what is the parent classloader, how to handle the parent first/last
delegation etc…). |
| 2 | the DependenciesResolutionConfiguration enables to pass a custom Resolver which will be used to build the plugin classloaders.
For now the library only provides MvnDependencyListLocalRepositoryResolver which will read the output of mvn dependencies:list
put in the plugin jar and will resolve from a local maven repository the dependencies. Note that SNAPSHOT are only resolved based on their name
and not from metadata (only useful in development). To continue the comparison to a Servlet server, you can easily implement an unpacked war resolver if you want. |
| 3 | the ClassLoaderConfiguration is configuring how the whole container/plugin pair will behave: what is the shared classloader?, which classes
are loaded from the shared loader first (intended to be used for API which shouldn’t be loaded from the plugin loader), which classes are loaded from
the parent classloader (useful to exclude to load a "common" library from the parent classloader for instance, can be neat for guava, commons-lang3 etc…). |
Once you have a manager you can create plugins:
final Container plugin1 = manager.create( (1)
    "plugin-id", (2)
new File("/plugin/myplugin1.jar")); (3)| 1 | to create a plugin Container just use the create method of the manager |
| 2 | you can give an explicit id to the plugin (or if you bypass it, the manager will use the jar name) |
| 3 | you specify the plugin root jar |
To create the plugin container, the Resolver will resolve the dependencies needed for the plugin, then the manager will
create the plugin classloader and register the plugin Container.
Listener for plugin registration
It is common to need to do some actions when a plugin is registered/unregistered. For that purpose ContainerListener can be used:
public class MyListener implements ContainerListener {
    @Override
    public void onCreate(final Container container) {
        System.out.println("Container #" + container.getId() + " started.");
    }

    @Override
    public void onClose(final Container container) {
        System.out.println("Container #" + container.getId() + " stopped.");
    }
}
They are registered on the manager directly:
final ContainerManager manager = getContainerManager();
final ContainerListener myListener = new MyListener();

manager.registerListener(myListener); (1)
// do something
manager.unregisterListener(myListener); (2)| 1 | registerListener is used to add the listener from now on, it will not get any event for already created containers. |
| 2 | you can remove a listener with unregisterListener at any time. |