The Component Kit starter lets you design your components configuration and generates a ready-to-implement project structure.
This tutorial shows you how to use the Component Kit starter to generate new components for MySQL databases. Before starting, make sure that you have correctly setup your environment. See this section.
Configuring the project
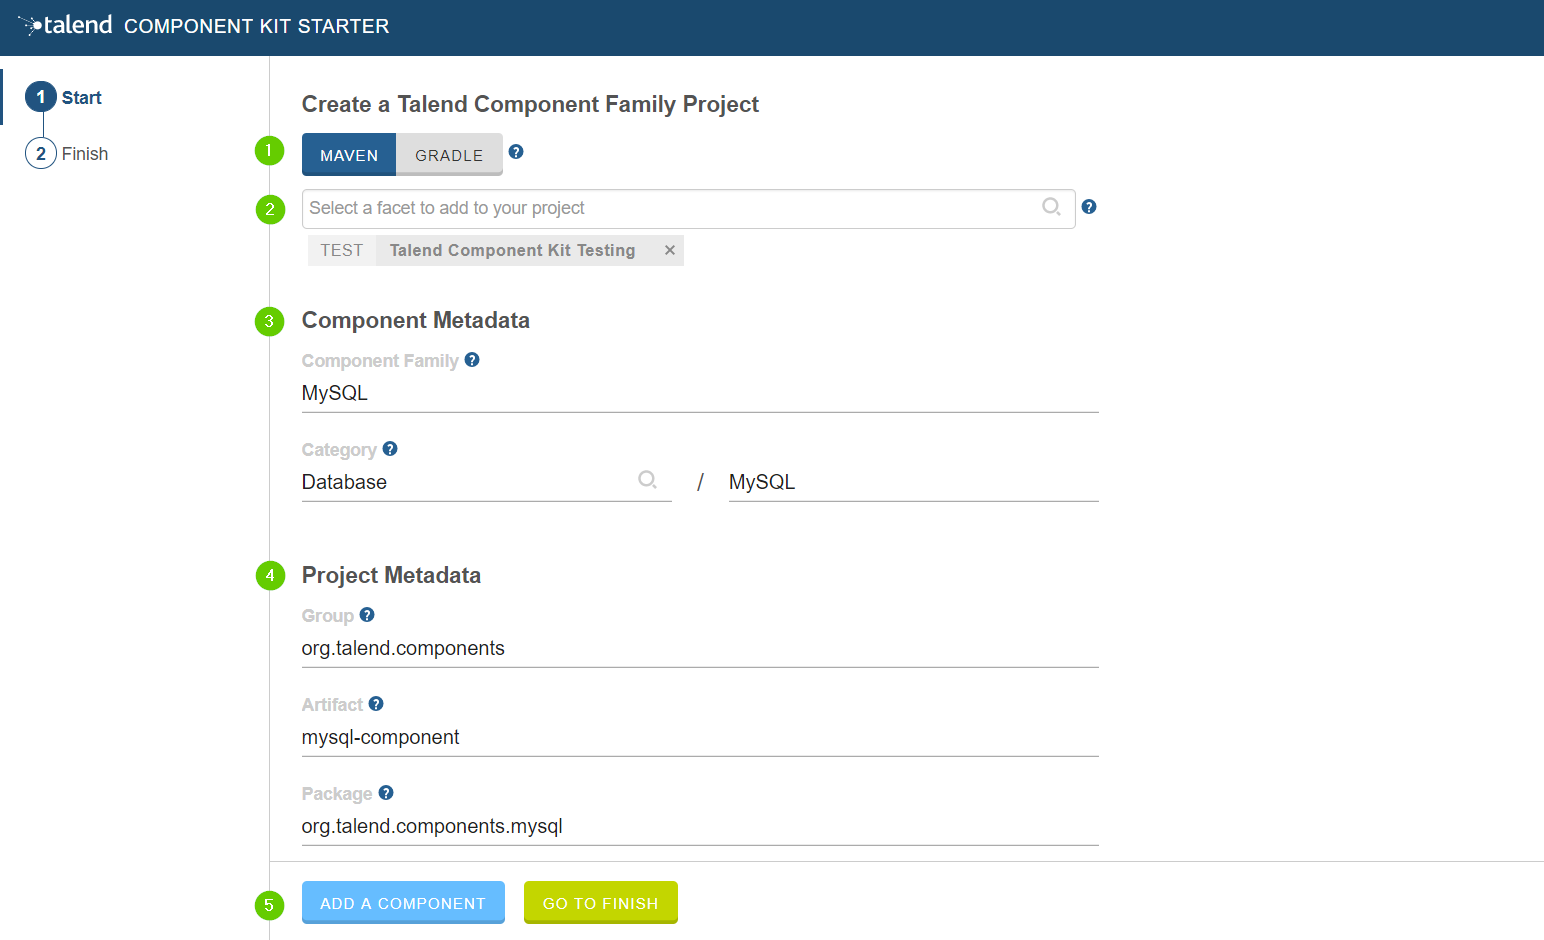
Before being able to create components, you need to define the general settings of the project:
-
Create a folder on your local machine to store the resource files of the component you want to create. For example,
C:/my_components. -
Open the starter in the web browser of your choice.
-
Select your build tool. This tutorial uses Maven, but you can select Gradle instead.
-
Add the Talend Component Kit Testing facet to your project to automatically generate unit tests for the components created later in this tutorial.
-
Enter the Component Family of the components you want to develop in the project. This name must be a valid java name and is recommended to be capitalized, for example 'MySQL'.
Once you have implemented your components in the Studio, this name is displayed in the Palette to group all of the MySQL-related components you develop, and is also part of your component name. -
Select the Category of the components you want to create in the current project. As MySQL is a kind of database, select Databases in this tutorial.
This Databases category is used and displayed as the parent family of the MySQL group in the Palette of the Studio. -
Complete the project metadata by entering the Group, Artifact and Package.
-
Click the ADD A COMPONENT button to start designing your components.
Creating an Input component
When clicking ADD A COMPONENT in the starter, a new step that allows you to define a new component is created in your project.
The intent in this tutorial is to create an input component that connects to a MySQL database, executes a SQL query and gets the result.
-
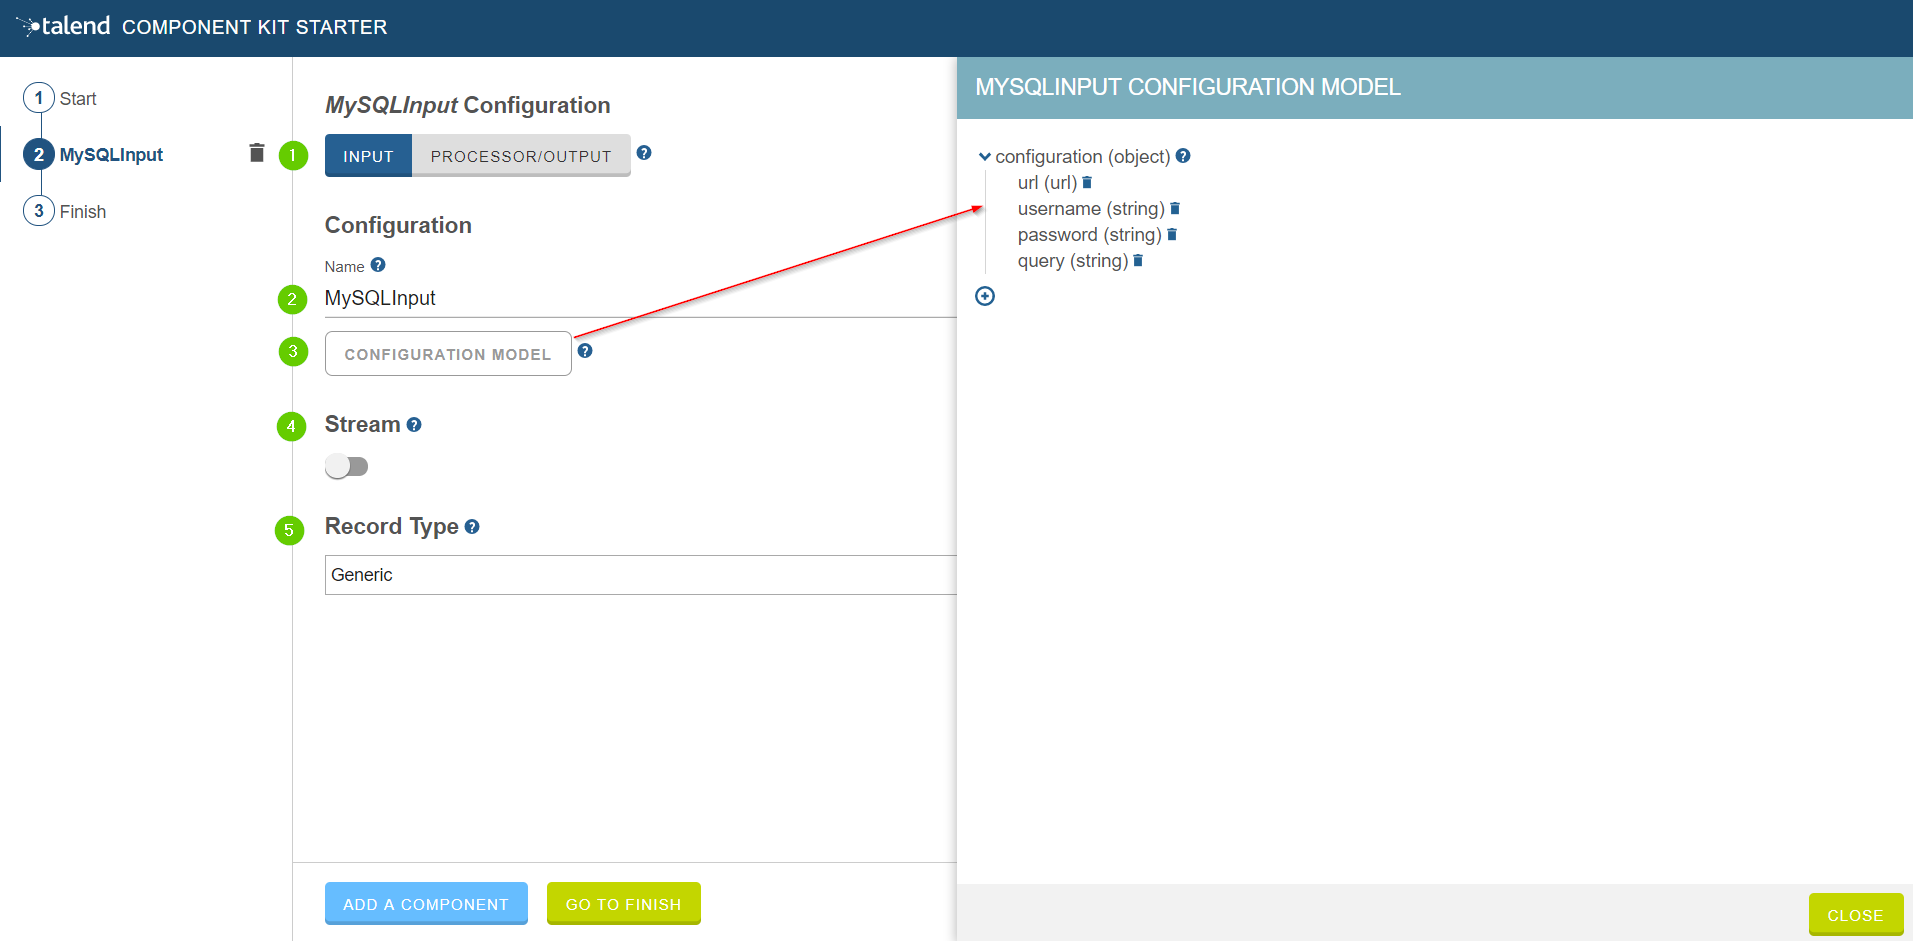
Choose the component type. INPUT in this case.
-
Enter the component name. For example, MySQLInput.
-
Click CONFIGURATION MODEL. This button lets you specify the required configuration for the component.
-
For each parameter that you need to add, click the (+) button on the right panel. Enter the name and choose the type of the parameter, then click the tick button to save the changes.
In this tutorial, to be able to execute a SQL query on the Input MySQL database, the configuration requires the following parameters:+-
a connection URL (string)
-
a username (string)
-
a password (string)
-
the SQL query to be executed (string).
Closing the configuration panel on the right does not delete your configuration.
-
-
Specify whether the component issues a stream or not. In this tutorial, the MySQL input component created is an ordinary (non streaming) component. In this case, let the toggle button disabled.
-
Select the Record Type generated by the component. In this tutorial, select Generic because the component is designed to generate JSON records.
You can also select Custom to define a POJO that represents your records.
Your input component is now defined. You can add another component or generate and download your project.
Creating a Processor component
When clicking ADD A COMPONENT in the starter, a new step that allows you to define a new component is created in your project.
The intent in this tutorial is to create a simple processor component that receives a record, logs it and returns it at it is.
-
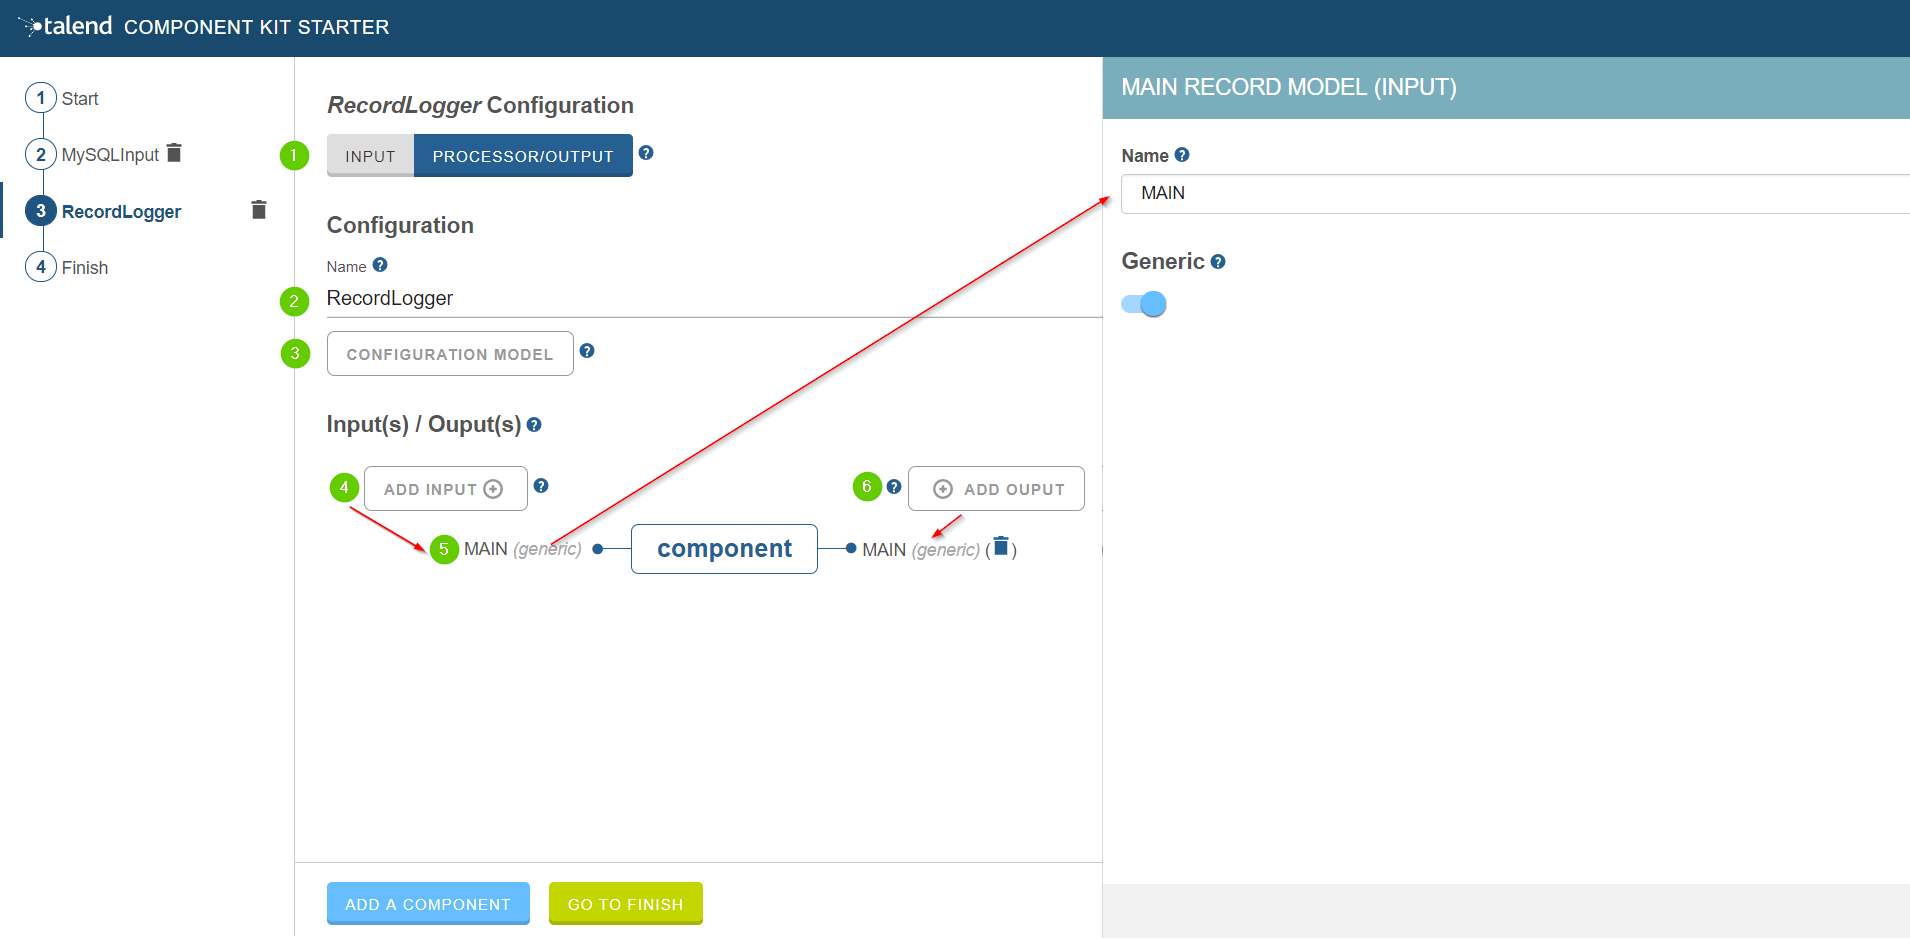
Choose the component type. PROCESSOR/OUTPUT in this case.
-
Enter the component name. For example, RecordLogger, as the processor created in this tutorial logs the records.
-
Specify the CONFIGURATION MODEL of the component. In this tutorial, the component doesn’t need any specific configuration. Skip this step.
-
Define the Input(s) of the component. For each input that you need to define, click ADD INPUT. In this tutorial, only one input is needed to receive the record to log.
-
Click the input name to access its configuration. You can change the name of the input and define its structure using a POJO. If you added several inputs, repeat this step for each one of them.
The input in this tutorial is a generic record. Enable the Generic option. -
Define the Output(s) of the component. For each output that you need to define, click ADD OUTPUT. In this tutorial, only one generic output is needed to return the received record.
Outputs can be configured the same way as inputs (see previous steps). -
Make sure to check the configuration of inputs and outputs as they are not set to Generic by default.
Your processor component is now defined. You can add another component or generate and download your project.
Creating an Output component
When clicking ADD A COMPONENT in the starter, a new step that allows you to define a new component is created in your project.
The intent in this tutorial is to create an output component that receives a record and inserts it into a MySQL database table.
| Output components are Processors without any output. In other words, the output is a processor that does not produce any records. |
-
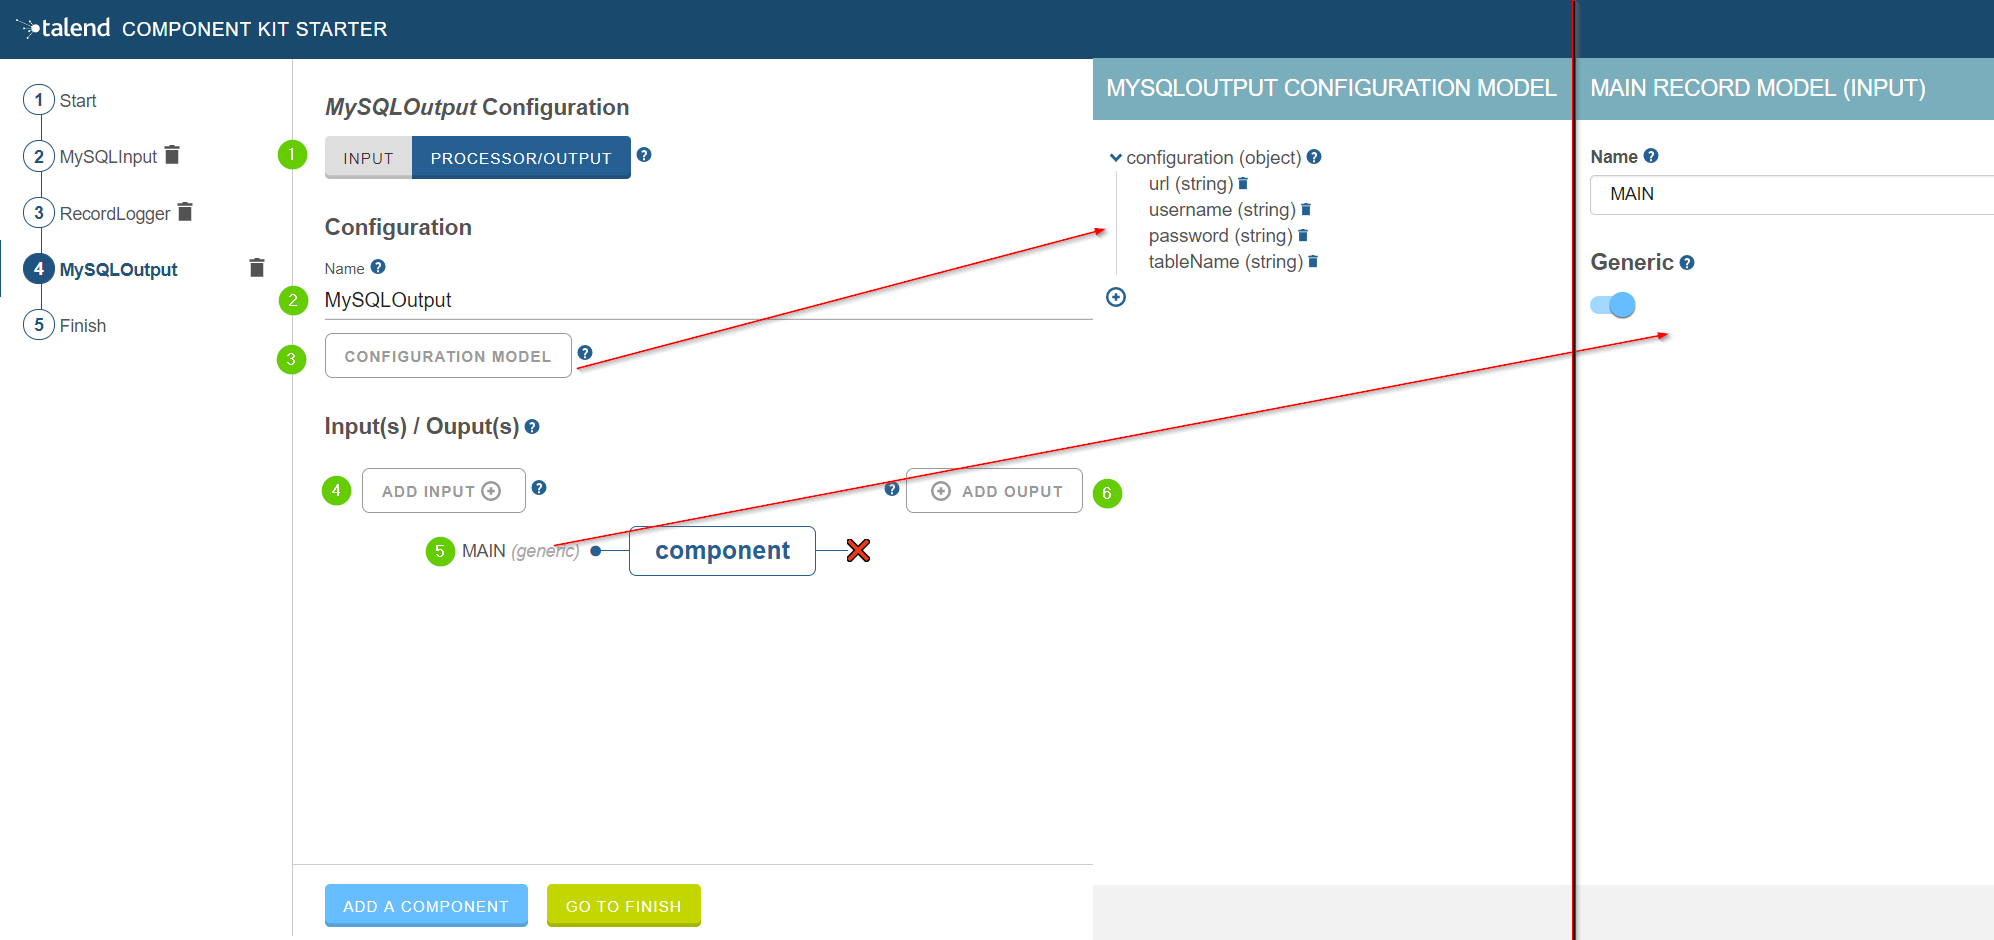
Choose the component type. PROCESSOR/OUTPUT in this case.
-
Enter the component name. For example, MySQLOutput.
-
Click CONFIGURATION MODEL. This button lets you specify the required configuration for the component.
-
For each parameter that you need to add, click the (+) button on the right panel. Enter the name and choose the type of the parameter, then click the tick button to save the changes.
In this tutorial, to be able to insert a record in the output MySQL database, the configuration requires the following parameters:+-
a connection URL (string)
-
a username (string)
-
a password (string)
-
the name of the table to insert the record in (string).
Closing the configuration panel on the right does not delete your configuration.
-
-
Define the Input(s) of the component. For each input that you need to define, click ADD INPUT. In this tutorial, only one input is needed.
-
Click the input name to access its configuration. You can change the name of the input and define its structure using a POJO. If you added several inputs, repeat this step for each one of them.
The input in this tutorial is a generic record. Enable the Generic option. -
Do not create any output because the component does not produce any record. This is the only difference between an output an a processor component.
Your output component is now defined. You can add another component or generate and download your project.
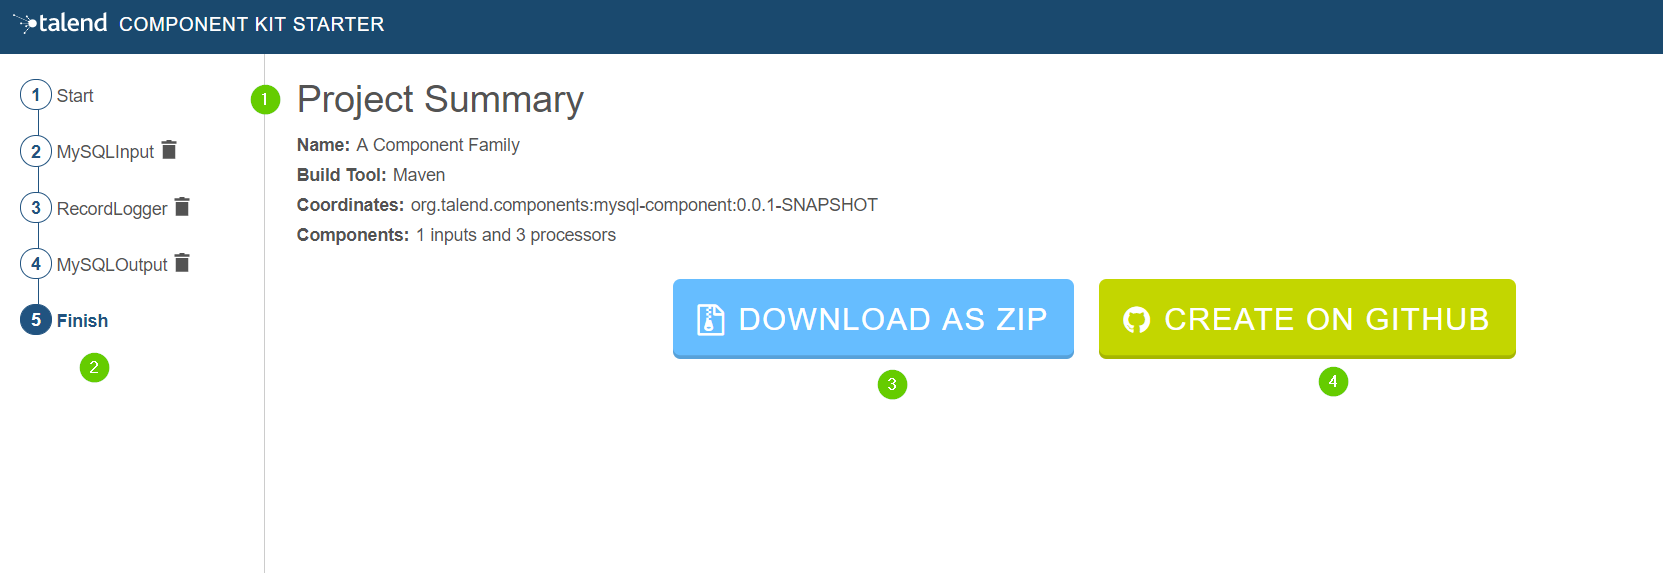
Generating and downloading the final project.
Once your project is configured and all the components you need are created, you can generate and download the final project. In this tutorial, the project was configured and three components of different types (input, processor and output) have been defined.
-
Click GO TO FINISH at the bottom of the page. You are redirected to a page that summarizes the project. On the left panel, you can also see all the components that you added to the project.
-
Generate the project using one of the two options available:
-
Download it locally as a ZIP file using the DOWNLOAD AS ZIP button.
-
Create a Github repository and push the project to it using the CREATE ON GITHUB button.
-
In this tutorial, the project is downloaded to the local machine as a ZIP file.
Compiling and exploring the generated project files
Once the package is available on your machine, you can compile it using the build tool selected when configuring the project.
-
In the tutorial, Maven is the build tool selected for the project.
In the project directory, execute themvn packagecommand.
If you don’t have Maven installed on your machine, you can use the Maven wrapper provided in the generated project, by executing the./mvnw packagecommand. -
If you have created a Gradle project, you can compile it using the
gradle buildcommand or using the Gradle wrapper:./gradlew build.
The generated project code contains documentation that can guide and help you implementing the component logic. Import the project to your favorite IDE to start the implementation.
The next tutorial shows how to implement an Input component in details.