This tutorial shows how to adapt the test configuration of the Zendesk search component that was done in this previous tutorial to make it work in a Continuous Integration environment.
In the test, the Zendesk credentials are used directly in the code to perform a first capture of the API response. Then, fake credentials are used in the simulation mode because the real API is not called anymore.
However, in some cases, you can require to continue calling the real API on a CI server or on a specific environment.
To do that, you can adapt the test to get the credentials depending on the execution mode (simulation/passthrough).
Setting up credentials
These instructions concern the CI server or on any environment that requires real credentials.
This tutorial uses:
-
A Maven server that supports password encryption as a credential provider. Encryption is optional but recommended.
-
The
MavenDecrypterRuletest rule provided by the framework. This rule lets you get credentials from Maven settings using a server ID.
To create encrypted server credentials for the Zendesk instance:
-
Create a master password using the command:
mvn --encrypt-master-password <password>. -
Store this master password in the
settings-security.xmlfile of the~/.m2folder. -
Encrypt the Zendesk instance password using the command:
mvn --encrypt-password <zendesk-password>. -
Create a server entry under servers in Maven
settings.xmlfile located in the~/.m2folder.
<server>
  <id>zendesk</id>
  <username>username@email.com</username>
  <password>The encrypted password {oL37x/xiSvwtlhrMQ=}</password>
</server>
You can store the settings-security.xml and settings.xml files elsewhere that the default location (~/.m2). To do that, set the path of the directory containing the files
in the talend.maven.decrypter.m2.location environment variable.
|
Adapting the unit test
-
Add the
MavenDecrypterRulerule to the test class. This rule allows to inject server information stored in Mavensettings.xmlfile to the test. The rule also decrypts credentials if they are encrypted.
public class SearchTest {

    @Rule
    public final MavenDecrypterRule mavenDecrypterRule = new MavenDecrypterRule(this);
}-
Inject the Zendesk server to the test. To do that, add a new field to the class with the
@DecryptedServerannotation, that holds the server ID to be injected.
public class SearchTest {

    @Rule
    public final MavenDecrypterRule mavenDecrypterRule = new MavenDecrypterRule(this);

    @DecryptedServer("zendesk")
    private Server server;
}
The MavenDecrypterRule is able to inject the server instance into this class at runtime. The server instance contains the username and the decrypted password.
-
Use the
serverinstance in the test to get the real credentials in a secured manner.
BasicAuth basicAuth = new BasicAuth("https://instance.zendesk.com",
                            server.getUsername(),
                            server.getPassword());
Once modified, the complete test class looks as follows:
public class SearchTest {

    @ClassRule
    public static final SimpleComponentRule component = new SimpleComponentRule("component.package");

    private final MavenDecrypter mavenDecrypter = new MavenDecrypter();

    @ClassRule
    public static final JUnit4HttpApi API = new JUnit4HttpApi()
                                                        .activeSsl();

    @Rule
    public final JUnit4HttpApiPerMethodConfigurator configurator = new JUnit4HttpApiPerMethodConfigurator(API);

    @Rule
    public final MavenDecrypterRule mavenDecrypterRule = new MavenDecrypterRule(this);

    @DecryptedServer("zendesk")
    private Server server;

    @Test
    public void searchQuery() {
        // Initiating the component test configuration
        BasicAuth basicAuth = new BasicAuth("https://instance.zendesk.com", server.getUsername(), server.getPassword());
        final SearchQuery searchQuery = new SearchQuery(basicAuth, "type:ticket status:open", "created_at", "desc");

        // We convert our configuration instance to URI configuration
        final String uriConfig = SimpleFactory.configurationByExample()
                        .forInstance(searchQuery)
                        .configured().toQueryString();

        // We create our job test pipeline
        Job.components()
                .component("search", "zendesk://search?" + uriConfig)
                .component("collector", "test://collector")
                .connections()
                .from("search").to("collector")
                .build()
                .run();

        final List<JsonObject> res = component.getCollectedData(JsonObject.class);
        assertEquals(4, res.size());
    }
}
This test will continue to work in simulation mode, because the API simulation proxy is activated.
Setting up the CI server in passthrough mode
This tutorial shows how to set up a CI server in passthrough mode using Jenkins.
-
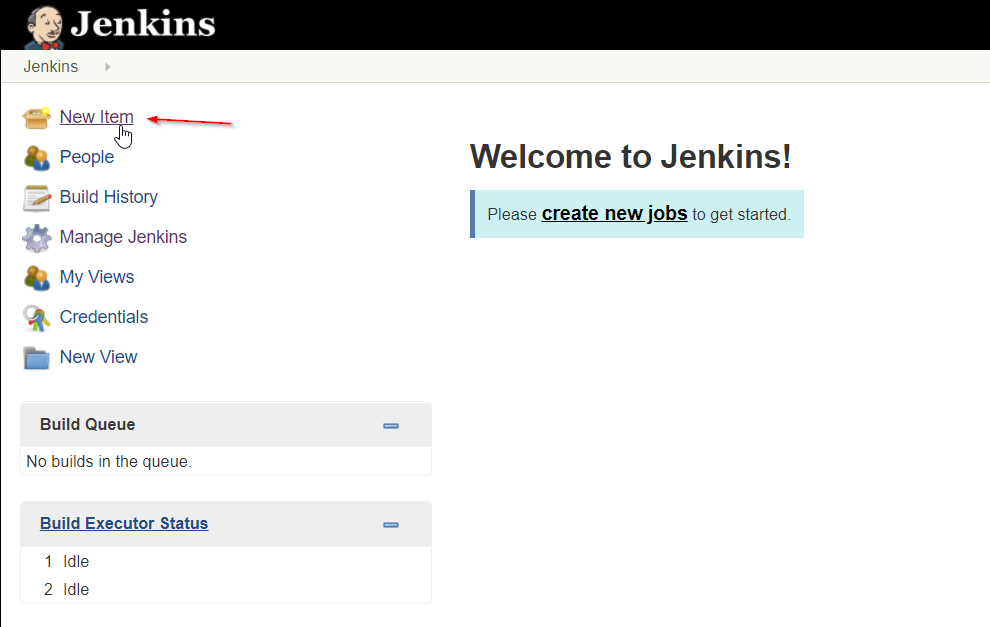
Log in to Jenkins.
-
Click New Item to create a new build job.
-
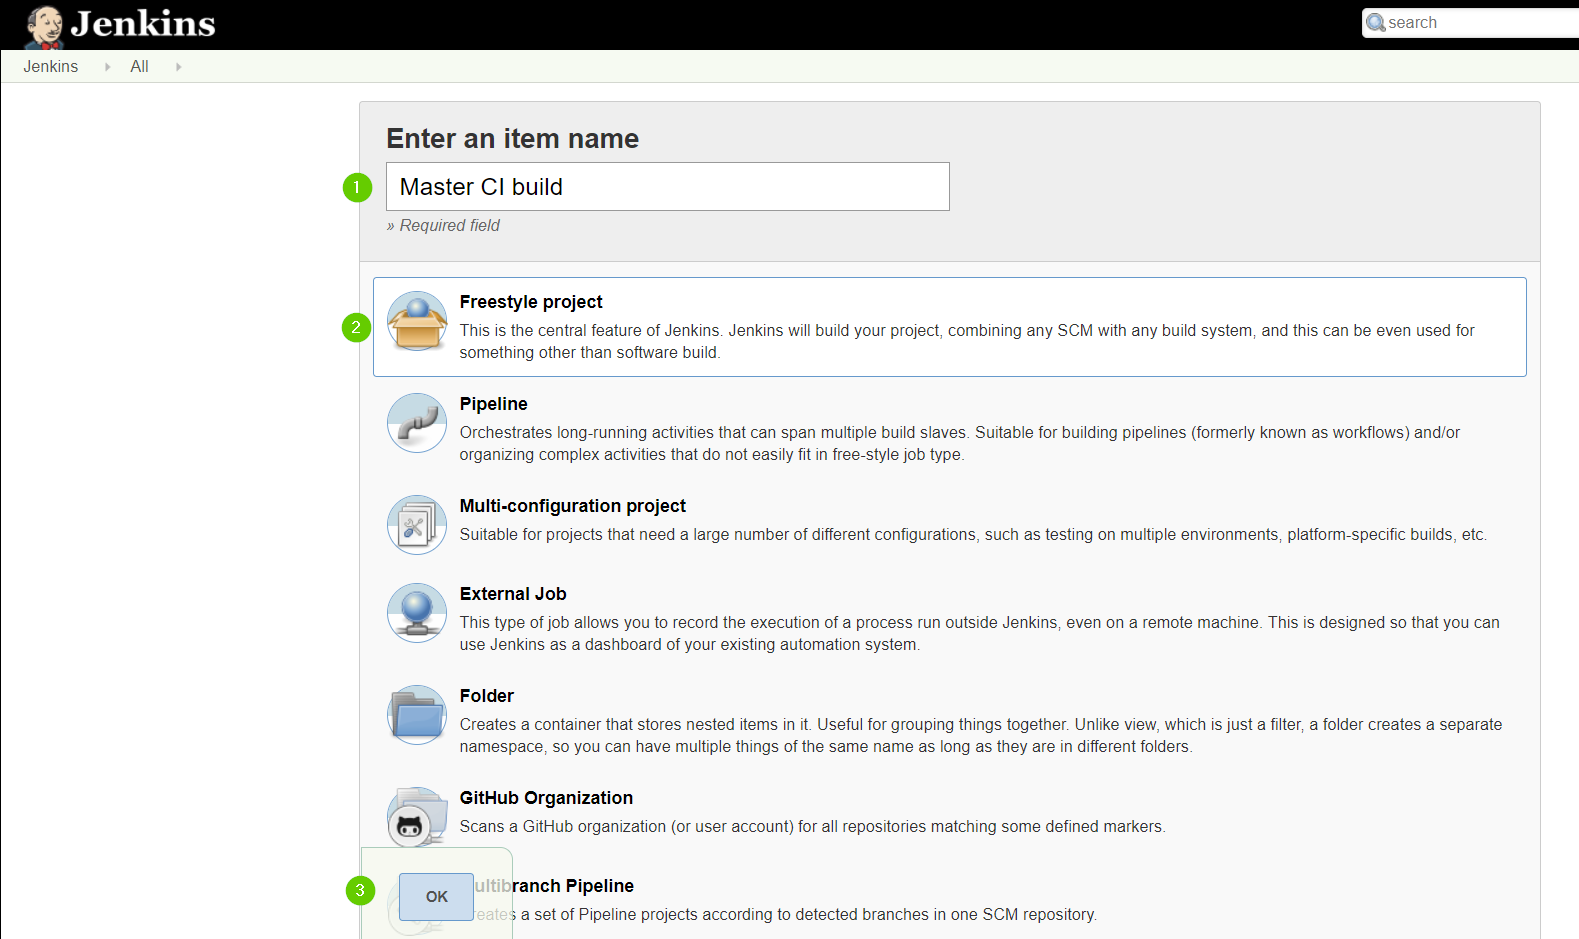
Enter an Item name (Job name) and choose the freestyle job. Then click OK.
-
In the Source Code Management section, enter your project repository URL. A GitHub repository is used in this tutorial.
-
Specify the
masterbranch as Branches to build.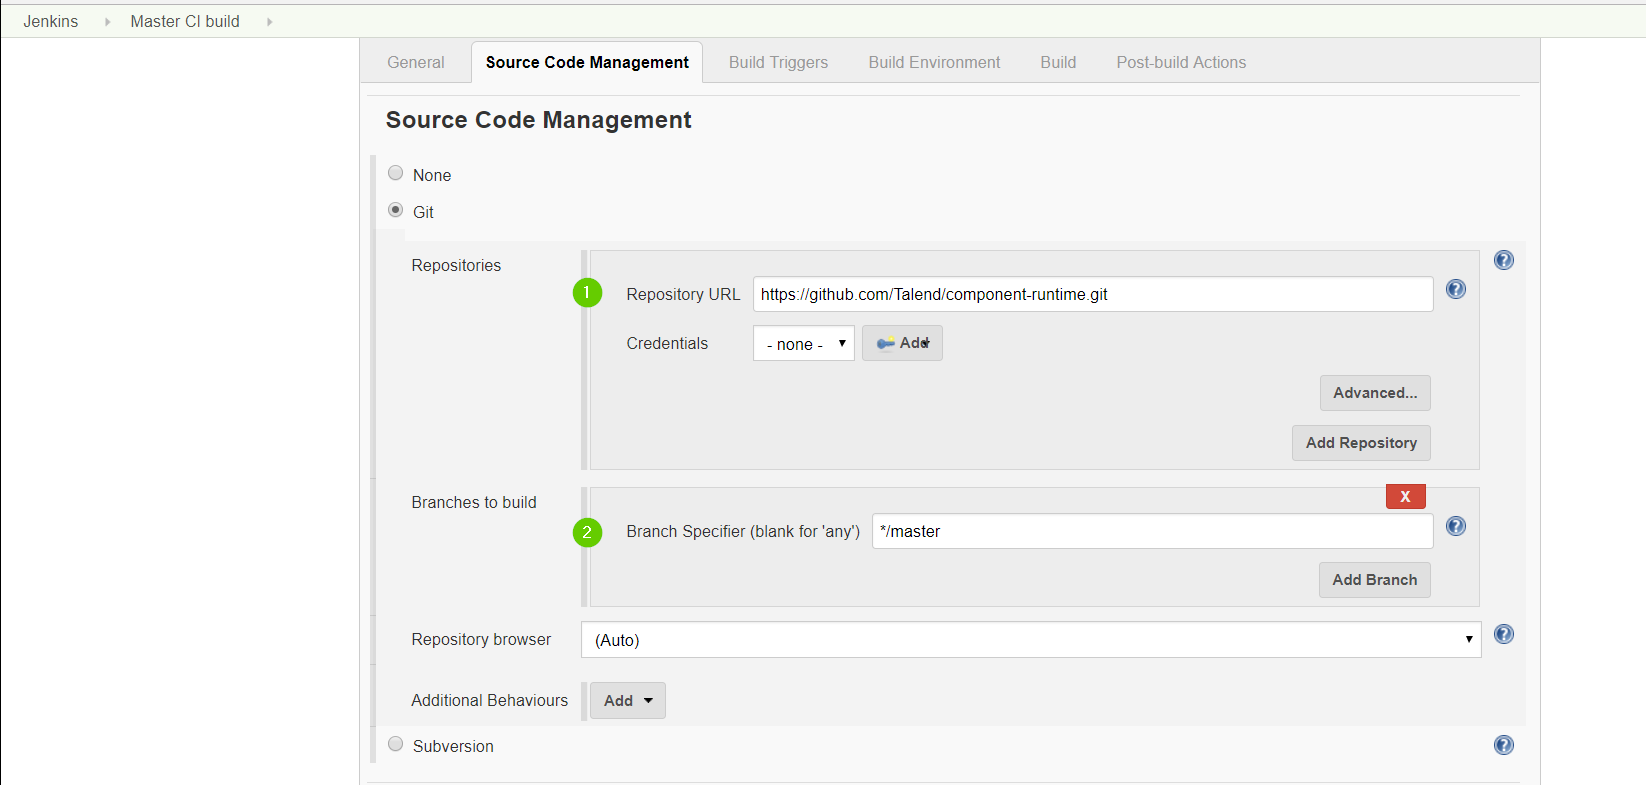
-
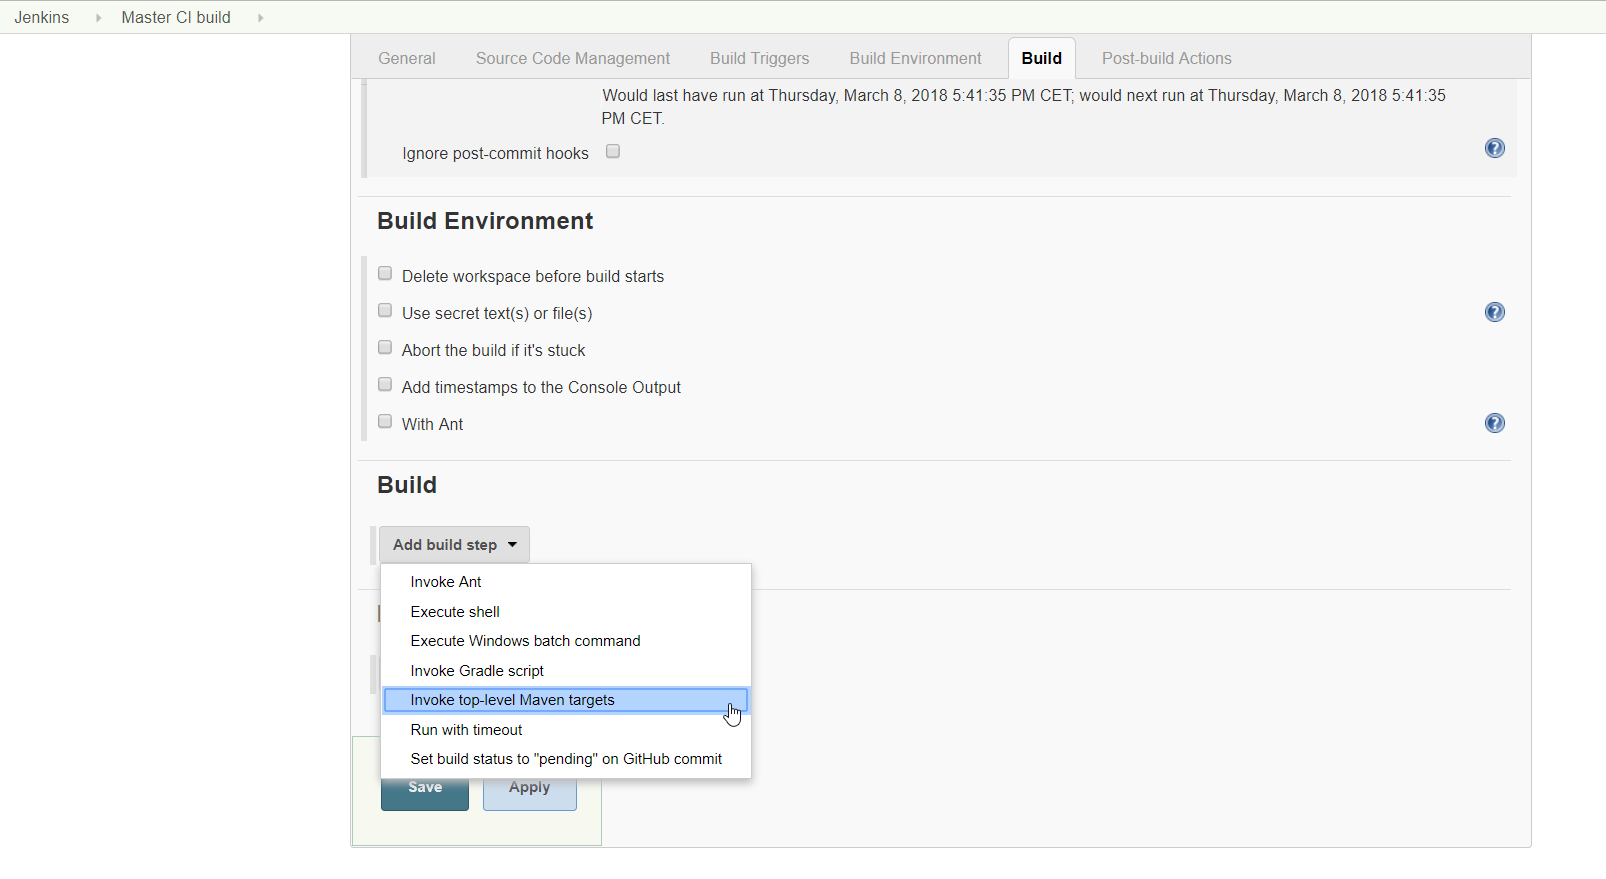
In the Build section, click Add build step and choose Invoke top-level Maven targets.
-
Choose your Maven version and enter the Maven build command. In this case:
clean install. Then, click Save.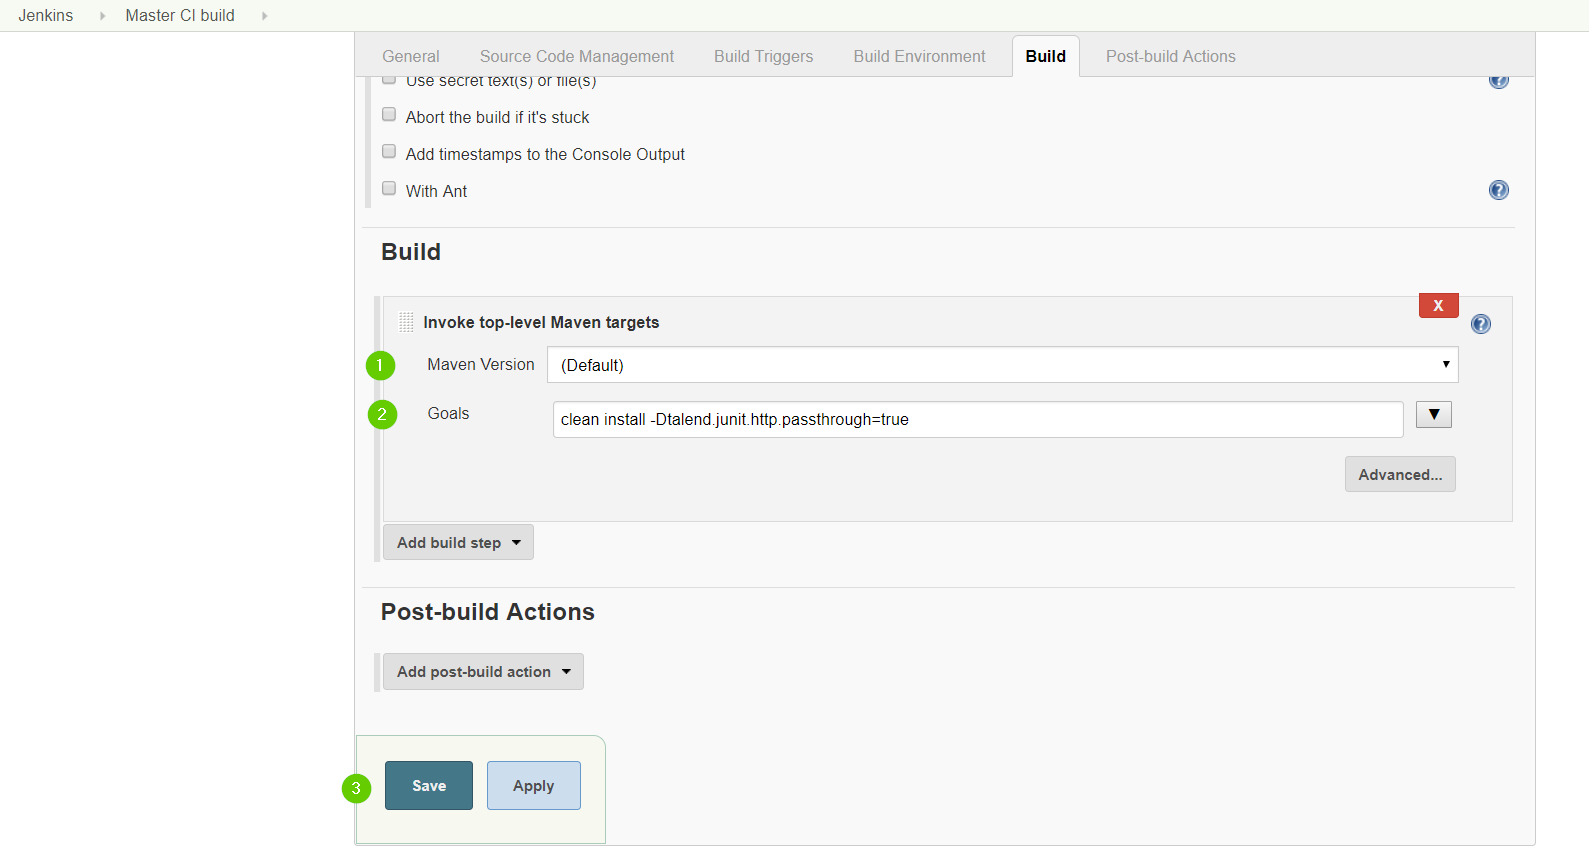
The
-Dtalend.junit.http.passthrough=trueoption is part of the build command. This option tells the API simulation proxy to run inpassthroughmode. This way, all the HTTP requests made in the test are forwarded to the real API server.The
MavenDecrypterRulerule allows to get the real credentials.You can configure the passthrough mode globally on your CI server by setting the talend.junit.http.passthroughenvironment variable totrue. -
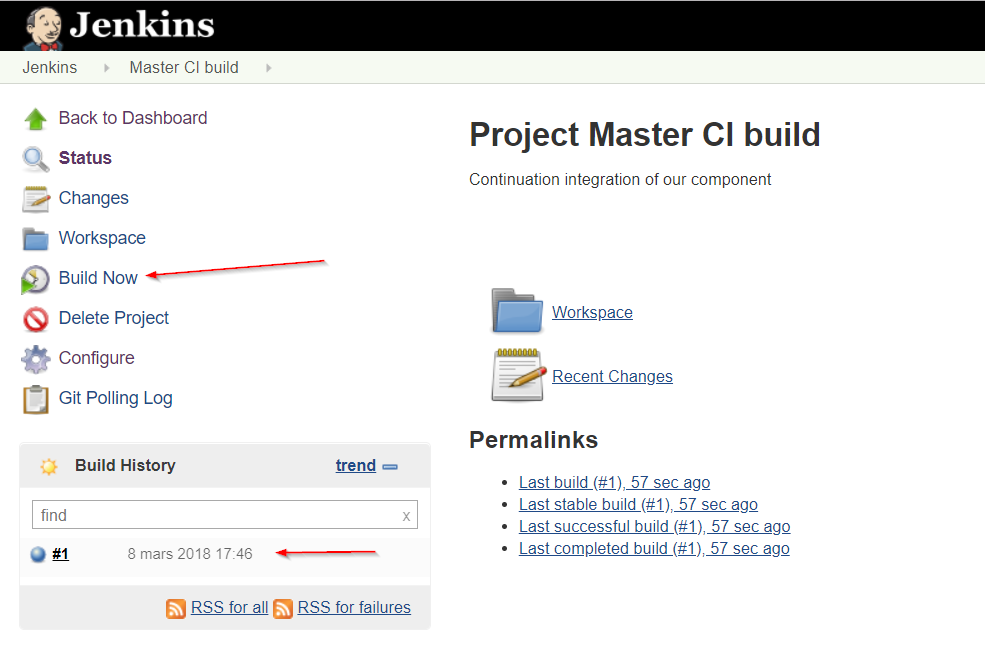
Test the job by selecting Build now, and check that the job has built correctly.


Now your tests run in a simulation mode on your development environment and in a passthrough mode on your CI server.