To be able to see and use your newly developed components, you need to integrate them to the right application.
Currently, you can deploy your components to Talend Studio as part of your development process to iterate on them:
You can also share your components externally and install them using a component archive (.car) file.
Check the versions of the framework that are compatible with your version of Talend Studio in this document.
If you were used to create custom components with the Javajet framework and want to get to know the new approach and main differences of the Component Kit framework, refer to this document.
Version compatibility
You can integrate and start using components developed using Talend Component Kit in Talend applications very easily.
As both the development framework and Talend applications evolve over time, you need to ensure compatibility between the components you develop and the versions of Talend applications that you are targeting, by making sure that you use the right version of Talend Component Kit.
Compatibility matrix
The version of Talend Component Kit you need to use to develop new components depends on the versions of the Talend applications in which these components will be integrated.
| Talend product | Talend Component Kit version |
|---|---|
Talend Studio 8.8.8 (aka master) |
latest release |
Talend Studio 8.0.1 |
latest release QA approved |
Talend Studio 7.3.1 |
Framework until 1.38.x |
Talend Studio 7.2.1 |
Framework until 1.1.10 |
Talend Studio 7.1.1 |
Framework until 1.1.1 |
Talend Studio 7.0.1 |
Framework until 0.0.5 |
Talend Cloud |
latest release QA and cloud teams approved |
More recent versions of Talend Component Kit contain many fixes, improvements and features that help developing your components. However, they can cause some compatibility issues when deploying these components to older/different versions of Talend Studio and Talend Cloud. Choose the version of Talend Component Kit that best fits your needs.
Changing the Talend Component Kit version of your project
Creating a project using the Component Kit Starter always uses the latest release of Talend Component Kit.
However, you can manually change the version of Talend Component Kit directly in the generated project.
-
Go to your IDE and access the project root .pom file.
-
Look for the
org.talend.sdk.componentdependency nodes. -
Replace the version in the relevant nodes with the version that you need to use for your project.
You can use a Snapshot of the version under development using the -SNAPSHOT version and Sonatype snapshot repository.
|
Iterating on component development with Talend Studio
Integrate components you developed using Talend Component Kit to Talend Studio in a few steps. Also learn how to enable the developer and debugging modes to iterate on your component development.
Version compatibility
The version of Talend Component Kit you need to use to develop new components depends on the version of Talend Studio in which components will be integrated.
Refer to this document to learn about compatibility between Talend Component Kit and the different versions of Talend applications.
Installing the components
Learn how to build and deploy components to Talend Studio using Maven Talend Component Kit plugins.
This can be done using the deploy-in-studio goal from your development environment.
If you are unfamiliar with component development, you can also follow this example to go through the entire process, from creating a project to using your new component in Talend Studio.
Configuring the component server
The Studio integration relies on the Component Server, that the Studio uses to gather data about components created using Talend Component Kit.
You can change the default configuration of component server by modifying the $STUDIO_HOME/configuration/config.ini file.
The following parameters are available:
| Name | Description | Default |
|---|---|---|
component.environment |
Enables the developer mode when set to |
- |
component.debounce.timeout |
Specifies the timeout (in milliseconds) before calling listeners in components Text fields |
750 |
component.kit.skip |
If set to |
false |
component.java.arguments |
Component server additional options |
- |
component.java.m2 |
Maven repository that the server uses to resolve components |
Defaults to the global Studio configuration |
component.java.coordinates |
A list of comma-separated GAV (groupId:artifactId:version) of components to register |
- |
component.java.registry |
A properties file with values matching component GAV (groupId:artifactId:version) registered at startup. Only use slashes (even on windows) in the path. |
- |
component.java.port |
Sets the port to use for the server |
random |
component.server.extensions |
A comma separated list of gav to locate the extensions. |
- |
components.server.beam.active |
Active, if set to true, Beam support (Experimental). It requires Beam SDK Java core dependencies to be available. |
false |
component.server.jul.forceConsole |
Adds a console handler to JUL to see logs in the console. This can be helpful in development because the formatting is clearer than the OSGi one in It uses the |
false |
Here is an example of a common developer configuration/config.ini file:
# use local .m2 instead of embedded studio one
maven.repository = global

# during development, see developer model part
component.environment = dev

# log into the console the component interactions - optional
component.server.jul.forceConsole = true
java.util.logging.SimpleFormatter.format = [%4$s] %5$s%6$s%n
Enabling the developer mode
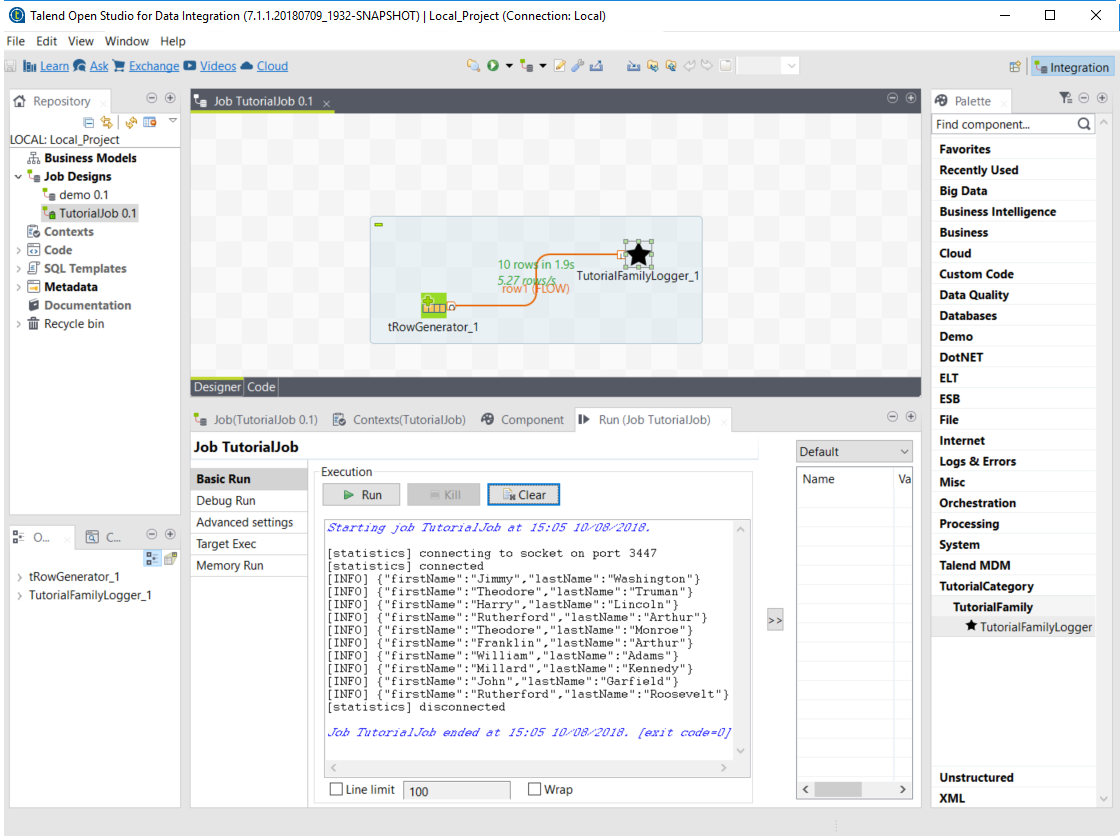
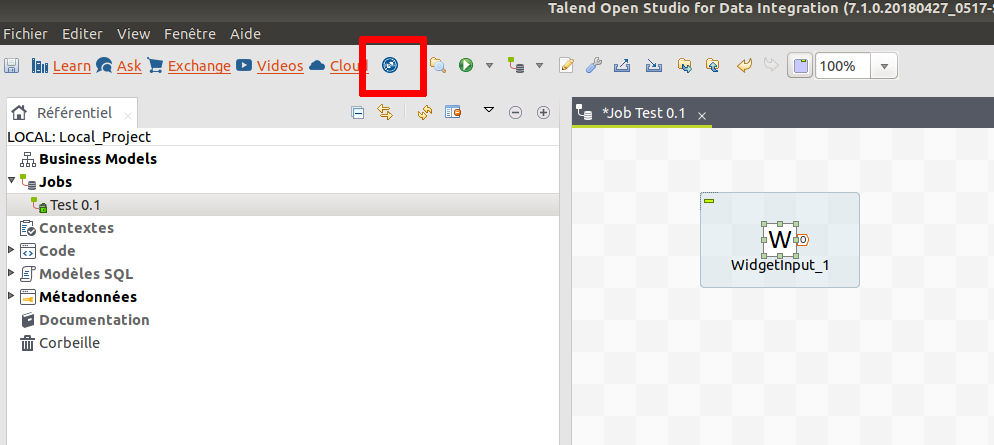
The developer mode is especially useful to iterate on your component development and to avoid closing and restarting Talend Studio every time you make a change to a component. It adds a Talend Component Kit button in the main toolbar:
When clicking this button, all components developed with the Talend Component Kit framework are reloaded. The cache is invalidated and the components refreshed.
| You still need to add and remove the components to see the changes. |
To enable it, simply set the component.environment parameter to dev in the config.ini configuration file of the component server.
Debugging your custom component in Talend Studio
Several methods allow you to debug custom components created with Talend Component Kit in Talend Studio.
Debugging the runtime or the Guess schema option of a component
-
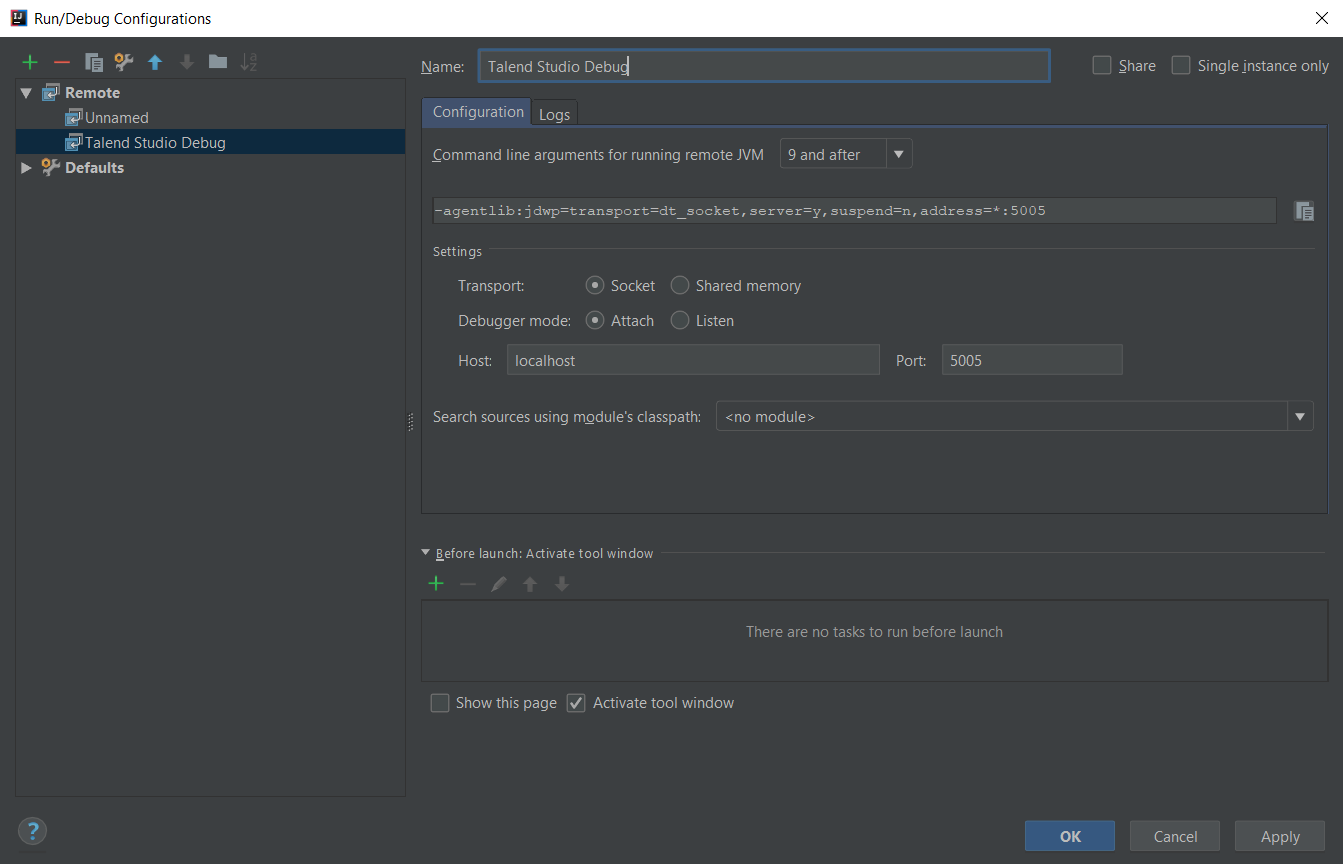
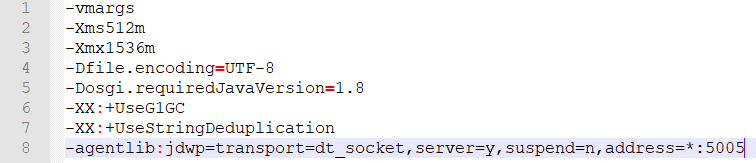
From your development tool, create a new Remote configuration, and copy the Command line arguments for running remote JVM field. For example,
-agentlib:jdwp=transport=dt_socket,server=y,suspend=n,address=*:5005, where:-
the suspend parameter of the -agentlib argument specifies whether you want to suspend the debugged JVM until the debugger attaches to it. Possible values are
n(no, default value) ory(yes). -
the address parameter of the -agentlib argument is the port used for the remote configuration. Make sure this port is available.
-
-
Open Talend Studio.
-
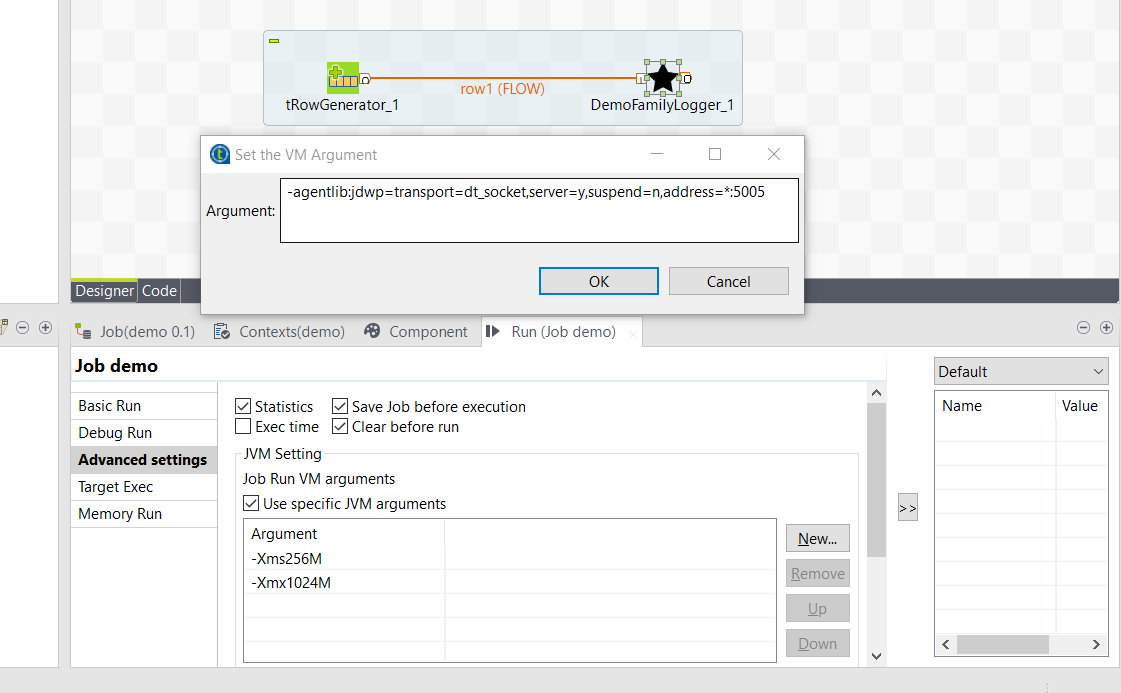
Create a new Job that uses the component you want to debug or open an existing one that already uses it.
-
Go to the Run tab of the Job and select Use specific JVM arguments.
-
Click New to add an argument.
-
In the popup window, paste the arguments copied from the IDE.
-
Enter the corresponding debug mode:
-
To debug the runtime, run the Job and access the remote host configured in the IDE.
-
To debug the Guess schema option, click the Guess schema action button of the component and access the remote host configured in the IDE.
-
Debugging UI actions and validations
-
From your development tool, create a new Remote configuration, and copy the Command line arguments for running remote JVM field. For example,
-agentlib:jdwp=transport=dt_socket,server=y,suspend=n,address=*:5005, where:-
suspend defines whether you need to access the defined configuration to run the remote JVM. Possible values are
n(no, default value) ory(yes). -
address is the port used for the remote configuration. Make sure this port is available.
-
-
Access the installation directory of your Talend Sutdio.
-
Open the
.inifile corresponding to your Operating System. For example,TOS_DI-win-x86_64.ini. -
Paste the arguments copied from the IDE in a new line of the file.
-
Go to Talend Studio to use the component, and access the host host configured in the IDE.
Random port when running concurrent studio instances
If you run multiple Studio instances automatically in parallel, you can run into some issues with the random port computation. For example on a CI platform. For that purpose, you can create the $HOME/.talend/locks/org.talend.sdk.component.studio-integration.lock file.
Then, when a server starts, it acquires a lock on that file and prevents another server to get a port until it is started. It ensures that you can’t have two concurrent processes getting the same port allocated.
However, it is highly unlikely to happen on a desktop. In that case, forcing a different value through component.java.port in your config.ini file is a better solution for local installations.
Installing components using a CAR file
Components built using Talend Component Kit can be shared as component archives (.car). These CAR files are executable files allowing to easily deploy the components it contains to any compatible version of Talend Studio.
Component developers can generate .car files from their projects to share their components and make them available for other users, as detailed in this document.
This document assumes that you have a component archive (.car) file and need to deploy it to Talend Studio.
Deploying from the CAR file to Talend Studio
The component archive (.car) is executable and exposes the studio-deploy command which takes a Talend Studio home path as parameter. When executed, it installs the dependencies into the Studio and registers the component in your instance. For example:
# for a studio
java -jar mycomponent.car studio-deploy /path/to/my/studio
or
java -jar mycomponent.car studio-deploy --location /path/to/my/studio

# for a m2 provisioning
java -jar mycomponent.car maven-deploy /path/to/.m2/repository
or
java -jar mycomponent.car maven-deploy --location /path/to/.m2/repository
You can also upload the dependencies to your Nexus server using the following command:
java -jar mycomponent.car deploy-to-nexus --url <nexus url> --repo <repository name> --user <username> --pass <password> --threads <parallel threads number> --dir <temp directory>In this command, Nexus URL and repository name are mandatory arguments. All other arguments are optional. If arguments contain spaces or special symbols, you need to quote the whole value of the argument. For example:
--pass "Y0u will \ not G4iess i' ^"Deploying a component archive to a remote project from Talend Studio
Talend Studio allows you to share components you have created using Talend Component Kit to other users working on the same remote project.
| Remote projects are available with Enterprise versions of Talend Studio only. Also, note that this feature has been removed in Studio since 7.3 release. |
Make sure you are connected to a remote project and the artifact repository for component sharing has been properly configured.
-
On the toolbar of the Studio main window, click or click File > Edit Project Properties from the menu bar to open the Project Settings dialog box.
-
In the tree view of the dialog box, select Repository Share to open the corresponding view.
-
Select the Propagate components update to Artifact Repository check box.
-
In the Repository ID field, specify the artifact repository configured for component sharing, and then click Check connection to verify the connectivity.
-
Click Apply and Close to validate the settings and close the dialog box.
-
Create a folder named
patchesat the root of your Talend Studio installation directory, then copy the .car files of the components you want share to this folder. -
Restart your Talend Studio and connect to the remote project.
The components are deployed automatically to the repository and available in the Palette for other users when connected to a remote project with the same sharing repository configuration.
Troubleshooting
My custom component builds correctly but does not appear in Talend Studio, how to fix it? This issue can be caused by the icon specified in the component metadata.
-
Make sure to specify a custom icon for the component and the component family.
-
These custom icons must be in PNG format to be properly handled by Talend Studio.
-
Remove SVG parameters from the
talend.component.server.icon.pathsproperty in the HTTP server configuration. Refer to this section.
Learn more about defining custom icons for components in this document.
From Javajet to Talend Component Kit
From the version 7.0 of Talend Studio, Talend Component Kit becomes the recommended framework to use to develop components.
This framework is being introduced to ensure that newly developed components can be deployed and executed both in on-premise/local and cloud/big data environments.
From that new approach comes the need to provide a complete yet unique and compatible way of developing components.
With the Component Kit, custom components are entirely implemented in Java. To help you get started with a new custom component development project, a Starter is available. Using it, you will be able to generate the skeleton of your project. By importing this skeleton in a development tool, you can then implement the components layout and execution logic in Java.
Defining the component configuration
With the previous Javajet framework, metadata, widgets and configurable parts of a custom component were specified in XML.
With the Component Kit, they are now defined in the <component_name><component_type>Configuration (for example, LoggerProcessorConfiguration) Java class of your development project.
Note that most of this configuration is transparent if you specified the Configuration Model of your components right before generating the project from the Starter.
| Any undocumented feature or option is considered not supported by the Component Kit framework. |
You can find examples of output in Studio or Cloud environments in the Gallery.
Widgets
Input/Text
Javajet
<PARAMETER
    NAME="CONFIG"
    FIELD="TEXT"
    NUM_ROW="10">
        <DEFAULT>""</DEFAULT>
</PARAMETER>
Component Kit
@Option
String config;
Password
Javajet
<PARAMETER
    NAME="PASSWORD"
    FIELD="PASSWORD"
    NUM_ROW="10"
    REQUIRED="true">
Component Kit
@Option
@Credential
String password;
Textarea
Javajet
<PARAMETER NAME="QUERY"
    FIELD="MEMO"
    NUM_ROW="1">
        <DEFAULT>""</DEFAULT>
</PARAMETER>
Component Kit
@Option
@Textarea
String query;
Integer
Javajet
<!-- There were no specific widget for number fields -->
<PARAMETER
    NAME="CONFIG"
    FIELD="TEXT"
    NUM_ROW="10">
        <DEFAULT>""</DEFAULT>
</PARAMETER>
Component Kit
@Option
@Documentation("This is a number")
public Integer number;
Checkbox
Javajet
<PARAMETER
    NAME="PRETTY_FORMAT"
    FIELD="CHECK"
    NUM_ROW="10">
        <DEFAULT>false</DEFAULT>
</PARAMETER>
Component Kit
@Option
Boolean pretty_format;
List
Javajet
<PARAMETER
    NAME="ACTION"
    FIELD="CLOSED_LIST"
    NUM_ROW="10">
    <ITEMS DEFAULT="1">
        <ITEM NAME="DELETE" VALUE="1" />
        <ITEM NAME="INSERT" VALUE="2" />
        <ITEM NAME="UPDATE" VALUE="3" />
    </ITEMS>
</PARAMETER>
Component Kit
@Option
@Proposable("valuesProvider")
String action;
/** service class */
@DynamicValues("valuesProvider")
public Values actions(){
  return new Values(asList(new Values.Item("1", "Delete"),
                    new Values.Item("2", "Insert"),
                    new Values.Item("3", "Update")));
}
or
Component Kit
@Option
ActionEnum action;

/** Define enum */
enum ActionEnum {
    Delete,
    Insert,
    Update
}
Suggestions
Javajet
<!-- There were no simple way to load proposals from service in javajet -->Component Kit
@Option
@Suggestable(value = "loadModules", parameters = { "myconfig" })
@Documentation("module names are loaded using service")
public String moduleName;


// In Service class
@Suggestions("loadModules")
public SuggestionValues loadModules(@Option final MyConfig myconfig) { }
Table
Javajet
<!-- There were no simple way to select complex objects in javajet -->Component Kit
@Option
List<MyObject> config;
Module List
Javajet
<PARAMETER NAME="DRIVER_JAR" FIELD="TABLE" NUM_ROW="3" NB_LINES="2" REQUIRED="true">
    <ITEMS>
        <ITEM NAME="JAR_NAME" FIELD="MODULE_LIST"  />
    </ITEMS>
</PARAMETER>
Component Kit
public class Driver implements Serializable {

    @ModuleList
    @Option
    private String path;

}

//define it in config class like this:
@Option
List<Driver> config;Validations
Property validation
Javajet
<!-- There were no url pattern validation in javajet -->Component Kit
/** configuration class */
@Option
@Validable("url")
String config;

/** service class */
@AsyncValidation("url")
ValidationResult doValidate(String url) {
//validate the property
}Binding properties
ActiveIf
Javajet
<PARAMETER
    NAME="AUTH_TYPE"
    FIELD="CLOSED_LIST"
    NUM_ROW="10">
    <ITEMS DEFAULT="NOAUTH">
        <ITEM NAME="NOAUTH" VALUE="NOAUTH" />
        <ITEM NAME="BASIC" VALUE="BASIC" />
        <ITEM NAME="BASIC" VALUE="OAUTH2" />
    </ITEMS>
</PARAMETER>

<PARAMETER
    NAME="LOGIN"
    FIELD="TEXT"
    NUM_ROW="20"
    SHOW_IF="AUTH_TYPE == 'BASIC'">
        <DEFAULT>"login"</DEFAULT>
</PARAMETER>

<PARAMETER
    NAME="LOGIN"
    FIELD="PASSWORD"
    NUM_ROW="20"
    SHOW_IF="AUTH_TYPE='BASIC'">
        <DEFAULT>"login"</DEFAULT>
</PARAMETER>
Component Kit
 enum AuthorizationType {
        NoAuth,
        Basic,
        oauth2
}

@Option
@Required
@Documentation("")
private AuthorizationType type = AuthorizationType.NoAuth;

@Option
@required
@ActiveIf(target = "type", value = "Basic")
@Documentation("Username for the basic authentication")
private String login;

@Option
@required
@credential
@ActiveIf(target = "type", value = "Basic")
@Documentation("password for the basic authentication")
private String password;
Return Variables
| Return variables availability (1.51+) deprecates After Variables. |
Javajet
<RETURNS>
    <RETURN NAME="QUERY" TYPE="id_String" AVAILABILITY="FLOW"/>
    <RETURN NAME="NAME_1_OF_AFTER_VARIABLE" TYPE="id_Integer" AVAILABILITY="AFTER"/>
</RETURNS>
AVAILABILITY can be :
-
AFTER: set after component finished. -
FLOW: changed on row level.
Component Kit
@Slf4j
@Version(1)
@ReturnVariable(value = "QUERY", availability = FLOW, type = String.class, description = "Current row query")
@Processor(name = "Row")
@Documentation("JDBC Row component.")
public class JDBCRowProcessor implements Serializable {

    @RuntimeContext
    private transient RuntimeContextHolder context;

    @ElementListener
    public void elementListener(@Input final Record record,
                                @Output final OutputEmitter<Record> success) throws SQLException {
        ...

        if (context != null) {
            context.set("QUERY", configuration.getDataSet().getSqlQuery());
        }
    }
}
Return variables can be nested as below:
import org.talend.sdk.component.api.component.ReturnVariables;
import org.talend.sdk.component.api.component.ReturnVariables.ReturnVariable;
import org.talend.sdk.component.api.processor.Processor;


    @ReturnVariables({
            @ReturnVariable(value = "PROCESS_COUNT", type = Integer.class,
                            availability = ReturnVariable.AVAILABILITY.AFTER),
            @ReturnVariable(value = "MISC", type = String.class,
                            availability = ReturnVariable.AVAILABILITY.FLOW) })
    @Processor
    public class ClassWithReturnVariablesGroup {
        ...

        @PreDestroy
        public void close() {
            context.set("PROCESS_COUNT", counted);
        }

    }
After Variables
Javajet
   <RETURN NAME="NAME_1_OF_AFTER_VARIABLE" TYPE="id_Integer" AVAILABILITY="AFTER"/>
   <RETURN NAME="NAME_2_OF_AFTER_VARIABLE" TYPE="id_String" AVAILABILITY="AFTER"/>
Component Kit
import org.talend.sdk.component.api.component.AfterVariables.AfterVariableContainer;
import org.talend.sdk.component.api.component.AfterVariables.AfterVariable;

/**
* Possible types:
* Boolean.class, Byte.class, byte[].class, Character.class, Date.class, Double.class, Float.class,
* BigDecimal.class, Integer.class, Long.class, Object.class, Short.class, String.class, List.class
*/
@AfterVariable(value = "NAME_1_OF_AFTER_VARIABLE", description = "Some description", type = Integer.class)
@AfterVariable(value = "NAME_2_OF_AFTER_VARIABLE", description = "Custom variable description", type = String.class)
class Emitter {

    @AfterVariableContainer
    public Map<String, Object> afterVariables() {
        // .. code
    }

}
or
import org.talend.sdk.component.api.component.AfterVariables.AfterVariableContainer;
import org.talend.sdk.component.api.component.AfterVariables.AfterVariable;
import org.talend.sdk.component.api.component.AfterVariables;

@AfterVariables({
    @AfterVariable(value = "NAME_1_OF_AFTER_VARIABLE", description = "Some description", type = Integer.class),
    @AfterVariable(value = "NAME_2_OF_AFTER_VARIABLE", description = "Custom variable description", type = String.class)
})
class Emitter {
    @AfterVariableContainer
    public Map<String, Object> afterVariables() {
        // .. code
    }
}
Defining the runtime
Previously, the execution of a custom component was described through several Javajet files:
-
<component_name>_begin.javajet, containing the code required to initialize the component.
-
<component_name>_main.javajet, containing the code required to process each line of the incoming data.
-
<component_name>_end.javajet, containing the code required to end the processing and go to the following step of the execution.
With the Component Kit, the entire execution flow of a component is described through its main Java class <component_name><component_type> (for example, LoggerProcessor) and through services for reusable parts.
Component execution logic
Each type of component has its own execution logic. The same basic logic is applied to all components of the same type, and is then extended to implement each component specificities. The project generated from the starter already contains the basic logic for each component.
Talend Component Kit framework relies on several primitive components.
All components can use @PostConstruct and @PreDestroy annotations to initialize or release some underlying resource at the beginning and the end of a processing.
In distributed environments, class constructor are called on cluster manager nodes. Methods annotated with @PostConstruct and @PreDestroy are called on worker nodes. Thus, partition plan computation and pipeline tasks are performed on different nodes.
|
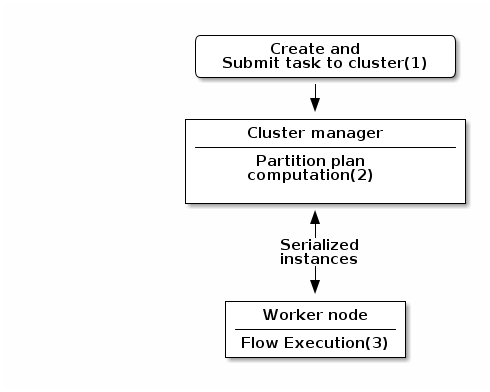
| 1 | The created task is a JAR file containing class information, which describes the pipeline (flow) that should be processed in cluster. |
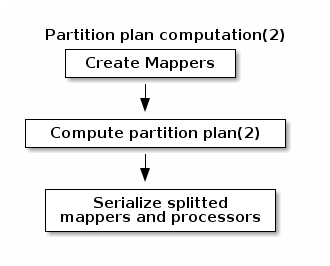
| 2 | During the partition plan computation step, the pipeline is analyzed and split into stages. The cluster manager node instantiates mappers/processors, gets estimated data size using mappers, and splits created mappers according to the estimated data size. All instances are then serialized and sent to the worker node. |
| 3 | Serialized instances are received and deserialized. Methods annotated with @PostConstruct are called. After that, pipeline execution starts. The @BeforeGroup annotated method of the processor is called before processing the first element in chunk.After processing the number of records estimated as chunk size, the @AfterGroup annotated method of the processor is called. Chunk size is calculated depending on the environment the pipeline is processed by. Once the pipeline is processed, methods annotated with @PreDestroy are called. |
| All the methods managed by the framework must be public. Private methods are ignored. |

| The framework is designed to be as declarative as possible but also to stay extensible by not using fixed interfaces or method signatures. This allows to incrementally add new features of the underlying implementations. |
Main changes
To ensure that the Cloud-compatible approach of the Component Kit framework is respected, some changes were introduced on the implementation side, including:
-
The File mode is no longer supported. You can still work with URIs and remote storage systems to use files. The file collection must be handled at the component implementation level.
-
The input and output connections between two components can only be of the Flow or Reject types. Other types of connections are not supported.
-
Every Output component must have a corresponding Input component and use a dataset. All datasets must use a datastore.