Talend Component Kit is a Java framework designed to simplify the development of components at two levels:
-
The Runtime, that injects the specific component code into a job or pipeline. The framework helps unifying as much as possible the code required to run in Data Integration (DI) and BEAM environments.
-
The Graphical interface. The framework helps unifying the code required to render the component in a browser or in the Eclipse-based Talend Studio (SWT).
Most part of the development happens as a Maven project and requires a dedicated tool such as IntelliJ.
The Component Kit is made of:
-
A Starter, that is a graphical interface allowing you to define the skeleton of your development project.
-
APIs to implement components UI and runtime.
-
Development tools: Maven wrappers, validation rules, packaging, Web preview, etc.
-
A testing kit based on JUnit 4 and 5.
By using this tooling in a development environment, you can start creating components as described below.
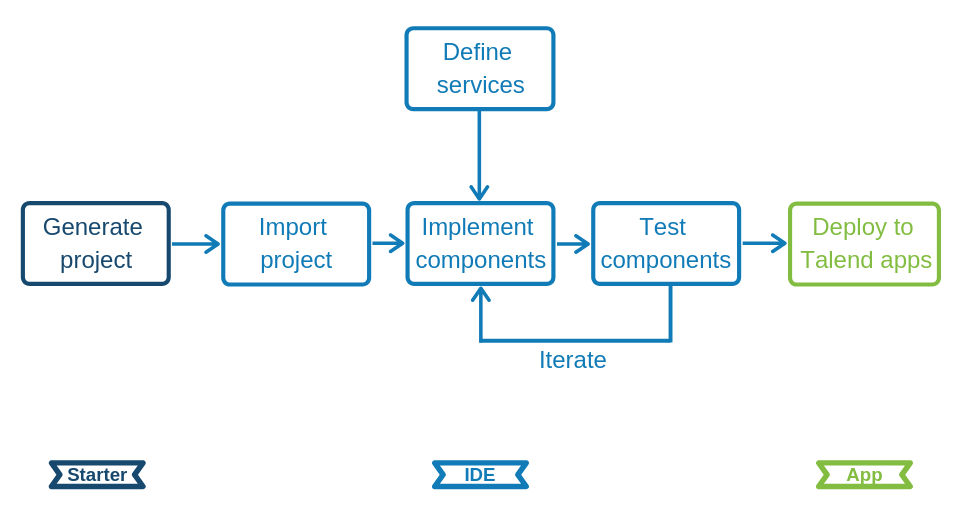
Talend Component Kit methodology
Developing new components using the Component Kit framework includes:
-
Creating a project using the starter or the Talend IntelliJ plugin. This step allows to build the skeleton of the project. It consists in:
-
Defining the general configuration model for each component in your project.
-
Generating and downloading the project archive from the starter.
-
Compiling the project.
-
-
Importing the compiled project in your IDE. This step is not required if you have generated the project using the IntelliJ plugin.
-
Implementing the components, including:
-
Registering the components by specifying their metadata: family, categories, version, icon, type and name.
-
Defining the layout and configurable part of the components.
-
Defining the execution logic of the components, also called runtime.
-
-
Deploying the components to Talend Studio or Cloud applications.
Optionally, you can use services. Services are predefined or user-defined configurations that can be reused in several components.
Component types
There are four types of components, each type coming with its specificities, especially on the runtime side.
-
Input components: Retrieve the data to process from a defined source. An input component is made of:
-
The execution logic of the component, represented by a
Mapperor anEmitterclass. -
The source logic of the component, represented by a
Sourceclass. -
The layout of the component and the configuration that the end-user will need to provide when using the component, defined by a
Configurationclass. All input components must have a dataset specified in their configuration, and every dataset must use a datastore.
-
-
Processors: Process and transform the data. A processor is made of:
-
The execution logic of the component, describing how to process each records or batches of records it receives. It also describes how to pass records to its output connections. This logic is defined in a
Processorclass. -
The layout of the component and the configuration that the end-user will need to provide when using the component, defined by a
Configurationclass.
-
-
Output components: Send the processed data to a defined destination. An output component is made of:
-
The execution logic of the component, describing how to process each records or batches of records it receives. This logic is defined in an
Outputclass. Unlike processors, output components are the last components of the execution and return no data. -
The layout of the component and the configuration that the end-user will need to provide when using the component, defined by a
Configurationclass. All output components must have a dataset specified in their configuration, and every dataset must use a datastore.
-
-
Standalone components: Make a call to the service or run a query on the database. A standalone component is made of:
-
The execution logic of the component, represented by a
DriverRunnerclass. -
The layout of the component and the configuration that the end-user will need to provide when using the component, defined by a
Configurationclass. All input components must have a datastore or dataset specified in their configuration, and every dataset must use a datastore.
-
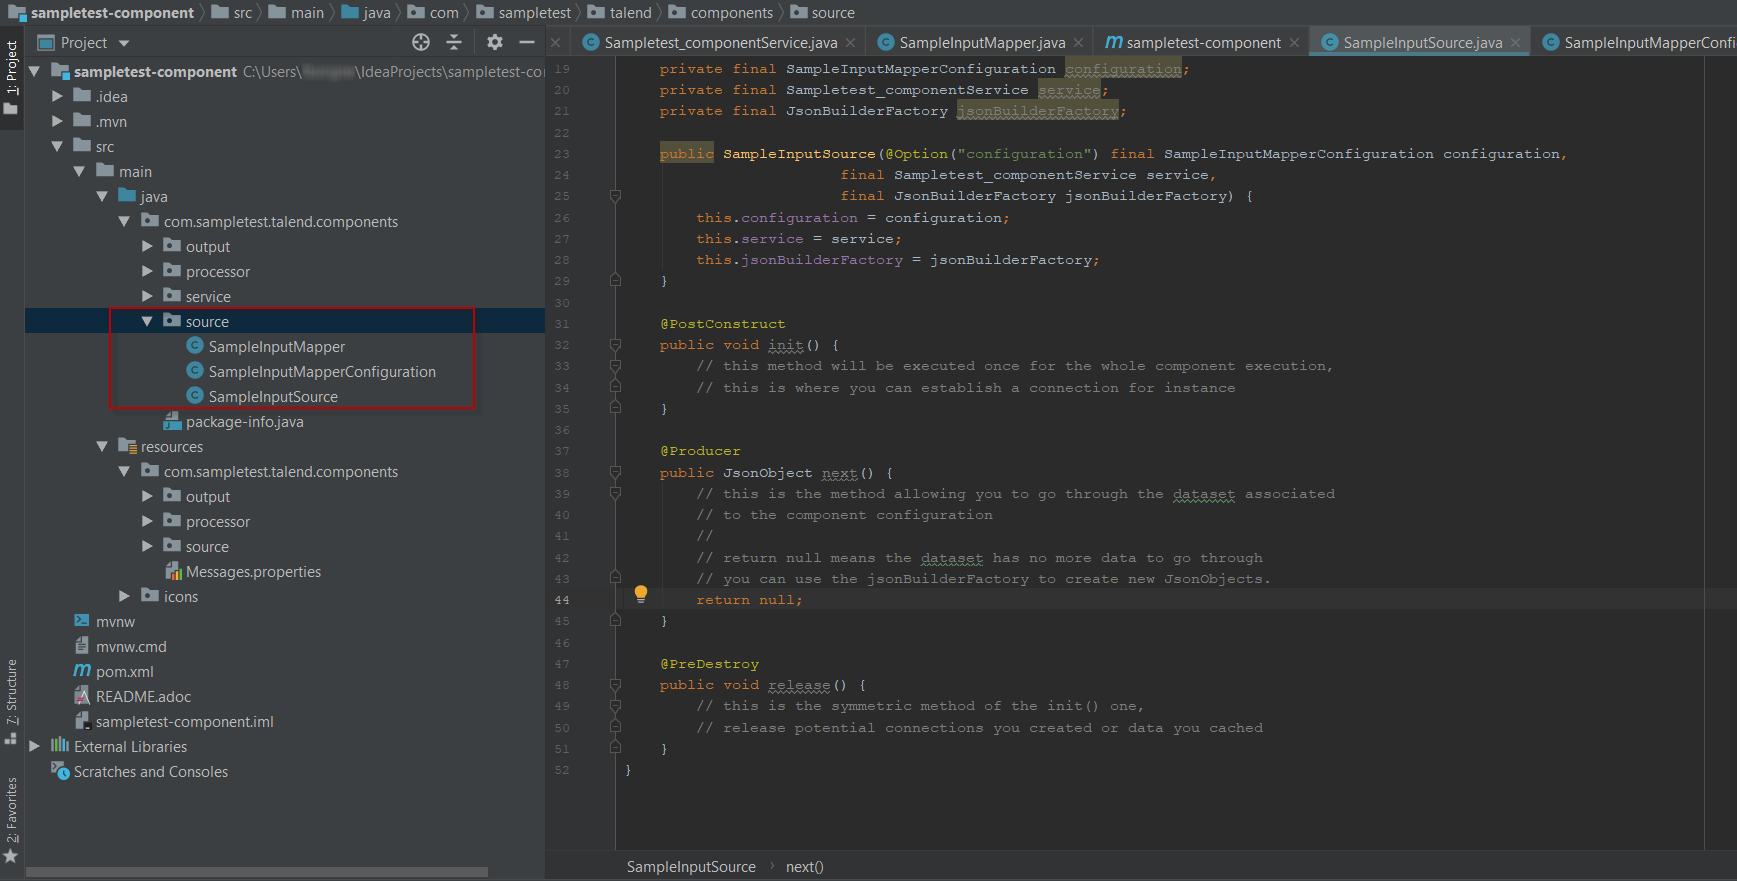
The following example shows the different classes of an input components in a multi-component development project:
Creating your first component
This tutorial walks you through the most common iteration steps to create a component with Talend Component Kit and to deploy it to Talend Open Studio.
The component created in this tutorial is a simple processor that reads data coming from the previous component in a job or pipeline and displays it in the console logs of the application, along with an additional information entered by the final user.
| The component designed in this tutorial is a processor and does not require nor show any datastore and dataset configuration. Datasets and datastores are required only for input and output components. |
Prerequisites
To get your development environment ready and be able to follow this tutorial:
-
Download and install a Java JDK 1.8 or greater.
-
Download and install Talend Open Studio. For example, from Sourceforge.
-
Download and install IntelliJ.
-
Download the Talend Component Kit plugin for IntelliJ. The detailed installation steps for the plugin are available in this document.
Generate a component project
The first step in this tutorial is to generate a component skeleton using the Starter embedded in the Talend Component Kit plugin for IntelliJ.
-
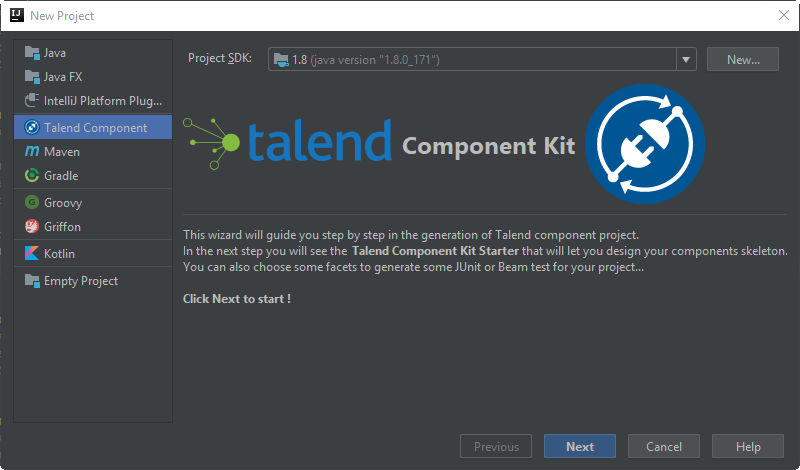
Start IntelliJ and create a new project. In the available options, you should see Talend Component.
-
Make sure that a Project SDK is selected. Then, select Talend Component and click Next.
The Talend Component Kit Starter opens. -
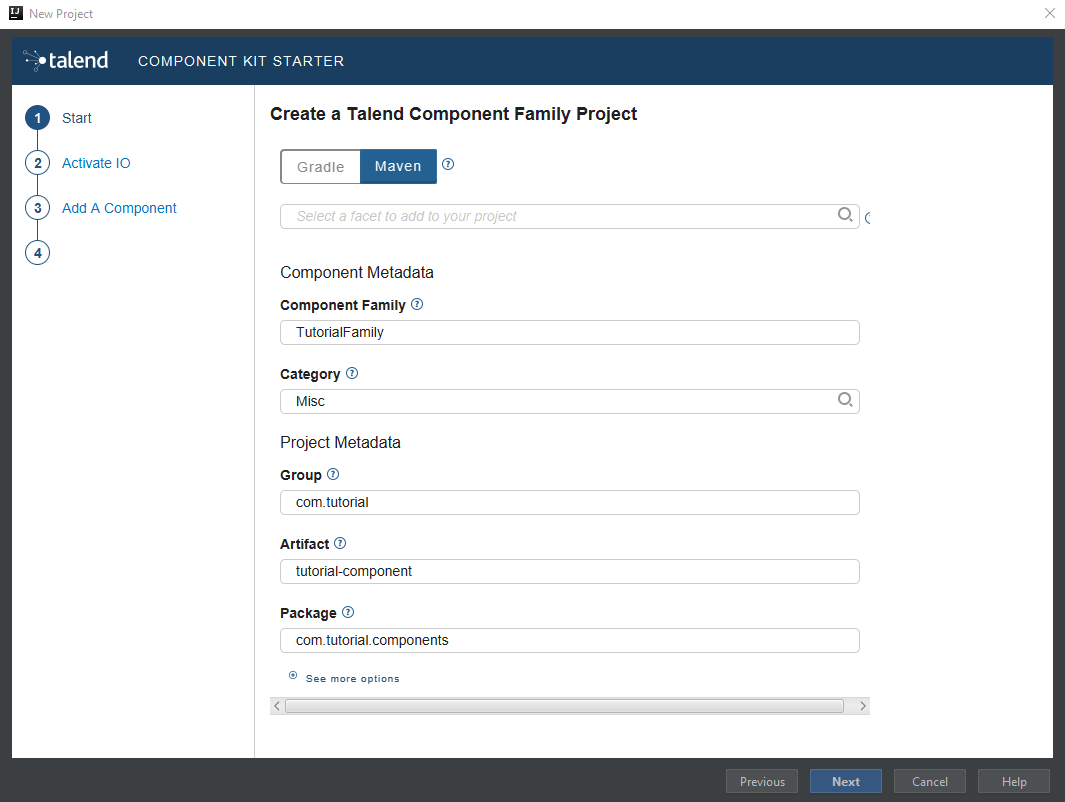
Enter the component and project metadata. Change the default values, for example as presented in the screenshot below:
-
The Component Family and the Category will be used later in Talend Open Studio to find the new component.
-
Project metadata is mostly used to identify the project structure. A common practice is to replace 'company' in the default value by a value of your own, like your domain name.
-
-
Once the metadata is filled, select Add a component. A new screen is displayed in the Talend Component Kit Starter that lets you define the generic configuration of the component. By default, new components are processors.
-
Enter a valid Java name for the component. For example, Logger.
-
Select Configuration Model and add a string type field named
level. This input field will be used in the component configuration for final users to enter additional information to display in the logs.
-
In the Input(s) / Output(s) section, click the default MAIN input branch to access its detail, and make sure that the record model is set to Generic. Leave the Name of the branch with its default
MAINvalue.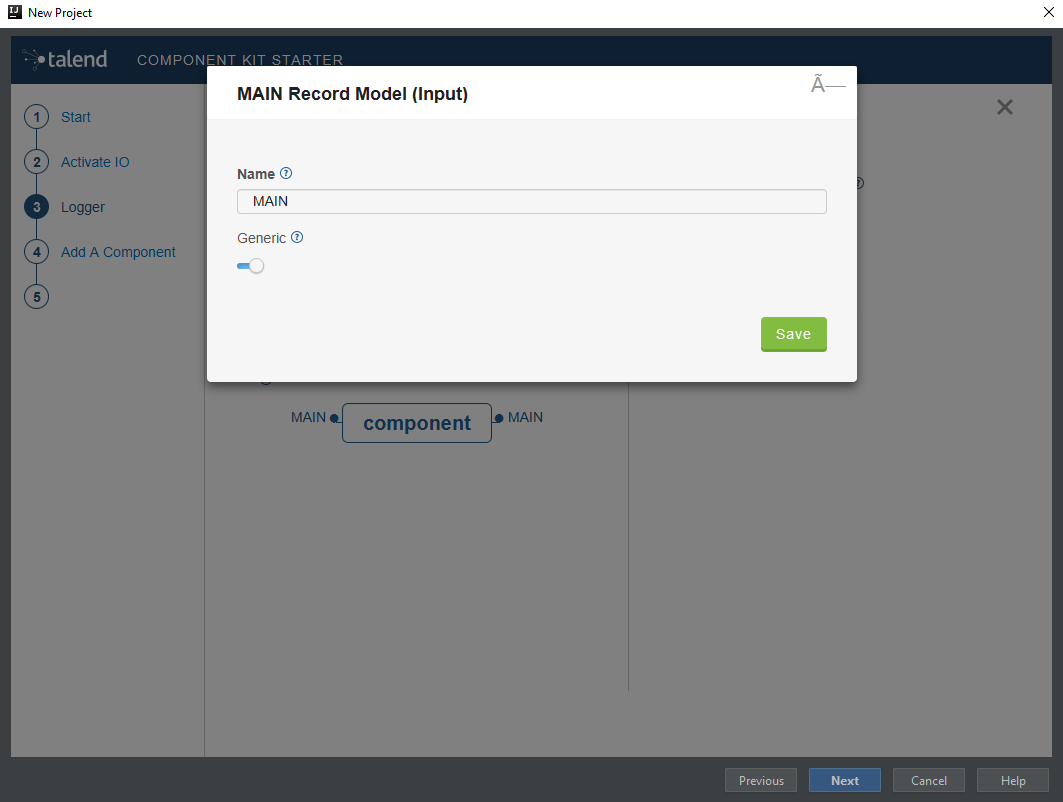
-
Repeat the same step for the default MAIN output branch.
Because the component is a processor, it has an output branch by default. A processor without any output branch is considered an output component. You can create output components when the Activate IO option is selected. -
Click Next and check the name and location of the project, then click Finish to generate the project in the IDE.
At this point, your component is technically already ready to be compiled and deployed to Talend Open Studio. But first, take a look at the generated project:
-
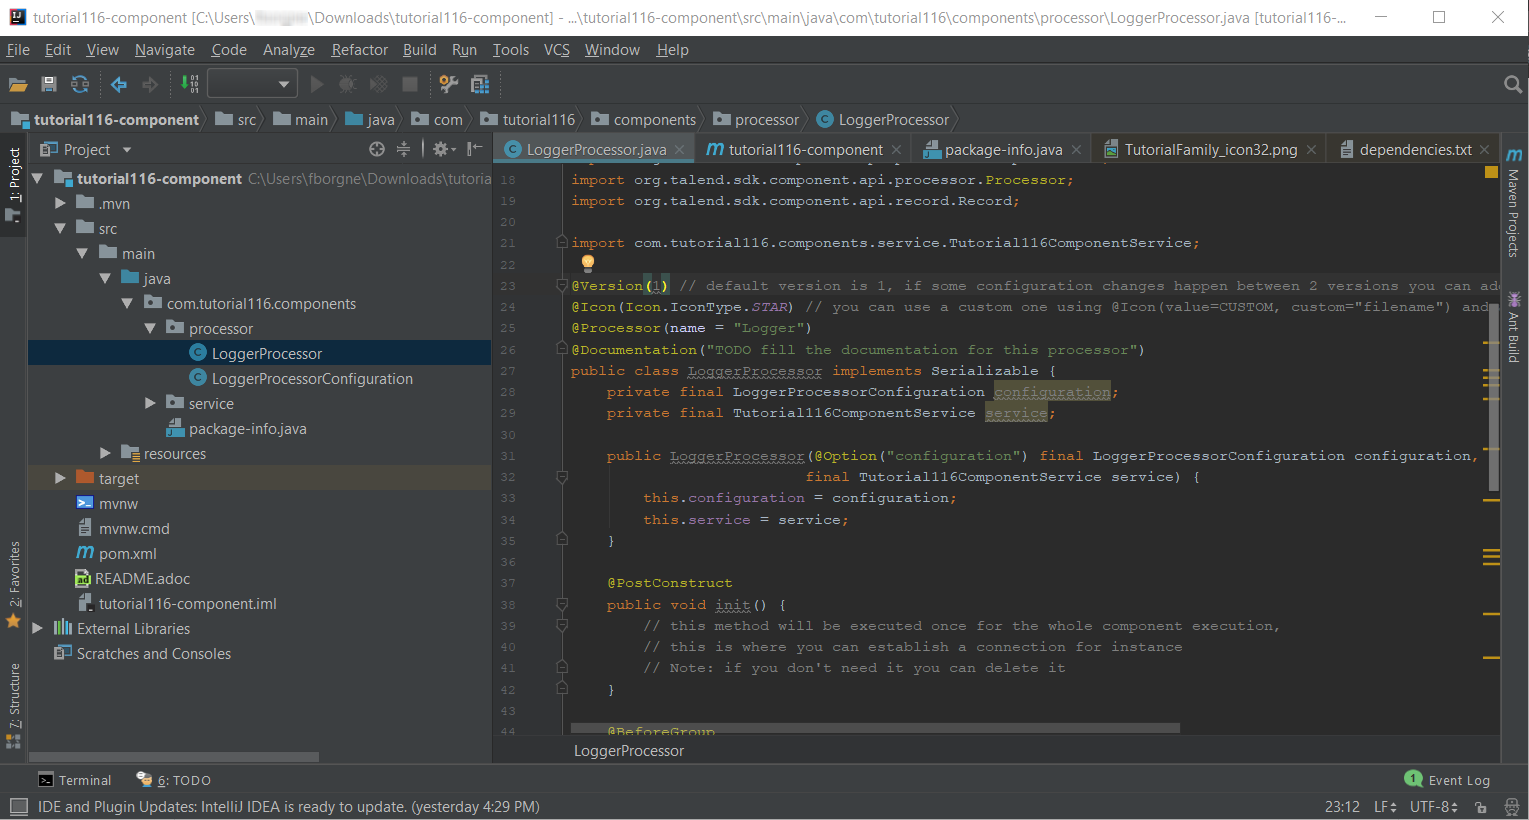
Two classes based on the name and type of component defined in the Talend Component Kit Starter have been generated:
-
LoggerProcessor is where the component logic is defined
-
LoggerProcessorConfiguration is where the component layout and configurable fields are defined, including the level string field that was defined earlier in the configuration model of the component.
-
-
The package-info.java file contains the component metadata defined in the Talend Component Kit Starter, such as family and category.
-
You can notice as well that the elements in the tree structure are named after the project metadata defined in the Talend Component Kit Starter.
These files are the starting point if you later need to edit the configuration, logic, and metadata of the component.
There is more that you can do and configure with the Talend Component Kit Starter. This tutorial covers only the basics. You can find more information in this document.
Compile and deploy the component to Talend Open Studio
Without modifying the component code generated from the Starter, you can compile the project and deploy the component to a local instance of Talend Open Studio.
The logic of the component is not yet implemented at that stage. Only the configurable part specified in the Starter will be visible. This step is useful to confirm that the basic configuration of the component renders correctly.
Before starting to run any command, make sure that Talend Open Studio is not running.
-
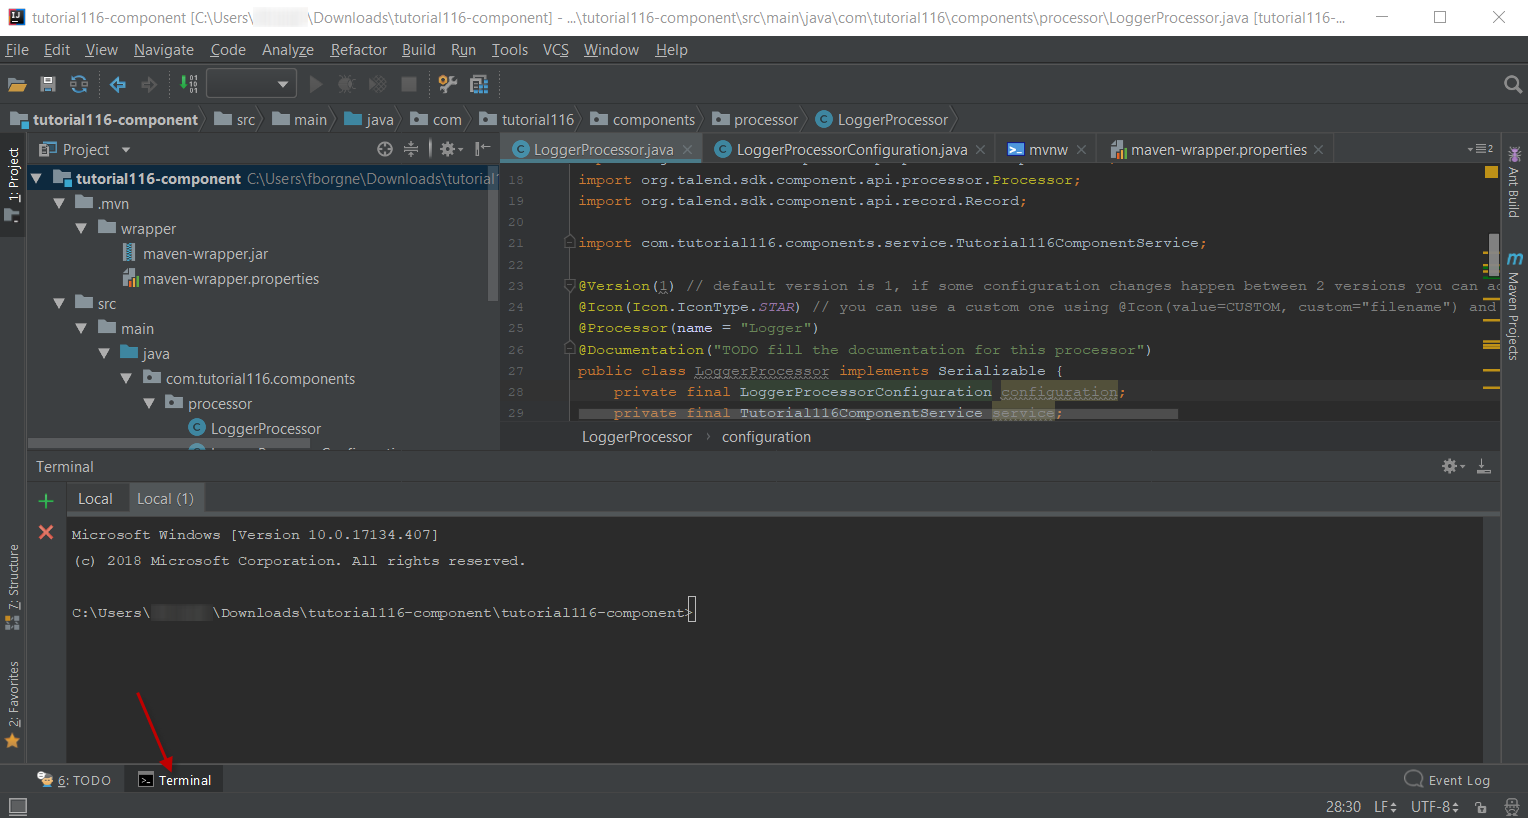
From the component project in IntelliJ, open a Terminal and make sure that the selected directory is the root of the project. All commands shown in this tutorial are performed from this location.
-
Compile the project by running the following command:
mvnw clean install.
Themvnwcommand refers to the Maven wrapper that is embedded in Talend Component Kit. It allows to use the right version of Maven for your project without having to install it manually beforehand. -
Once the command is executed and you see BUILD SUCCESS in the terminal, deploy the component to your local instance of Talend Open Studio using the following command:
mvnw talend-component:deploy-in-studio -Dtalend.component.studioHome="<path to Talend Open Studio home>".Replace the path with your own value. If the path contains spaces (for example, Program Files), enclose it with double quotes. -
Make sure the build is successful.

-
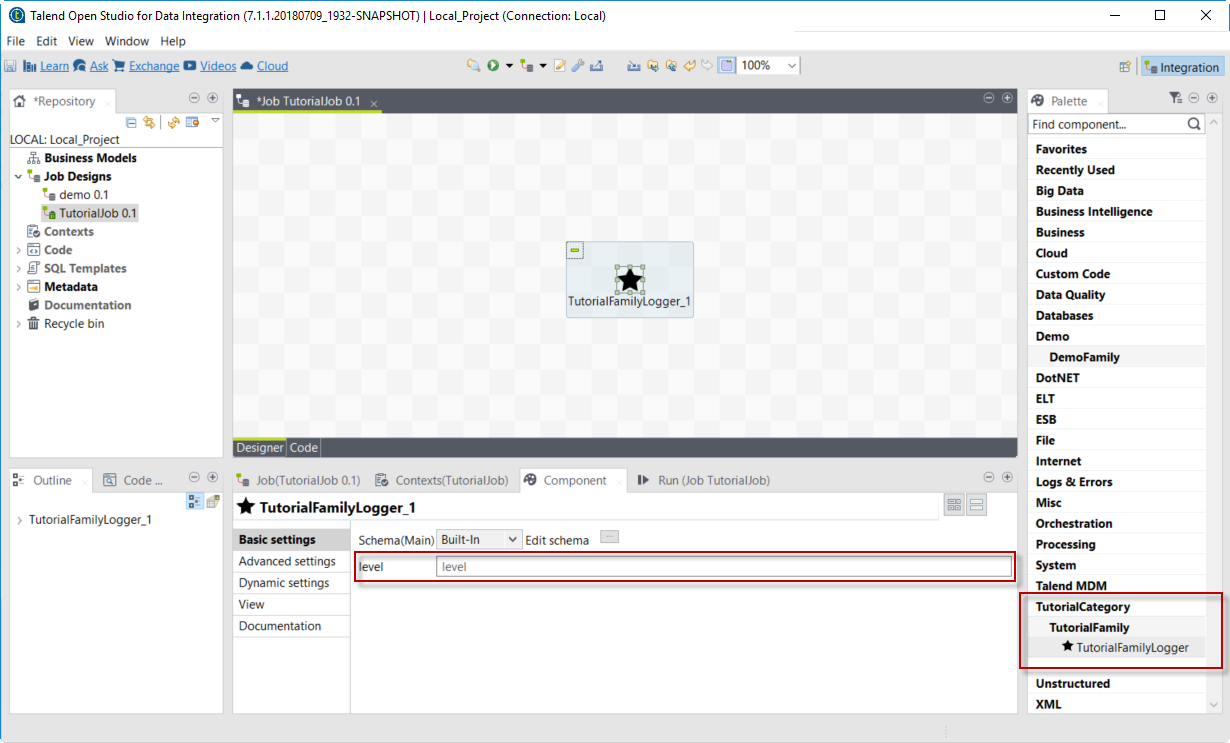
Open Talend Open Studio and create a new Job:
-
Find the new component by looking for the family and category specified in the Talend Component Kit Starter. You can add it to your job and open its settings.
-
Notice that the level field specified in the configuration model of the component in the Talend Component Kit Starter is present.
-
At this point, the new component is available in Talend Open Studio, and its configurable part is already set. But the component logic is still to be defined.
Edit the component
You can now edit the component to implement its logic: reading the data coming through the input branch to display that data in the execution logs of the job. The value of the level field that final users can fill also needs to be changed to uppercase and displayed in the logs.
-
Save the job created earlier and close Talend Open Studio.
-
Go back to the component development project in IntelliJ and open the LoggerProcessor class. This is the class where the component logic can be defined.
-
Look for the
@ElementListenermethod. It is already present and references the default input branch that was defined in the Talend Component Kit Starter, but it is not complete yet. -
To be able to log the data in input to the console, add the following lines:
//Log read input to the console with uppercase level.
        System.out.println("["+configuration.getLevel().toUpperCase()+"] "+defaultInput);
The
@ElementListenermethod now looks as follows:@ElementListener public void onNext( @Input final Record defaultInput) { //Reads the input. //Log read input to the console with uppercase level. System.out.println("["+configuration.getLevel().toUpperCase()+"] "+defaultInput); }
-
Open a Terminal again to compile the project and deploy the component again. To do that, run successively the two following commands:
-
mvnw clean install -
`mvnw talend-component:deploy-in-studio -Dtalend.component.studioHome="<path to Talend Open Studio home>"
-
The update of the component logic should now be deployed. After restarting Talend Open Studio, you will be ready to build a job and use the component for the first time.
To learn the different possibilities and methods available to develop more complex logics, refer to this document.
If you want to avoid having to close and re-open Talend Open Studio every time you need to make an edit, you can enable the developer mode, as explained in this document.
Build a job with the component
As the component is now ready to be used, it is time to create a job and check that it behaves as intended.
-
Open Talend Open Studio again and go to the job created earlier. The new component is still there.
-
Add a tRowGenerator component and connect it to the logger.
-
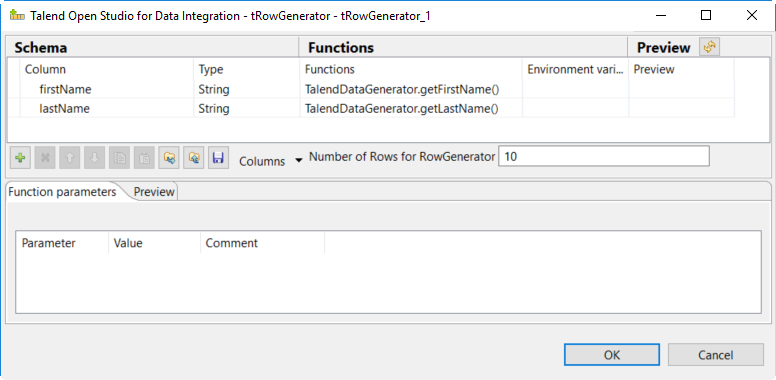
Double-click the tRowGenerator to specify the data to generate:
-
Add a first column named
firstNameand select the TalendDataGenerator.getFirstName() function. -
Add a second column named 'lastName' and select the TalendDataGenerator.getLastName() function.
-
Set the Number of Rows for RowGenerator to
10.
-
-
Validate the tRowGenerator configuration.
-
Open the TutorialFamilyLogger component and set the level field to
info.
-
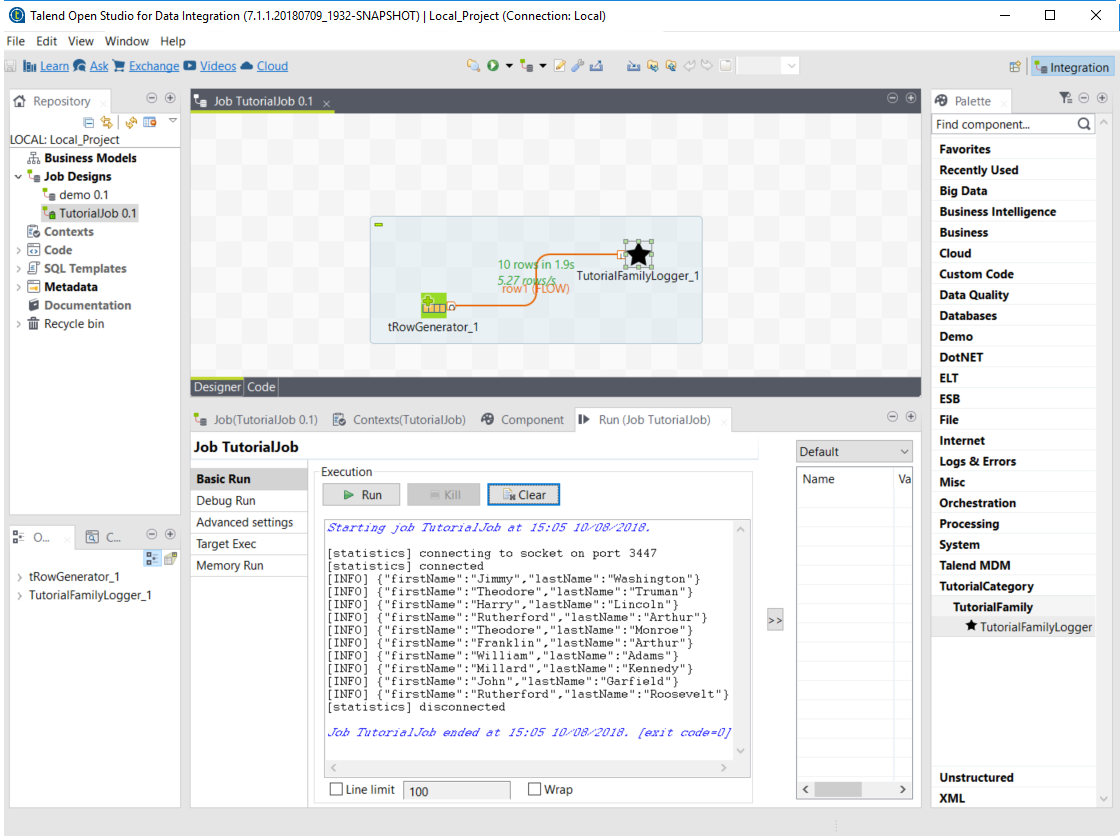
Go to the Run tab of the job and run the job.
The job is executed. You can observe in the console that each of the 10 generated rows is logged, and that theinfovalue entered in the logger is also displayed with each record, in uppercase.
Record types
Components are designed to manipulate data (access, read, create). Talend Component Kit can handle several types of data, described in this document.
By design, the framework must run in DI (plain standalone Java program) and in Beam pipelines.
It is out of scope of the framework to handle the way the runtime serializes - if needed - the data.
For that reason, it is critical not to import serialization constraints to the stack. As an example, this is one of the reasons why Record or JsonObject were preferred to Avro IndexedRecord.
Any serialization concern should either be hidden in the framework runtime (outside of the component developer scope) or in the runtime integration with the framework (for example, Beam integration).
Record
Record is the default format. It offers many possibilities and can evolve depending on the Talend platform needs. Its structure is data-driven and exposes a schema that allows to browse it.
Projects generated from the Talend Component Kit Starter are by default designed to handle this format of data.
Record is a Java interface but never implement it yourself to ensure compatibility with the different Talend products. Follow the guidelines below.
|
Creating a record
You can build records using the newRecordBuilder method of the RecordBuilderFactory (see here).
For example:
public Record createRecord() {
    return factory.newRecordBuilder()
            .withString("name", "Gary")
            .withDateTime("date", ZonedDateTime.of(LocalDateTime.of(2011, 2, 6, 8, 0), ZoneId.of("UTC")))
            .build();
}
In the example above, the schema is dynamically computed from the data. You can also do it using a pre-built schema, as follows:
public Record createRecord() {
    return factory.newRecordBuilder(myAlreadyBuiltSchemaWithSchemaBuilder)
            .withString("name", "Gary")
            .withDateTime("date", ZonedDateTime.of(LocalDateTime.of(2011, 2, 6, 8, 0), ZoneId.of("UTC")))
            .build();
}
The example above uses a schema that was pre-built using factory.newSchemaBuilder(Schema.Type.RECORD).
When using a pre-built schema, the entries passed to the record builder are validated. It means that if you pass a null value null or an entry type that does not match the provided schema, the record creation fails. It also fails if you try to add an entry which does not exist or if you did not set a not nullable entry.
| Using a dynamic schema can be useful on the backend but can lead users to more issues when creating a pipeline to process the data. Using a pre-built schema is more reliable for end-users. |
Accessing and reading a record
You can access and read data by relying on the getSchema method, which provides you with the available entries (columns) of a record. The Entry exposes the type of its value, which lets you access the value through the corresponding method. For example, the Schema.Type.STRING type implies using the getString method of the record.
For example:
public void print(final Record record) {
    final Schema schema = record.getSchema();
    // log in the natural type
    schema.getEntries()
          .forEach(entry -> System.out.println(record.get(Object.class, entry.getName())));
    // log only strings
    schema.getEntries().stream()
          .filter(e -> e.getType() == Schema.Type.STRING)
          .forEach(entry -> System.out.println(record.getString(entry.getName())));
}
Supported data types
The Record format supports the following data types:
-
String
-
Boolean
-
Int
-
Long
-
Float
-
Double
-
DateTime
-
Array
-
Bytes
-
Record
| A map can always be modelized as a list (array of records with key and value entries). |
For example:
public Record create() {
       final Record address = factory.newRecordBuilder()
               .withString("street", "Prairie aux Ducs")
               .withString("city", "Nantes")
               .withString("country", "FRANCE")
               .build();
       return factory.newRecordBuilder()
                     .withBoolean("active", true)
                     .withInt("age", 33)
                     .withLong("duration", 123459)
                     .withFloat("tolerance", 1.1f)
                     .withDouble("balance", 12.58)
                     .withString("name", "John Doe")
                     .withDateTime("birth", ZonedDateTime.now())
                     .withRecord(
                             factory.newEntryBuilder()
                               .withName("address")
                               .withType(Schema.Type.RECORD)
                               .withComment("The user address")
                               .withElementSchema(address.getSchema())
                               .build(),
                             address)
                     .withArray(
                             factory.newEntryBuilder()
                                       .withName("permissions")
                                       .withType(Schema.Type.ARRAY)
                                       .withElementSchema(factory.newSchemaBuilder(Schema.Type.STRING).build())
                                       .build(),
                             asList("admin", "dev"))
                     .build();
   }
Example: discovering a schema
For example, you can use the API to provide the schema. The following method needs to be implemented in a service.
Manually constructing the schema without any data:
@DiscoverSchema
getSchema(@Option MyDataset dataset) {
    return factory.newSchemaBuilder(Schema.Type.RECORD)
            .withEntry(factory.newEntryBuilder().withName("id").withType(Schema.Type.LONG).build())
            .withEntry(factory.newEntryBuilder().withName("name").withType(Schema.Type.STRING).build())
            .build();
}
Returning the schema from an already built record:
@DiscoverSchema
public Schema guessSchema(@Option MyDataset dataset, final MyDataLoaderService myCustomService) {
   return myCustomService.loadFirstData().getRecord().getSchema();
}
MyDataset is the class that defines the dataset. Learn more about datasets and datastores in this document.
|
Authorized characters in entry names
Entry names for Record and JsonObject types must comply with the following rules:
-
The name must start with a letter or with
_. If not, the invalid characters are ignored until the first valid character. -
Following characters of the name must be a letter, a number, or
. If not, the invalid character is replaced with.
For example:
-
1foobecomesfoo. -
f@obecomesf_o. -
1234f5@obecomes___f5_o. -
foo123staysfoo123.
JsonObject
The runtime also supports JsonObject as input and output component type. You can rely on the JSON services (Jsonb, JsonBuilderFactory) to create new instances.
This format is close to the Record format, except that it does not natively support the Datetime type and has a unique Number type to represent Int, Long, Float and Double types. It also does not provide entry metadata like nullable or comment, for example.
It also inherits the Record format limitations.