From the version 7.0 of Talend Studio, Talend Component Kit becomes the recommended framework to use to develop components.
This framework is being introduced to ensure that newly developed components can be deployed and executed both in on-premise/local and cloud/big data environments.
From that new approach comes the need to provide a complete yet unique and compatible way of developing components.
With the Component Kit, custom components are entirely implemented in Java. To help you get started with a new custom component development project, a Starter is available. Using it, you will be able to generate the skeleton of your project. By importing this skeleton in a development tool, you can then implement the components layout and execution logic in Java.
Defining the component configuration
With the previous Javajet framework, metadata, widgets and configurable parts of a custom component were specified in XML.
With the Component Kit, they are now defined in the <component_name><component_type>Configuration (for example, LoggerProcessorConfiguration) Java class of your development project.
Note that most of this configuration is transparent if you specified the Configuration Model of your components right before generating the project from the Starter.
| Any undocumented feature or option is considered not supported by the Component Kit framework. |
You can find examples of output in Studio or Cloud environments in the Gallery.
Widgets
Input/Text
Javajet
<PARAMETER
    NAME="CONFIG"
    FIELD="TEXT"
    NUM_ROW="10">
        <DEFAULT>""</DEFAULT>
</PARAMETER>
Component Kit
@Option
String config;
Password
Javajet
<PARAMETER
    NAME="PASSWORD"
    FIELD="PASSWORD"
    NUM_ROW="10"
    REQUIRED="true">
Component Kit
@Option
@Credential
String password;
Textarea
Javajet
<PARAMETER NAME="QUERY"
    FIELD="MEMO"
    NUM_ROW="1">
        <DEFAULT>""</DEFAULT>
</PARAMETER>
Component Kit
@Option
@Textarea
String query;
Integer
Javajet
<!-- There were no specific widget for number fields -->
<PARAMETER
    NAME="CONFIG"
    FIELD="TEXT"
    NUM_ROW="10">
        <DEFAULT>""</DEFAULT>
</PARAMETER>
Component Kit
@Option
@Documentation("This is a number")
public Integer number;
Checkbox
Javajet
<PARAMETER
    NAME="PRETTY_FORMAT"
    FIELD="CHECK"
    NUM_ROW="10">
        <DEFAULT>false</DEFAULT>
</PARAMETER>
Component Kit
@Option
Boolean pretty_format;
List
Javajet
<PARAMETER
    NAME="ACTION"
    FIELD="CLOSED_LIST"
    NUM_ROW="10">
    <ITEMS DEFAULT="1">
        <ITEM NAME="DELETE" VALUE="1" />
        <ITEM NAME="INSERT" VALUE="2" />
        <ITEM NAME="UPDATE" VALUE="3" />
    </ITEMS>
</PARAMETER>
Component Kit
@Option
@Proposable("valuesProvider")
String action;
/** service class */
@DynamicValues("valuesProvider")
public Values actions(){
  return new Values(asList(new Values.Item("1", "Delete"),
                    new Values.Item("2", "Insert"),
                    new Values.Item("3", "Update")));
}
or
Component Kit
@Option
ActionEnum action;

/** Define enum */
enum ActionEnum {
    Delete,
    Insert,
    Update
}
Suggestions
Javajet
<!-- There were no simple way to load proposals from service in javajet -->Component Kit
@Option
@Suggestable(value = "loadModules", parameters = { "myconfig" })
@Documentation("module names are loaded using service")
public String moduleName;


// In Service class
@Suggestions("loadModules")
public SuggestionValues loadModules(@Option final MyConfig myconfig) { }
Table
Javajet
<!-- There were no simple way to select complex objects in javajet -->Component Kit
@Option
List<MyObject> config;Validations
Property validation
Javajet
<!-- There were no url pattern validation in javajet -->Component Kit
/** configuration class */
@Option
@Validable("url")
String config;

/** service class */
@AsyncValidation("url")
ValidationResult doValidate(String url) {
//validate the property
}Binding properties
ActiveIf
Javajet
<PARAMETER
    NAME="AUTH_TYPE"
    FIELD="CLOSED_LIST"
    NUM_ROW="10">
    <ITEMS DEFAULT="NOAUTH">
        <ITEM NAME="NOAUTH" VALUE="NOAUTH" />
        <ITEM NAME="BASIC" VALUE="BASIC" />
        <ITEM NAME="BASIC" VALUE="OAUTH2" />
    </ITEMS>
</PARAMETER>

<PARAMETER
    NAME="LOGIN"
    FIELD="TEXT"
    NUM_ROW="20"
    SHOW_IF="AUTH_TYPE == 'BASIC'">
        <DEFAULT>"login"</DEFAULT>
</PARAMETER>

<PARAMETER
    NAME="LOGIN"
    FIELD="PASSWORD"
    NUM_ROW="20"
    SHOW_IF="AUTH_TYPE='BASIC'">
        <DEFAULT>"login"</DEFAULT>
</PARAMETER>
Component Kit
 enum AuthorizationType {
        NoAuth,
        Basic,
        oauth2
}

@Option
@Required
@Documentation("")
private AuthorizationType type = AuthorizationType.NoAuth;

@Option
@required
@ActiveIf(target = "type", value = "Basic")
@Documentation("Username for the basic authentication")
private String login;

@Option
@required
@credential
@ActiveIf(target = "type", value = "Basic")
@Documentation("password for the basic authentication")
private String password;
After Variables
Javajet
   <RETURN NAME="NAME_1_OF_AFTER_VARIABLE" TYPE="id_Integer" AVAILABILITY="AFTER"/>
   <RETURN NAME="NAME_2_OF_AFTER_VARIABLE" TYPE="id_String" AVAILABILITY="AFTER"/>
Component Kit
import org.talend.sdk.component.api.component.AfterVariables.AfterVariableContainer;
import org.talend.sdk.component.api.component.AfterVariables.AfterVariable;

/**
* Possible types:
* Boolean.class, Byte.class, byte[].class, Character.class, Date.class, Double.class, Float.class,
* BigDecimal.class, Integer.class, Long.class, Object.class, Short.class, String.class, List.class
*/
@AfterVariable(value = "NAME_1_OF_AFTER_VARIABLE", description = "Some description", type = Integer.class)
@AfterVariable(value = "NAME_2_OF_AFTER_VARIABLE", description = "Custom variable description", type = String.class)
class Emitter {

    @AfterVariableContainer
    public Map<String, Object> afterVariables() {
        // .. code
    }

}
or
import org.talend.sdk.component.api.component.AfterVariables.AfterVariableContainer;
import org.talend.sdk.component.api.component.AfterVariables.AfterVariable;
import org.talend.sdk.component.api.component.AfterVariables;

@AfterVariables({
    @AfterVariable(value = "NAME_1_OF_AFTER_VARIABLE", description = "Some description", type = Integer.class),
    @AfterVariable(value = "NAME_2_OF_AFTER_VARIABLE", description = "Custom variable description", type = String.class)
})
class Emitter {
    @AfterVariableContainer
    public Map<String, Object> afterVariables() {
        // .. code
    }
}
Defining the runtime
Previously, the execution of a custom component was described through several Javajet files:
-
<component_name>_begin.javajet, containing the code required to initialize the component.
-
<component_name>_main.javajet, containing the code required to process each line of the incoming data.
-
<component_name>_end.javajet, containing the code required to end the processing and go to the following step of the execution.
With the Component Kit, the entire execution flow of a component is described through its main Java class <component_name><component_type> (for example, LoggerProcessor) and through services for reusable parts.
Component execution logic
Each type of component has its own execution logic. The same basic logic is applied to all components of the same type, and is then extended to implement each component specificities. The project generated from the starter already contains the basic logic for each component.
Talend Component Kit framework relies on several primitive components.
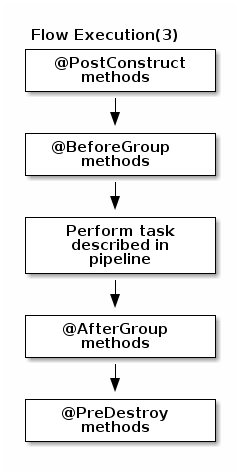
All components can use @PostConstruct and @PreDestroy annotations to initialize or release some underlying resource at the beginning and the end of a processing.
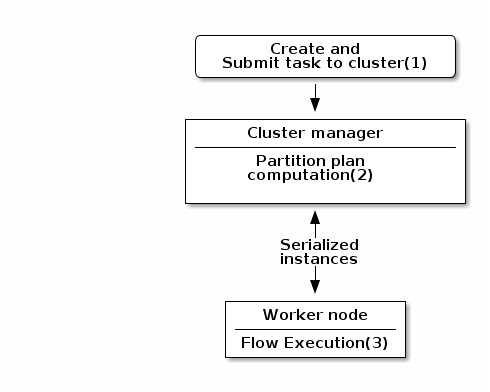
In distributed environments, class constructor are called on cluster manager nodes. Methods annotated with @PostConstruct and @PreDestroy are called on worker nodes. Thus, partition plan computation and pipeline tasks are performed on different nodes.
|
| 1 | The created task is a JAR file containing class information, which describes the pipeline (flow) that should be processed in cluster. |
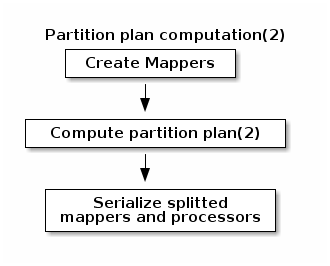
| 2 | During the partition plan computation step, the pipeline is analyzed and split into stages. The cluster manager node instantiates mappers/processors, gets estimated data size using mappers, and splits created mappers according to the estimated data size. All instances are then serialized and sent to the worker node. |
| 3 | Serialized instances are received and deserialized. Methods annotated with @PostConstruct are called. After that, pipeline execution starts. The @BeforeGroup annotated method of the processor is called before processing the first element in chunk.After processing the number of records estimated as chunk size, the @AfterGroup annotated method of the processor is called. Chunk size is calculated depending on the environment the pipeline is processed by. Once the pipeline is processed, methods annotated with @PreDestroy are called. |
| All the methods managed by the framework must be public. Private methods are ignored. |
| The framework is designed to be as declarative as possible but also to stay extensible by not using fixed interfaces or method signatures. This allows to incrementally add new features of the underlying implementations. |
Main changes
To ensure that the Cloud-compatible approach of the Component Kit framework is respected, some changes were introduced on the implementation side, including:
-
The File mode is no longer supported. You can still work with URIs and remote storage systems to use files. The file collection must be handled at the component implementation level.
-
The input and output connections between two components can only be of the Flow or Reject types. Other types of connections are not supported.
-
Every Output component must have a corresponding Input component and use a dataset. All datasets must use a datastore.


